Tag Archives: rawhide

Rawhide Mora Sheath

by Woodsbum

It has been several months of me procrastinating, but I finally got motivated for long enough period to finish my friend’s knife sheath. Believe me when I say that it was not an easy feat. We are in the middle of the rainy season and I still have a lot of new Netflix series unwatched, not to mention some Captain Morgan Reserve that isn’t going to drink itself.

Lack of motivation and inebriation opportunities aside, I did get the sheath finished. For this build I did a few things differently. Instead of making a complete leather liner I cut out the plastic from the original sheath and then used leather for the top portion to make it snug. The first attempt didn’t work as well as I had anticipated so I ended up having to take it all apart and trim the thickness of the liner. Interestingly enough, the inner liner didn’t have to be stitched once I had the old one wet formed and waxed a little. It really holds its shape well.

Rawhide Mora Sheath

Rawhide Mora Sheath

In future builds I might do something similar from now on. If I take the leather I am building the liner out of and wet it, form it, and bind it to keep it in shape, and then wax it when it is done I can easily just use rawhide over the top as an exoskeleton of sorts. This keeps the rawhide smooth and allows it all to stay tight without the liner binding up on me after the rawhide constricts during drying.

You can see how I forced the over layer to constrict and thus hold onto the main sheath by shear friction.

Side View - Notice the forced shrinkage.

Side View – Notice the forced shrinkage.

A few things that I have discovered about rawhide:

  • You can adjust the shrinkage of the rawhide with use of a heat gun. If you want it to constrict tighter just dry the wet rawhide with the old Warner.
  • Dying it is almost impossible, but getting it to soak up color while it is getting ready for working gives it a nice even color. I used coffee on this build but I am thinking about using some fruit juices and wine for some added shades on my next builds. I think some red wine in coffee would give an almost mahogany color.
  • The more rugged the rawhide looks the better the finished product. I like how the inner part of the rawhide is textured. It gives a very interesting and rustic look to the sheath.
  • Layers of different rawhide cuts and textures also gives it an interesting look.

I am thinking about doing something out of rawhide for my Marlin 1895 to hold a few additional rounds. I think I can do a rawhide cover with leather liner that will lace up one side and hold 8 to 10 cartridges. If I do, I will try and take more pictures of the actual build process. These last couple knife sheaths were fairly basic so a final description seemed to suffice.

As I do more projects and find soaks that will color stain the rawhide in interesting manners, I will update you. I will also do a few builds that have more pictures of the process. If you have been reading my site very much at all you know I am very bad about taking pictures. Someday this may change, but if you have any questions I can try and answer them for you here.

Thanks for looking and if you get a chance, try out some projects yourself.

  • Share on Tumblr

Rawhide Mora Sheath

by Woodsbum

A couples of weeks ago we taught another NBEF Bowhunters Education Class. While other people were teaching, I took a few minutes to whip up a sheath for my friend’s son who was going to a summer camp. The camp was called “Ranger Camp” where they taught many different skills to include quite a few bushcraft techniques. So that the poor kid was not stuck with a plastic Mora classic sheath as well as giving him a chance to be one of the “cool kids,” I took some time to get his neck knife squared away.

The first thing I did was cut off the plastic belt loop off the stock sheath. I then wrapped the sheath in rawhide and sewed it together along the back so the original sheath became an insert/frame/internal structure.

Sewn along the back of the Mora

Sewn along the back of the Mora

Unfortunately the rawhide shifted quite a bit and was difficult to keep in place considering my work bench was nothing more than a couple catalogs and a bow case across my lap. I did get a good stitch on it and it dried quite nicely.

I then did an outer wrap that was to become the belt/strap loop and attachment for a firesteel. Since his firesteel was at home and I needed one to make a loop, I went downstairs and picked him up a Light My Fire. This one had an antler handle and was pretty nice looking so it went well with the rawhide sheath design.

Belt loop/strap loop

Belt loop/strap loop

Here is the loop I did for the Light My Fire. I love how rawhide forms and hardens into shape. The way this loop formed perfectly to the firesteel made me quite happy.

Firesteel loop

Firesteel loop

All said and done, Tristan was envied by the other kids and some of the instructors for having a nice sheath for his Mora. He is a good kid that does a whole lot for his brother and parents so I really hope he gets lots of good use and many years of enjoyment out of this sheath. He definitely deserves to have good things happen for him.

AND. In case you were wondering, he did have a great time at his “Ranger Camp.” They taught him firemaking, archery, shelters, how to cook over flame, and all sorts off fun skills that anyone spending time in the woods should know. You can definitely see that this time in the woods learning bushcraft skills really fired him up to learn and try more. It really brings big smiles to my face when I see that spark in his eye.

Final Product

Final Product

  • Share on Tumblr

First Rawhide Project

by Woodsbum

A friend of mine gave me an osage orange walking stick that was in serious need of a handle and a way to protect the tip from damage. For those that are not familiar with osage orange, it is a tree that grows in places like Texas and is a very hard wood with thorns that will rip you up. It also produces what we used to call horse apples or hedge apples. The osage orange is also a prized wood for bow construction. In places where it grows, you will also see it used quite often for fence posts since it doesn’t shrink or rot very easily.

Since I had a blank slate from which to work from, I decided to try my hand at using rawhide. I have never used it before and am quite clueless about the process other than soaking, stretching and sewing….  That is about the detail and extent of the knowledge I had about it so I set out in search of some instruction. Library you ask? Nope. Elderly gentleman that looks like Davey Crockett? Nope again. Local books store, Backwoodsman magazine, or some obscure Foxfire volume? No way…..  Youtube!

So step 1 in the process was to find rawhide and some nice looking thread to use to sew it all up. On my way home last night the whole Interstate was actually closed down, thus forcing me to find an alternate route home. This made me think that I was suddenly destined to get my walking stick finished and I took the opportunity to stop by Tandy Leather. $45 later, I was back in traffic and slowly crawling home.

The next step is to make your template/pattern and cut out your rawhide so you can soak it…..  I bypassed the pattern thing and just cut off a few chunks to soak. After a couple hours sitting in water it was soft enough to work. At this point I eyeballed the sizes and did some chopping.

Soaked and ready for trimming

Soaked and ready for trimming

Once I had a rough guess as to what shape and size I needed everything and it was all chopped accordingly, it was time to punch some holes and get ready for sewing.

Holes poked

Holes poked

I found that rawhide is so forgiving due to its stretchy nature, it is actually quite annoying to work with at times. It gets slimy, pulls and stretches at the wrong times, and is difficult to judge the shrinkage and contraction as it dries. It really is quite fun.

Once the holes are poked you just start stitching it up. I used a cross stitch pattern that I have seen several sheathmakers use for rawhide.

Sewing it up

Sewing it up

Rawhide is much easier to work with than leather. There seems to be an inherent allowance for looser tolerances with rawhide than people allow with leather. I like this as well.

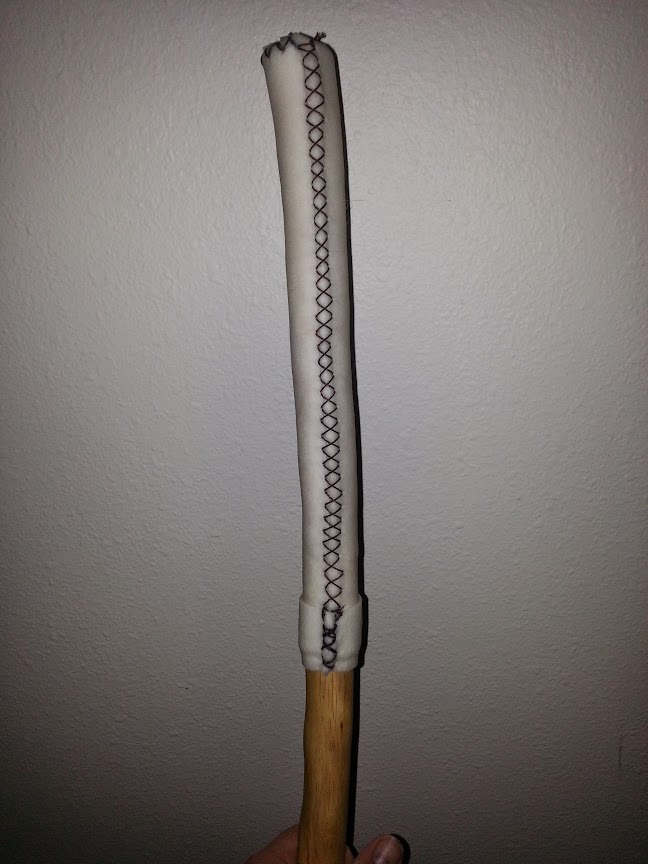
Once everything was all stitched up it looked like this.

All stitched up

All stitched up

One thing I need to figure out is how to tie off the ends of the thread. I just tied and cut for now, but I have a feeling that it will eventually pull loose and I will end up having to redo it. To help this not happen with the handle portion I did a sort of end cap thing. Once I figure out how to professionally tie it off, I will go back and do my version of professionally tying it off. My version is much goofier looking, but will work.

Handle section

Handle section

I will also research how to dye rawhide and go back later to make it a little less……  Uh…  Rawhide like? Not sure how to describe it, but it just kind of glows at this point.

For anyone that starts off on one of these projects, I suggest you do some Youtube research and then look at what some professional leatherworkers build. Contrasting the amateurs online with professional pieces helped to make me understand the idea of crossstitching and the sort.

Good luck to anyone that gives it a try. It is really quite easy and isn’t as big of a hassle as I originally thought it would be.

  • Share on Tumblr