Monthly Archives: August 2014

Glock 19 Upgrades

by Gunguy

When someone asks me what pistol to get I recommend the Glock 19. I have been using them for several years and the Glocks are bomb proof. Glocks, AK’s and cockroaches will be the three remaining things on earth after a nuclear apocalypse. If you have one you know that it works out of the box and you don’t have to do anything to it.

Since I can’t leave good enough alone I made the following changes to improve on an all ready excellent gun. I have them listed in the order of personal importance.

You can see in the pics below that the overall appearance hasn’t changed. The upgrades I chose improve the handling and reliability of the Glock 19 without altering it so that all the after market accessories and holsters will still work with the gun. With these changes the gun is considerably better and my absolute favorite.

Since the proof is in the pudding see the results of shooting 124 gr Aguila practice ammo at a 10 yard swinging target below.
 Glock 19 Upgrades

Glock 19 Upgrades

Glock 10 yd Target

  • Share on Tumblr

FCC/FEMA Tips for Communicating During an Emergency

by Gunguy

Civil Unrest / Natural Disaster Home Preps link here.

Preparing for an emergency:

  1. Know what type of landline telephone service you have. Some newer forms of telephone service will not work without electric power. Understand whether you have this newer type of service, such as Voice over IP (VoIP), which is provided over broadband connections, or more traditional telephone service, which typically is powered over copper telephone lines. Ask your service provider if you are unsure.
    • If you have newer telephone service that works with battery backup equipment during power outages,test the battery periodically, understand how long it should last, learn how to replace it, and consider having a spare battery that you can charge before a storm. If you do not have battery backup equipment, ask your provider if they can supply it or if it is available elsewhere.
      • If your electricity goes out and you don’t need to use the phone right away, you can disconnect the battery to prevent it from draining and plug it back in when you need to receive or make calls.  Once power is restored, plug the battery back in so it can recharge.
    •  If you have traditional telephone service, it may work during electric power outages – but you may need to use a “corded” phone. Remember that many cordless home phones rely on electric power to operate.
  2. Charge your wireless phone if a storm is coming. Also consider keeping an extra battery and a car charger on hand.
  3. Charge your laptop or tablet computer if a storm is coming. If your electricity goes out but secure WiFi is available in your community, you may be able to use your computer or tablet to go online and send emails. You may also be able to use the battery power in these devices to recharge your wireless phone using a USB cable, but be careful not to drain the battery power of your computer or tablet if you need to go online.
  4. Broadcasters are an important source of news during emergencies, so consider keeping a battery-operated, solar-powered, or hand-crank-operated radio or digital portable television for use during power outages. Make sure you have charged or fresh batteries if needed. Some hand-cranked radios can also be used to charge cell phones, but check the instruction manual before assuming this is the case. 

    During an emergency:

  5. Limit non-emergency phone calls. This will minimize network congestion, free up “space” on the network for emergency communications, and conserve battery power if you are using a wireless phone. If you do need to make a call, try to keep it brief and only convey vital information to emergency personnel and/or family.
  6. For non-emergencies, try text messaging from your wireless phone.  In many cases, text messages to other wireless devices will go through when your call may not, though there may be a delivery delay during times of network congestion.  (In most locations you cannot send a text message to 911, however.)
  7. Adjust your wireless phone. Check your wireless device or manual for ways to conserve battery power, such as dimming the brightness of your display screen and disabling certain applications.  If you have difficulty accessing your wireless network, consider connecting to WiFi service if your phone is WiFi-capable.  If the wireless network in your area is damaged and you do not see any signal bars on your phone, consider turning your phone off to prevent the battery from draining as your phone seeks a usable wireless signal.
  8. Call 911 only for emergencies. Learn and use the designated number in your state for highway accidents or other non-life-threatening incidents.
  9. Wait 10 seconds before redialing a call. Redialing a wireless call multiple times in quick succession can increase network congestion, further limiting the ability of all users to place calls.  If you must make a call, space out your call attempts.
  10. If you have call forwarding on a landline phone at home, consider forwarding those calls to your wireless number, particularly in the event of an evacuation, so that you can continue to receive incoming calls to your home telephone number; and
  11. If you do not have electric power in your home and are using your car to charge wireless phones or listen to news on the car radio, be careful. Don’t try to reach your car if it is not safe to do so, and remain vigilant about carbon monoxide emissions from your car, especially if it is in a closed space.

Find more information at www.ready.gov, http://www.redcross.org, or www.fema.gov.

  • Share on Tumblr

Bushmaster M17S Customization By K&M Aerospace Review

by Gunguy

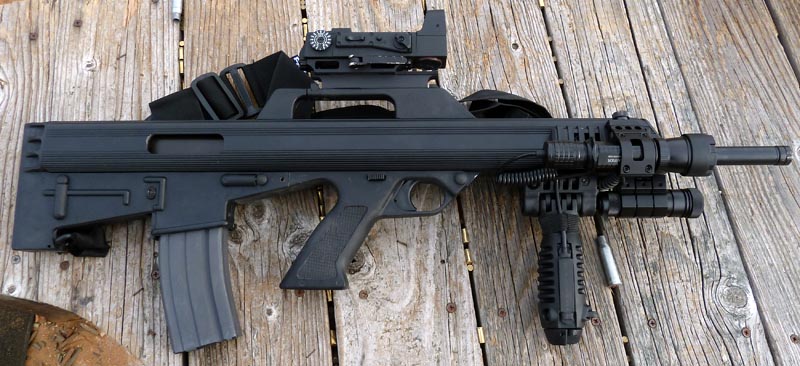
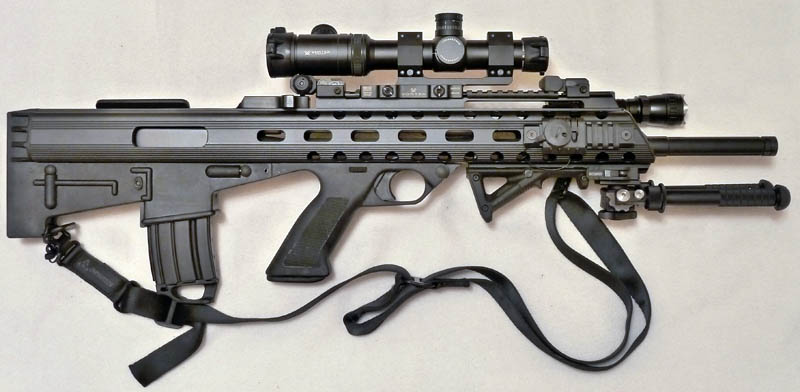
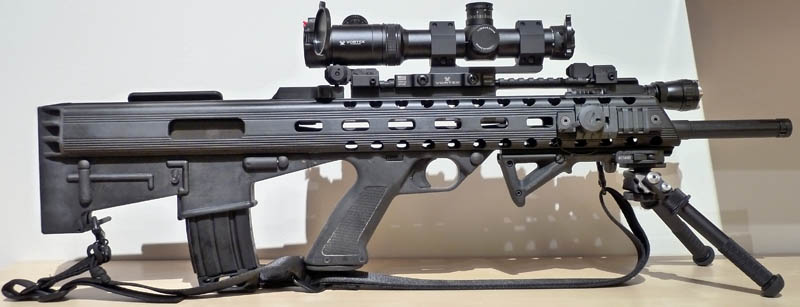
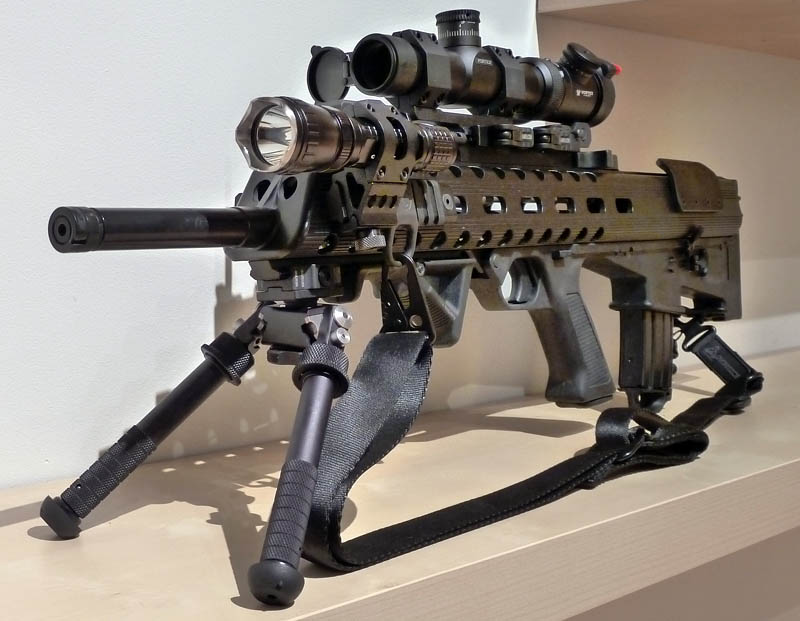
Base rifle: Bushmaster M17S, gas operated, short-stroke gas piston, 5.56×45 NATO bullpup rifle.

Factory Specifications:

Weight: 8.2 lb (3.7 kg)
Length: 30 in (760 mm)
Barrel length: 21.5 in (550 mm)

Rifle Customization performed by Ken from K&M Aerospace
List of custom work performed on the rifle with pricing:

Standard mod with the slot hole configuration+ charging handle+ upper rail, lower rail and paint – $350
2x 4.12″ side rail – $80
Install side rails – $30
Cheek rest – $35 – very practical and simple mod that allows for a comfortable and consistent cheek weld thus speeding up target acquisition.
Trigger fix – $125 – Probably the best single modification this rifle has seen. It drastically improved the smoothness of the pull and eliminated most of the creep and grittiness that plagued the original setup. Trigger pull has decreased from almost 10 lbs. to an average 6 lbs. 4 oz. on Lyman digital trigger pull gauge. This single mod has completely changed the feel of the rifle.
Gas piston assembly cleaning – $30
Shipping – $25
Total – $675

Overall I have to say that all work performed is of outstanding quality and value and completely changes the look and feel of the rifle. Having previously dealt with a few local gunsmiths that almost ruined rifle’s upper receiver trying to install side rails alone, all my expectations were exceeded by how clean and professional Ken’s work is. I highly recommend his services to anybody looking to add that custom touch to their rifle. Keep in mind that not all services or modifications are listed on Ken’s website, so it is best to contact him directly with inquiries related to any custom work.

Email: ken.kmaerospace at gmail.com
Phone: 480-406-0538
Location:
K&M Aerospace
PMB197
2040 S. Alma School Rd. Ste 1
Chandler, AZ 85286-0987

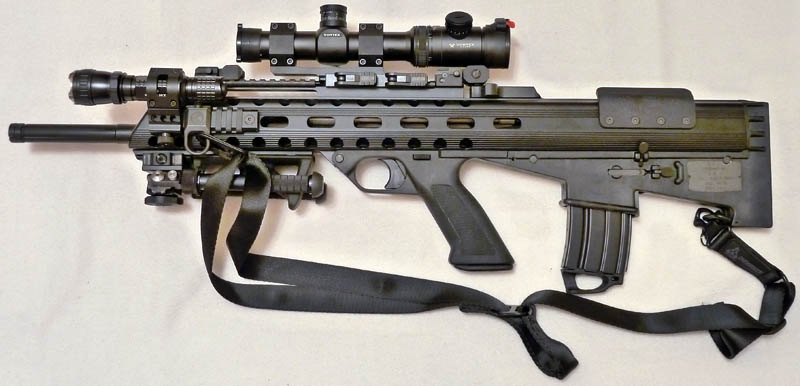
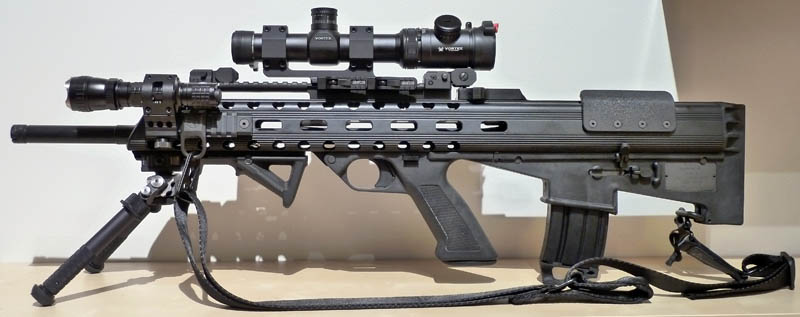
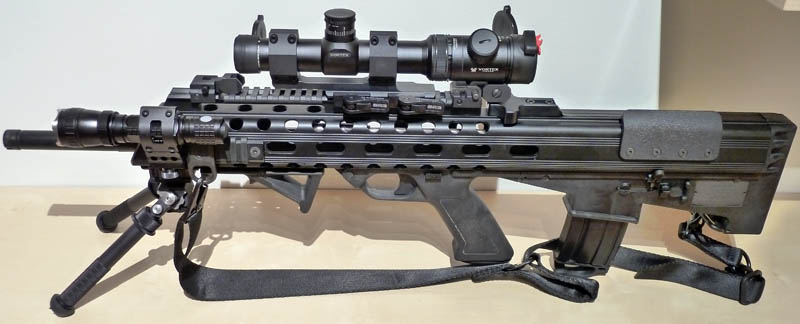
Rifle in the after photos is accessorized with the following:

Scope:

Vortex Viper PST Rifle Scope 30mm Tube 1-4x 24mm 2/10 MIL Adjustments Illuminated TMCQ Reticle Matte

Scope Mount:

Vortex Optics ADR Cantilever Mount w/2in Offset for 30mm Scope Tube ADR-30

Scope Accessories:

Butler Creek Flip-Up Rifle Scope Cover #2A Objective (Front)

Butler Creek Flip-Up Rifle Scope Cover #14 Eyepiece (Rear)

Back Up Iron Sights (BUIS):

GG&G Spring Flip Up Front Sight for Dovetails, Tritium Sight Post

GG&G Spring Actuated A2 Rear Peep Spring Flip Up Sight w/ Trijicon Tritium A2 Aperture


Flashlight and Mount:

Olight M20S Warrior Premium R5 Black Tactical Flashlight with Side Switch 320 lumens – by default, this flashlight comes with an orange peel reflector which diffuses and shortens the throw of emitted light beam. The orange peel reflector has been changed to the smooth type for maximum throw and low dispersion.
OFF SET TACTICAL Weapon Mount For Olight M20 /M21/M30


Bipod:

Accu-Shot Atlas Bipod (V8.1) (Clamp On) (BT10-LW17)


Stock Accessories:

MagPul MS2 Multi-Mission Single Point / 2 Point Sling Nylon

MagPul RSA Rail Mount Sling Adapter Loop AR-15 Steel Matte

Magpul Rail Cover – Great item to cover unused portions of picatinny rail and for indexing of location for attachments and accessories.
Picatinny Rail Spare CR-2032 Battery Holder for Scope

Original_M17S

Bushmaster_M17S_Left

Bushmaster_M17S_Left2

Bushmaster_M17S_Left3


Bushmaster_M17S_Right


Bushmaster_M17S_Right2

Bushmaster_M17S_Left4

  • Share on Tumblr

Civil Unrest / Natural Disaster Home Preps

by Gunguy

So all this civil unrest has finally made some people I know really want to get involved
with prepping. They have asked me how they should start out and what to keep in mind. In order to not overwhelm them I suggest the following as a minimum to keep in their homes. I recommend enough supplies to last them at least a week.

  1. Water – I store 3 gallons per person per day. Useful fact: Each 24 count case of 16.9 oz water bottles equals 3.16 Gallons.
  2. Food – Store what you normally eat and possibly some Mountain House freeze dried food for convenience. Make sure you try it before the emergency occurs to see if you like it.
  3. Portable gas stove to prep food and boil water. Get extra fuel. Open the window when cooking for air flow.
  4. Portable Toilet – 5 gallon bucket with seat lid. Toilet paper, baby Wipes, 13 Gallon trash bags for waste and any feminine products go inside the bucket when being stored.
  5. Big hand sanitizer to disinfect hands and save on water.
  6. Emergency AM/FM/NOAA Weather Radio. Hand crank and solar powered radio.
  7. Headlamp flashlights and extra AAA batteries.
  8. Emergency lantern and DD batteries.
  9. External battery pack to keep phones/ipad charged for several days without power.
  10. Security Door brace to reinforce your door(s).
  11. Cash – small bills.
  12. Safety – Whatever weapons or harsh words you can legally use to defend yourself.
  • Share on Tumblr

A Good Video about Friction Fire

by Woodsbum

It is really hard to find a good video about friction fire. Most don’t really go too much into wood selection other than giving you a list of “wood combinations” that work together. This video shows you the finger nail test and explains how to check to see if the wood is actually dry enough to use.

Another couple of points about this video:

  • He uses the spindle to create a good socket in the hearth (fire board). Good technique that most “experts” online do not do.
  • He also checks the dust after he creates a socket. The color and consistency of the dust will help you figure out how well your spindle and hearth will work.
  • It isn’t too obvious in the video, but using the initial dust from creating your socket will help you get an ember quicker. I assume that he did that considering he piled all the remaining dust on top of his ember to keep it going.

Here is the video:

How to read the dust:

  • Light brown and lighter dusty dust means that you are going too slow or there is not enough friction. Try going faster and pressing down a bit more. It could also mean that your wood choice was too soft.
  • Light brown and fuzzy type dust means you are just shaving off pieces of the wood and not actually getting any heat. Go faster. The dust will get darker and be kind of fuzzy in appearance as you get closer to the right combo of technique and wood.
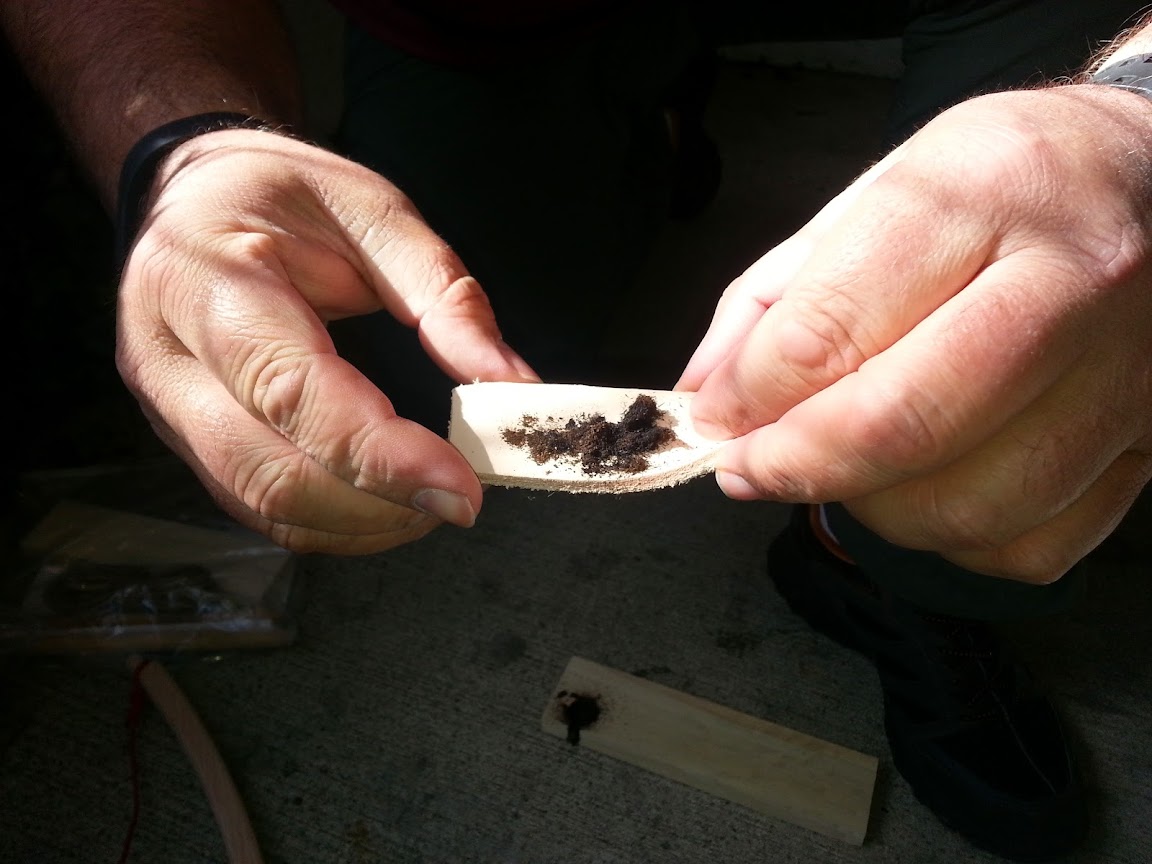
  • Dark brown almost black and fuzzy dust is what you are after. This is the perfect combo so look for embers burning in the dust.
  • Dark brown/black that are almost like little rolls of wood means that you are possibly going too fast and not pushing down hard enough. The wood dust is more like shavings that are not keeping enough heat to burn.
  • Dark brown/black that is almost a crusty or already burned looking means that you are going too fast or pressing down too hard. It could also mean that your wood choice was of a type wood that was too hard.

This is perfect dust:

Perfect dust from friction fire

Perfect dust from friction fire

There are many different charts out there on what type of wood works best. The big thing is for you to test out several combinations and get used to testing the wood’s density with your fingernail. It has to be able to dent it without a massive amount of pressure, but it should not break or crack under that pressure.

Keep trying  different wood types from your area to get that perfect combination for you. Technique plays an important factor as well. I can get the softer woods like pine and cottonwood going, but fail with maple and cedar. It really comes down to what works for you.

Good luck and have some fun!!!!

  • Share on Tumblr