Monthly Archives: April 2015

Cooking Bannock

by Woodsbum

One of the many great things about camping is a wonderful treat called bannock. Cooking bannock and making bannock is as much an art as it is a treat to eat. The closest way to describe it is hard tack.

Bannock is nothing more than flour, baking powder, water, and whatever spices you desire. I personally like sugar and cinnamon for breakfast or dessert, but mixing bacon grease and a bit of salt work well when used as a hard tack.

Here is a great video about how to cook over an open fire.


This video is about actually making bannock. Remember to experiment a bit with the spices. I know some people that go so far as to add bacon bits and grease so that they have an actual meal/snack or add marshmallows, sugar, chocolate chips, etc., for a dessert. Raisins are also not a bad addition. You can even go far as to use bannock on top and bottom of a bunch of preserves in the middle to make a great Dutch oven cobbler.


Again, just have some fun and test some things out!!!

  • Share on Tumblr

Painting an AR – Part 2

by Woodsbum

This is the second part of my AR painting experiment. If you did not see the first part, you can check it out here.

Painting and AR – Part 2 is about the actual painting process as well as what I learned while actually painting on the camo pattern. This was actually harder than I had anticipated or realized it would be.

As a stencil, I used these that I found on Amazon. They are designed for airbrushing and the pattern actually looked really good when painted. I did find a could things out regarding these stencils, however. When painting with them it is necessary to block off other parts of the stencil that you are not using. For instance, if you want the middle cutout you have to block off all the other cutouts on the stencil. This was a bit of a chore to deal with due to the paper “bib” I made to protect from over spray made the stencil a bit bulky. It also caused all sorts of build up of paint in and around the actual stencil. By the time I was done with each cutout I was almost scraping off the additional layers of paint so I didn’t smear or drip in unwanted areas.

I did realize quite quickly that the easiest way to fix you mess ups was to fit a portion of the stencil over the messed up area and just paint over the spot needing touch up. It is not necessary to actually match up the stencil to the exact shape you just painted. The new lines just add additional shape to the colored camo splotch. While painting, I found this to be an all out lifesaver when I messed up.

Here is a quick couple of pictures of both my progress and the layout of my painting area.

Painting area and progress

Painting area and progress

I painted on the back of my truck and used some butcher paper as the protector from over spray. At the top you can see a section of my stencil and how I covered up all the unused sections. The next picture will show a bit more.

More of my working area

More of my working area

Notice how I used masking tape and printer paper to cover the unwanted stencil designs? This helped a lot because most of the extra paint came off with the tape. I only had to scrape a little off the edges when swapping stencil shapes.

As you can see I also covered up the rubber control section of my Vortex Strikefire 2. I did this so that I would not have a lot of paint chipping off the rubber or getting on everything after it dried. Paint on rubber just seems to take forever to dry. You can also see the paper that I inserted between the handguard and the barrel. This will give it a really nice look when done.

Masking job

Masking job

When painting, I found that I put the stencil as close to the rifle as possible and did short little bursts with the spray can. This did increase the potential for runs and curtains in the paint, but it drastically reduced the amount of over spray that I had to deal with. The lines were much tighter and more defined using this method. I also found that using the tan as the base coat really lightened the overall camo pattern. If I had used a light green and then painted the other splotches on, the overall affect would have been a much darker camo pattern. I think this will work quite well as a pattern to span most environments. If I need to add a little burlap to darken it as needed, this will give me the most range in environments.

Here is the final pattern from the right side of the rifle. I took this picture before I unmasked everything so that you can see the difference that the dark barrel makes with the pattern. I would also like to point out that I just painted over the dust cover (closed) to help keep a nice pattern. When the dust cover is open, there is a black hole that blends right in. We used to keep the dust cover closed while in the field to lessen the amount of cleaning we had to do, so this is how it will be most of the time that I carry it.

Finished, but still masked

Finished, but still masked

Barrel unmasked and pattern from front. The additional splotch on the front of the flip up cover helped a lot to break up the front of the rifle. Also, you can see how keeping the barrel black really helped with the camo pattern as well. It gives it a bit more depth.

View from top

View from top

So you can see how well the black, rubber controls on the optic blend into the pattern and how the black barrel showing through the handguards also helps, I took a picture next to my truck. As you can see, the tire and rim actually show through the handguard. This will also help with the camo pattern.

Finished camo

Finished camo

The final picture I have for you is where I just tossed in onto a shrub in my front yard. Although it sticks out a bit, I think it will span quite a few types of terrain. Adding some burlap will definitely help in more green and forested type areas, but this will definitely be better for drier areas than a dark green or black rifle. The black blob effect is very visible from a distance.

Tossed in a bush

Tossed in a bush

I still have another AR to paint once the rest of my parts arrive. I will be doing it a bit different than this one just to see how the light green base works versus the tan base. It is also my SPR type rifle, so the larger silhouette will definitely need more middle of the road type base color to keep from either glowing or blobbing respectively.

  • Share on Tumblr

Painting an AR – Part 1

by Woodsbum

Recently I was the recipient of all sorts of garage dwelling goodies such wood stain, spray paint, and a rifle painting kit. To ensure that this rifle painting kit did not go to waste or possibly go “stale” I promptly started getting read for a home camo paint job.

What I have done is broken down the process into two parts. The first part will be based around the materials needed, color schemes and the base color I used for my paint job. The second part will be the actual painting process and what it all looked like after I was done. You can find part 2 here.

To precursor this whole project I wanted to establish the basis for my decision to paint my new AR. The reality of the situation is that I am more of a traditionalist when it comes to firearms. It wasn’t until recently that I got into modifying or upgrading any firearms that I own. Even more surprising is that until recently I really wasn’t too into tactical firearms or gear at all. Most of my holsters are leather and most of my backpacks are canvas. Although I have a lot of gear from my time on Active Duty, I really have never been one of those “tactical” guys that owned any high speed gear that you see the “tactical” guys running around wearing. An old LBV (Load Bearing Vest) was actually the most “tactical” thing I owned until recently so camouflaging a rifle to keep it from standing out is truly uncharted territory for me. Thanks to Gunguy for getting me more into this whole world. I thank you, but my bank account and wife probably do not…..  Just saying……

Back to the project…..  Here are the materials that are needed to complete the paint job:

  • A rifle to paint
  • Paint. I feel you should get an actual paint kit that is made to adhere to firearm coatings. The one I received was from LBX Tactical.
  • Masking tape. The stuff I got was from Home Depot, but I linked to some that is very similar to what I used.
  • Stencils. You can use vegetation or homemade cutouts, but I opted to get something a bit nicer. The paint kit from LBX Tactical actually comes with stencils, but they are a digital pattern. All my gear is Multicam. This presents a problem because I don’t want to have color clashing or pattern explosion issues…..  The fashion police might come arrest me because EVERYONE knows that being fashionable while tactical is a definite must!
  • Heat gun to dry your paint.
  • Wire or something to hang your rifle from during painting and drying.
  • Beer
  • Break parts cleaner or something to prep your rifle.
  • Paper of some sort to assist with masking and preventing over spray.

Once you get your materials all consolidated and ready for use, the first step is to drink a beer while you clean the surface of the rifle you are going to paint. I used brake parts cleaner to get rid of the oil and residue that might have been present. Once the brake parts cleaner dried, I wiped the rifle down with a rag to remove any droplets or residue. While it all dried, I finished my beer.

The next step is to get another beer and start masking off your rifle to apply the base coat. I removed the optics from mine so I could get a good coat of paint on the entire upper. I also removed the stock so I could paint the entire buffer tube. The parts that I masked off were:

  • Barrel. The barrel gets hot and I didn’t want the paint to end up bubbling or burning off after use. I also like the look of the black barrel sticking out below the keymod rail.
  • Charging Handle/Bolt Carrier. I actually removed the BCM charging handle and just taped off the bolt carrier. This way I could paint the back part of the upper with ease as well as keep the nice charging handle looking nice. It gives a nice contrast to the rest of the rifle, in my opinion.
  • The controls for the optics.

Once this was all taped off and ready for paint, I did a light and quick first coat of paint. When painting, many people have a tendency to get an overly thick coat on their first pass. This actually is a bad thing because it causes too thick of a layer that has not cured or bonded to the surface properly. Complications such as eventual chipping, runs or curtain potential is all increased due to a thicker coat applied in a single pass. It also helps to keep a beer handy while doing all this.

After several coats of paint, the entire base coat was finished. I also used the drying time between coats as a beer drinking opportunity. This is also vitally important to the project so that you get ample time to relax and enjoy this project.

Once I had completely painted the rifle I hung it up on a wire and used a heat gun to ensure the paint was not only dry, but bonded properly to the rifle’s surface. After inspection I did realize that I needed to repaint some areas, such as the area of the lower that lies beneath the safety. At first I had forgotten to move the selector to “Fire” and paint where the lever masked the lower. I also had to touch up a couple spots around the sling swivels and single point attachment.

Again, don’t forget to apply heat to the rifle after you paint it. Think of this process no different that what is done to a car after painting. It is put in a warm garage to almost “bake” the paint onto the metal. The same concept works here. The paint must truly heat up to adhere to the rifle properly.

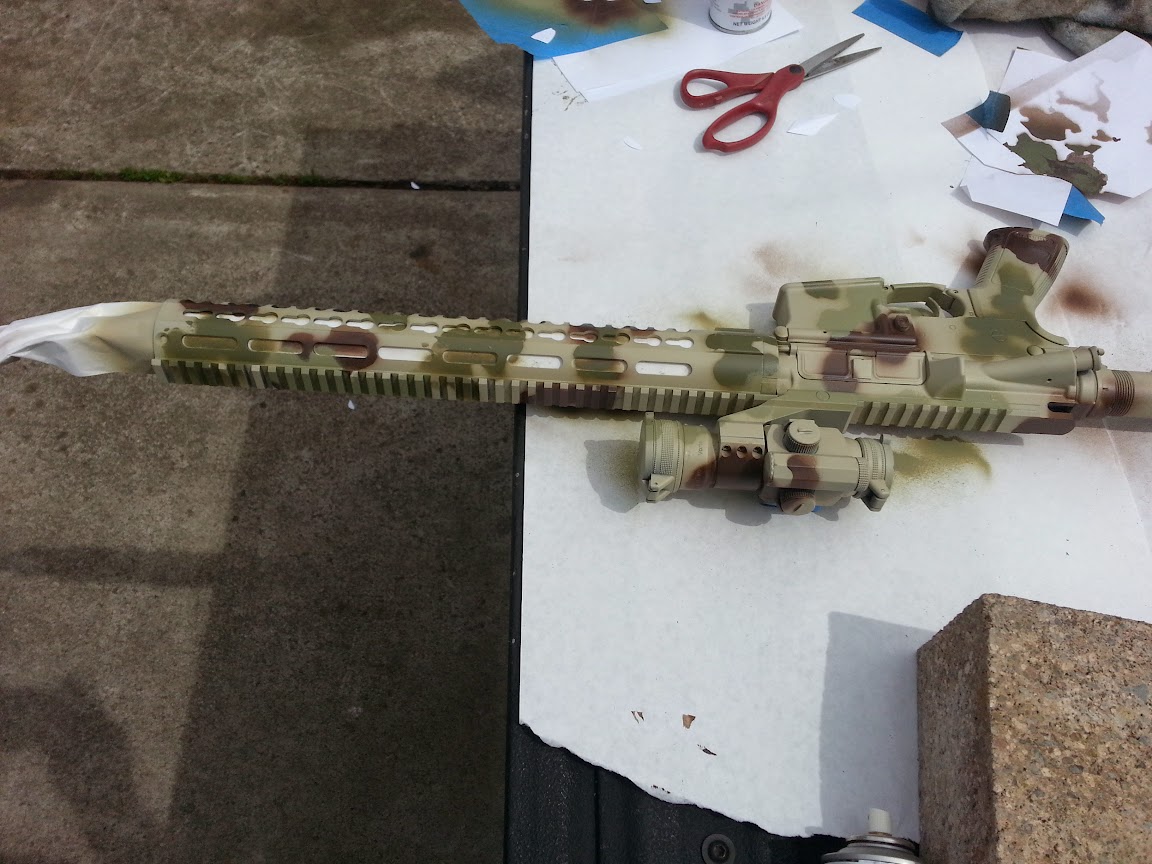
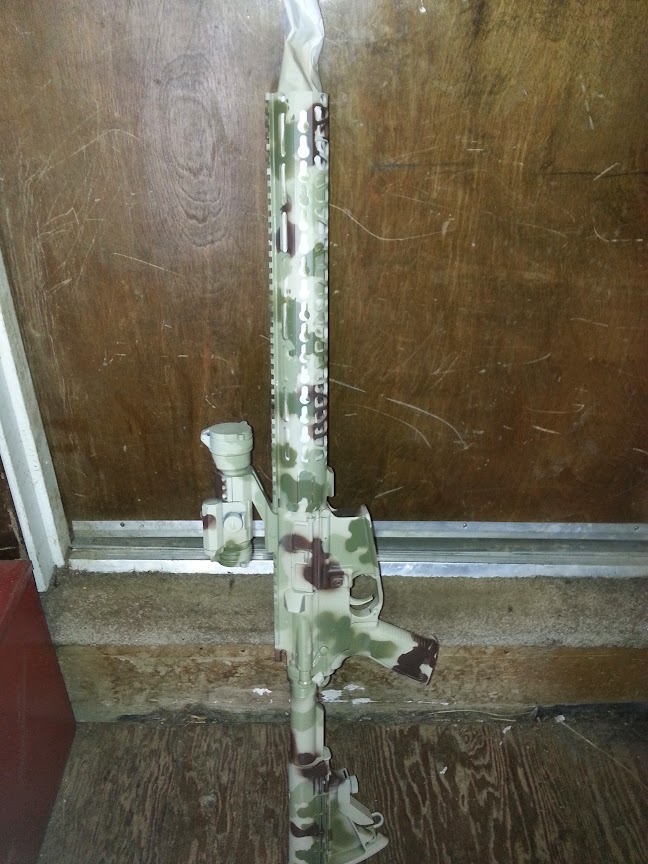
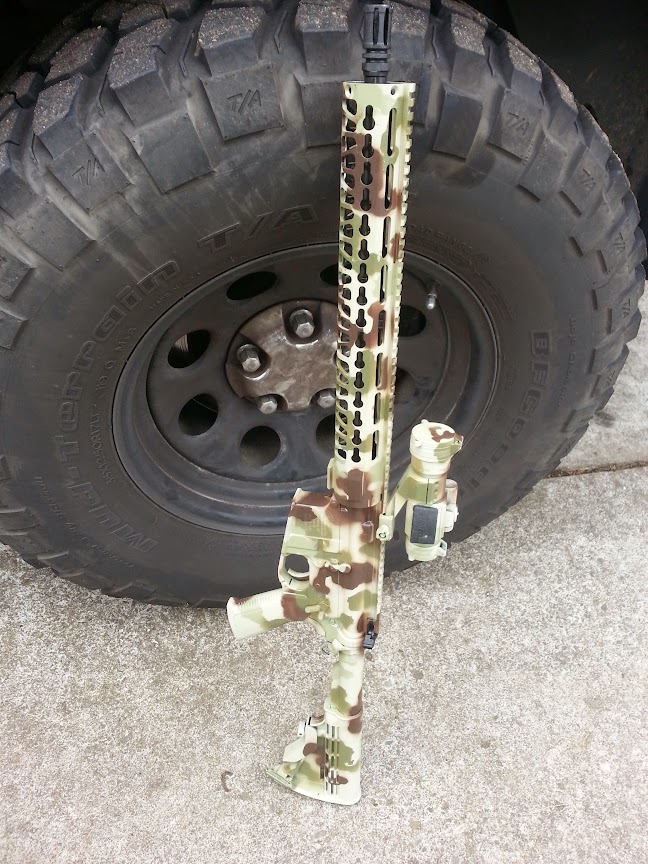
Here is what the rifle looks like with the base coat applied.
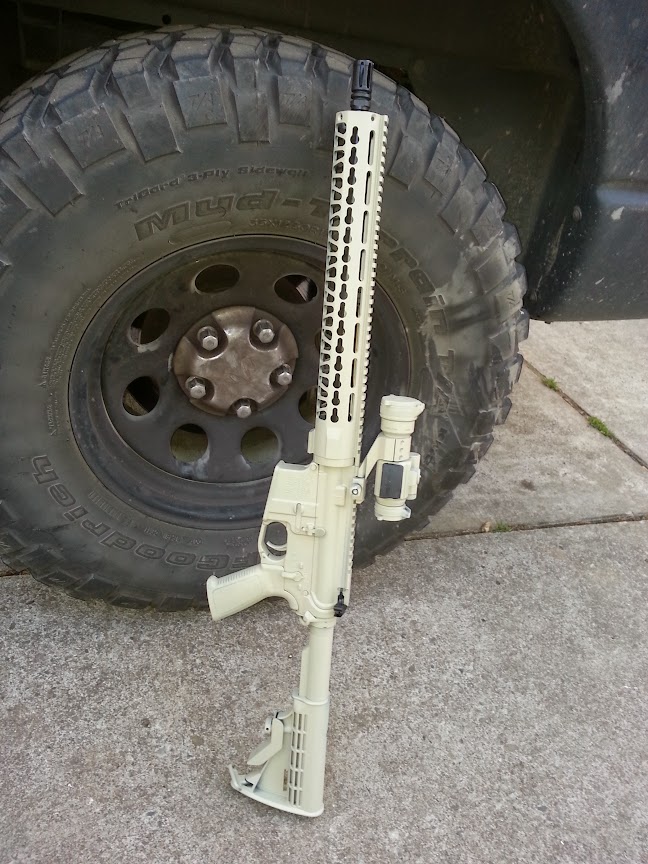
AR with base coat

AR with base coat

As you can see, the black barrel beneath the keymod rail looks kind of nice. Add the still black charging handle and it really gives it a bit of class to the job.

Here is the rifle from a little different angle. Notice how well the color blends into the rifle. This paint did a wonder job of adhering to the rifle to make a solid base for the camo pattern. I was quite impressed with the paint in the kit. The real “hero” here, in my opinion, is the heat gun that I used between coats. I could see the texture of the paint change to really match the texture of the receiver and hand guard when heat was applied. It evened out and really seemed to “melt” into the rifle’s finish much better.

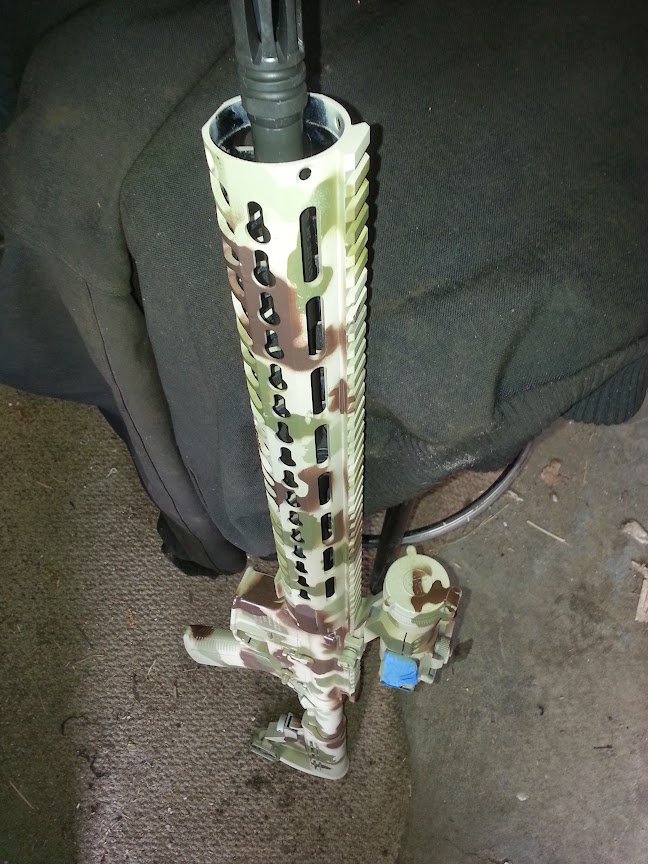
As you can see, I did get some over spray inside the hand guard. I am now sure how I plan on fixing this. I have considered just getting a spacer, but might just mask it and spray on down the barrel to get the inside of the hand guard. So far I have not made any decisions.

AR base coat

AR base coat

This weekend I am going to use the stencils and finish up the camo pattern. Check back on Monday for that post. My goal is to make something that looks very similar to multicam and blends well with my other gear and my surroundings.

  • Share on Tumblr

Charring Natural Materials

by Woodsbum

One of my MANY issues I have is my inability to either film, splice, or create a decent video in any form or fashion. Due to this definite deficiency in my skill set I tend to find good videos that others have done. This video is pretty good about charring natural materials.

I char a lot of different things to use with my flint and steel for starting fires. For quick and easy charring I tend to use a lot of heavy cotton cloth from JoAnn’s Fabrics. I do also use a lot of inner tree bark, cat tail down, punk wood for coal extention, various types of plant stalks, etc. Mostly anything that is light and porous that seems like it will char well gets tried out. Some does work while others don’t.

This video shows various natural materials and what the natural materials look like after having been charred.

Many videos about how to make a char tin or how to actually char material are available. This video is pretty good and shows how to make char cloth as well as lighting it with a firesteel. Of course there are hundreds of videos out there, but this guys cover some good points such as only making a small hole with an awl or nail rather than a slit with a knife. He also mentions something that many people I teach charring to, which is the way that the lid always sticks after the charring is done. He doesn’t really show how long to char it. I personally keep it on the fire until I don’t see much smoke left at all. I actually char things longer than most, but since I live in a very wet/moist type environment the drier the char cloth the better.

I hope you enjoyed this post about charring and use of natural materials as a char media. If I can get a video put together that I am not completely ashamed of, I will try and get something built to show you a couple good char tin tricks.

  • Share on Tumblr

AR 15 Build Field Report

by Woodsbum

Similar to last week’s report, I wanted to follow up and tell you about how my newest AR 15 build faired while out in the field. Again, I don’t really have much in the way of pictures to show you. When I go shooting I do not go to a range. I take off to the hills and shoot clay pidgins, potatoes, or tannerite. Couple that with the fact that only I am out there and you have a very difficult time shooting while taking “selfies” of your firearms in action.

When I break in a new AR, I tend to use steel cased Wolf ammo to wear in the chambers a bit and make other rounds cycle easier. On this outing I blew off the last 90 rounds of steel case I had and then started on factory and reloads. Other than my brother’s reloads which usually have feeding issues, I had no other failures at all. Overall I put about 400 rounds through it.

The Vortex Strikefire 2 optics are just awesome, like always. One of the many things I love about them, aside from how easy it is to get on target and the fact that they just work flawlessly, is how easy it is to sight in with this optic.

Here is a “redneck” guide to sighting in an optic without using paper targets: I usually pick a very soft dirt pile and pop off a couple rounds to see where it is hitting. Then I adjust until I get to where I am on target at 25 yards. I then move it out to 50 and repeat the process. Finally I move to 100 yards and do it one last time with full sized clay pidgins. If I am using only a red/green dot optic I stop here. If I am sighting in a scope I have more to do. To fine tune a scope I move from full sized clays to the broken pieces and repeat the process while slowly moving down target size. This will usually get me down to about a 1″-2″ group at 100 yards.

A couple of the things I really loved about my new build are the weight and the handguard. By installing one of the keymod rails, I actually opened up the entire barrel length to allow for better heat dissipation. Although the barrel did get hot while rapid firing (as expected), it cooled off within just a couple minutes rather than having to wait several minutes like any other configuration I have used. It really was nice to have that full handguard covering almost the entire barrel as well. I did not have to worry about melting things into the barrel after shooting or burning myself by being stupid. It truly is a great configuration. And in regard to the weight, it was an absolute pleasure to shoot such a light rifle. I don’t consider the .223/5.56 to have any real recoil, so that was never a consideration with regard to weight. It was just so nice and easy to carry. I truly love this new build.

For those of you who have been skeptical about ordering from Daytona Tactical, I will give you a few tidbits. Their order processing is VERY slow. From the time that I ordered until my parts were delivered was almost 3 weeks. They also ship via USPS, so that does suck a bit. You can’t track your packages like you can with FedEx or UPS. The product is quite good, however. I have absolutely NO complaints about the items I received and the pricing was absolutely amazing. If you are after a quick build that you just want to be able to shoot, then I REALLY and HIGHLY suggest you make an order through Daytona Tactical. You will be happy with the results.

  • Share on Tumblr