Monthly Archives: May 2014

KEGERATOR!!!!

by Woodsbum

This post isn’t very backwoods, gun, or gardening related. It is however AWESOME!!!!!

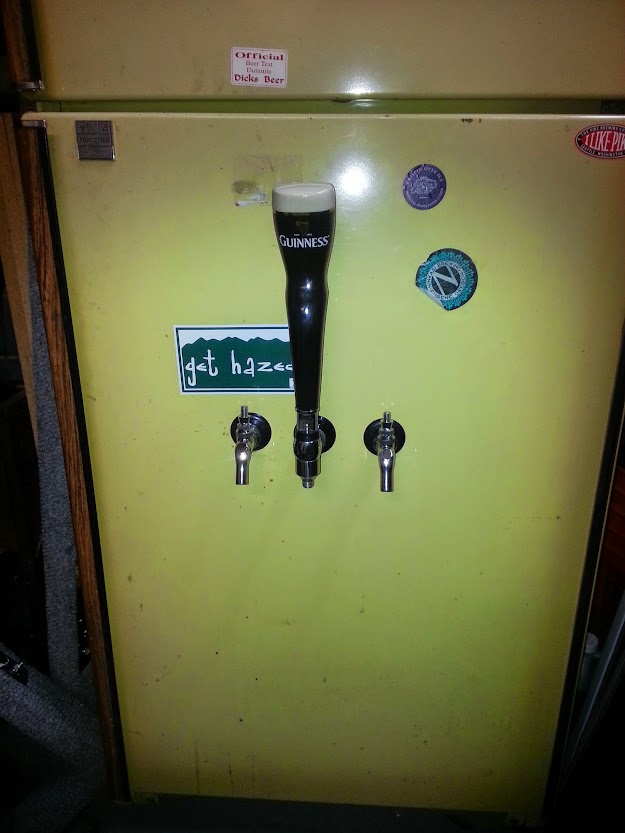
After many years of putting it off, I finally did the work needed to get my kegerator up and running. As you can see from the picture below, I will have two CO2 beers and one nitrogen beer on tap. There are a few pieces that I am still waiting on to arrive, but for the most part I am done with all the hard part.

The beauty!!

The beauty!!

The refrigerator was given to me by my brother a while ago. It ended up quitting me for about a year. I then REALLY examined the wiring and found that all I needed to do was tighten a connection. Been working ever since. There was already one hole drilled and a pretty worn/nasty spout installed. He also ran a CO2 hose through the side, but was down in the corner so that kegs could very easily pinch a line. I did a few modifications to make it my own (read as BETTER!!!).

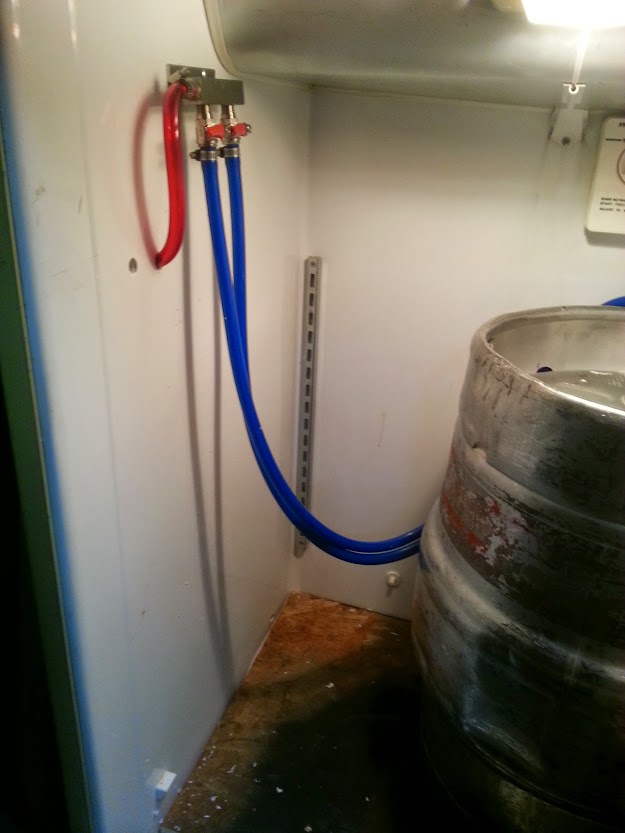
CO2 lines installed.

CO2 lines installed

As you can see, I installed a manifold for my CO2 so that I could run two beers off the one tank. I color coded it so that it would look nice as well. The second hole you see is for my nitrogen lines. That, my CO2 regulator, sankey coupler, and spout for my Guinness faucet should be here today. It was tough, but I drilled the hole just barely big enough for the hose. I did this so that it would stay nice and tight without me having to squirt expandable foam all over the place. I also built a floor for the kegs to sit on out of some scrap wood I had laying around. This has helped keep things in place as well as protecting the bottom of the refrigerator from the kegs as I swap them out.

Ball locks on gas lines.

Ball locks on gas lines.

Another thing I did was for ease of swapping couplers and kegs around as I changed out beer. If you look, I put ball lock keg fittings on all my gas lines and I put sankey to ball lock quick disconnect conversion kits on my couplers. By doing this, I can easily swap out between American and European sankey couplers, “M” couplers, or just use the ball lock system for homebrew in corny kegs. It gives me much more freedom in my beer choices. I also did this for my nitrogen system so I can swap in the same fashion. This means that I can use my Guinness coupler (U coupler), sankeys or hook up a corny there as well.

Beer lines to my shanks.

Beer lines to my shanks.

I did the same thing with the beer lines. You can see the ball lock connectors in the door tray. I put the Guinness between the two Perlick faucets so that it wasn’t as odd if I was not running all three beers at once for whatever reason.

To drill the holes, I used a 1/2 inch hole saw. They are about $10 from Home Depot for a good one. It really wasn’t that big of a chore and it really came out well.

The faucet handle situation does need to be rethought a bit. The actual tall, bar style handles I have don’t fit correctly where I have the spout. The handles hit the door and thus don’t close out the faucet properly. This is a serious problem and I will have to do some thinking about how to fix this.

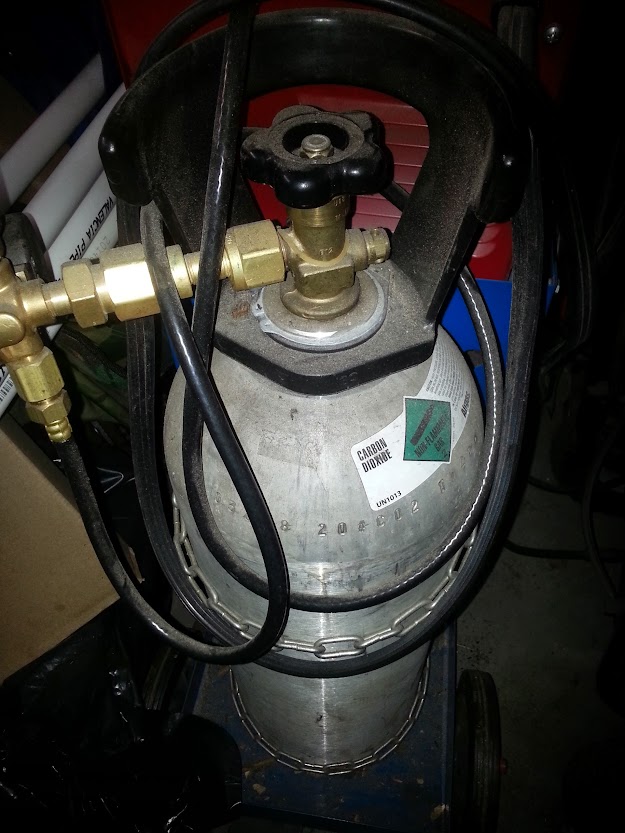
Since I already have my tanks and such, I will end up building myself a tank stand/holder to keep them safe. My CO2 tank actually was originally a soda machine tank, but I reallocated it for a while to do some welding. It already has food style CO2 in it, so hopefully my welds don’t get sick since it wasn’t a welding mix.

CO2 tank

CO2 tank

Like I mentioned, my regulator for this will be here today. My nitrogen tank will be ready today as well so I can hook up the lines and this bad boy!

Nitrogen regulator

Nitrogen regulator

I was a little surprised by the differences between CO2 and nitrogen regulators. Notice how the second gauge goes all the way to 60 PSI? Guinness for instance should be run around the 30 mark from what I have been told and have read. It will be a fun experience to “test it out and drink the practice runs.”

Since I have not decided what to do for a drip tray yet, I will have to also do some thinking there. I have been considering re-purposing something completely obnoxious for the task, but can’t find anything worthy as of yet. There is no doubt that I will think of something, however. I might just weld up something out of steel. We will have to see.

If you decide to do your own kegerator, do yourself a favor and do it right from the beginning. I have seen many that were done in a haphazard fashion that were just given away a while later because it didn’t fit the person’s needs. Spend the money for the right parts and just get it done.

Happy beer drinking!!!!

  • Share on Tumblr

DIY Tobacco Pipes

By Woodsbum

For a long time I was very partial to cigars, but was not pleased with the incredible price that a premium cigar would command. Eventually, I picked up smoking a pipe instead of a cigar while out in the bush. Not only are pipes easier to carry without crushing everything, but more important to my wallet is the price for tobacco. It means that I can smoke just as much as I want without wasting an entire cigar if it just doesn’t hit the taste buds properly.

Now a good pipe can cost in excess of $100 and can just skyrocket from there. Because I have something wrong with my cranial wiring, I always think that I can figure out a way to do as good or better……   Enter a post on BushcraftUSA that discusses building your own pipe.

In the post, the guy “SkogKniv” who now is known by his real name of Leif, there is a method of drilling out the center pith of a tree branch so that it can be used as a pipe stem. Once I started playing around, I figured out how to drill out some very long tree branches to make myself a homemade pipe.

Getting the right materials and tools together is always a chore. Knowing that the hardest part was going to be drilling the stem, I decided to start with that part first. The first hurdle was to find the right wire for drilling. I went through several types to include coat hangers, tie wire, hanging wire for pictures, gardening wire, and several others. What I found to work best is 16 gauge stainless steel wire that is sold at Ace Hardware and Home Depot near all the fasteners. It is the perfect combination of flexibility and durability so that it won’t bend or break off during the drilling process. The next thing you will need is one of those cable, survival saws. They have the key rings on either end that you put your fingers through and it is made of a rough wire material. Lastly, you will need a good drill.

What I did was just like the post describes. I rounded out the end of the wire, chucked down the other end, and then started drilling through the center of the stem. It took a little bit, but wasn’t as hard as I thought it would be. I then cut the end off the survival saw and used that to clean out the inside of the stem I drilled. It worked just like sandpaper. With a little maneuvering and manipulation of the saw, I was also able to taper the ends of the stem so that it looked cleaner as well.

Here are a couple things that I learned:

  1. Don’t pick a dry stick. It needs to be green.
  2. Don’t pick a stick that has any twigs growing out of it. Those cause a knot in the stem that you will not be able to drill through very well.
  3. Make sure you hold and guide the wire as you drill. Otherwise it will bend in the middle and slap your finger nail completely off….  Don’t ask.
  4. Trying to do it all with a wire as opposed to sanding with the saw will only get you a mouth full of sawdust.

Once you get the stem drilled and ready, all the rest consists of is:

  1. Drilling the bowl. Use a drill press and some decent bits. I like the 3/4 inch bits from Harbor Freight.
  2. Drill the hole for the stem to press into. Measure it out and pick the right sized bit from there. Make sure you drill so that it will be just below the hole you drilled for the bowl.
  3. Dremel out a small hole to attach the bowl to the stem hole. This is called the draw hole. I like using the wood carving bit in my Dremel and making a little channel as well as the hole. It makes the pipe smoke better.
  4. Sand and wax with carnuba wax, then polish.

It really is almost too simple once you get your stem drilled. Here are a couple pipes I have made.

Homemade pipe

Homemade pipe


Homemade pipe

Homemade pipe

Homemade pipe

Homemade pipe

Homemade pipe

Homemade pipe

  • Share on Tumblr

Food Dehydration – NewB Guide

by Woodsbum

To make life easier in my family, I finally decided to get a food dehydrator. “How would this make your life easier?” many will ask. It is quite simple: jerky……..

My family LOVES jerky and “snack” type foods. Not necessarily junk food, but snack type items. We love veggies that are cut up and ready to eat. Fruits that are cut up and easy to pop in your mouth. Popcorn is also a favorite. The absolute, top shelf snacking chow at our house happens to be beef jerky.

For those that are not familiar with the “jerky” world, it can become quite an expensive habit to have. A small package of Jack Links (our household favorite brand prior to the homemade stuff I did over the weekend) can run $10 for only a few minutes of taste bud Utopia. Couple that with the expensive dehydrated fruit that we get on occasion and a hefty bite can be taken out of your bank account. What we did was purchase this:

Excalibur Food Dehydrator

Excalibur Food Dehydrator

In only a few minutes of work and several hours of wait time, I ended up with some INCREDIBLE beef jerky. Here is how I did it:

  • Purchased a steak block from Cash and Carry, a local restaurant supplier that is open to the public. I got round steak for around $3 a pound.
  • I cut the meat into thin slices. Mine ended up between 1/8 inch to 1/4 inch depending on how steady my hand was.
  • The meat was marinated in Frank’s Red Hot buffalo sauce, soy sauce, lemon juice, liquid smoke, black and red pepper, garlic, and Tabasco sauce for 24 hours.
  • We set the device’s temperature setting to “Jerky” and the timer to 8 hours. about 6 hours into the process, we flipped the jerky over.

That was it. It came out delicious and we now have a great way to keep jerky in the house for a mere fraction of the price.

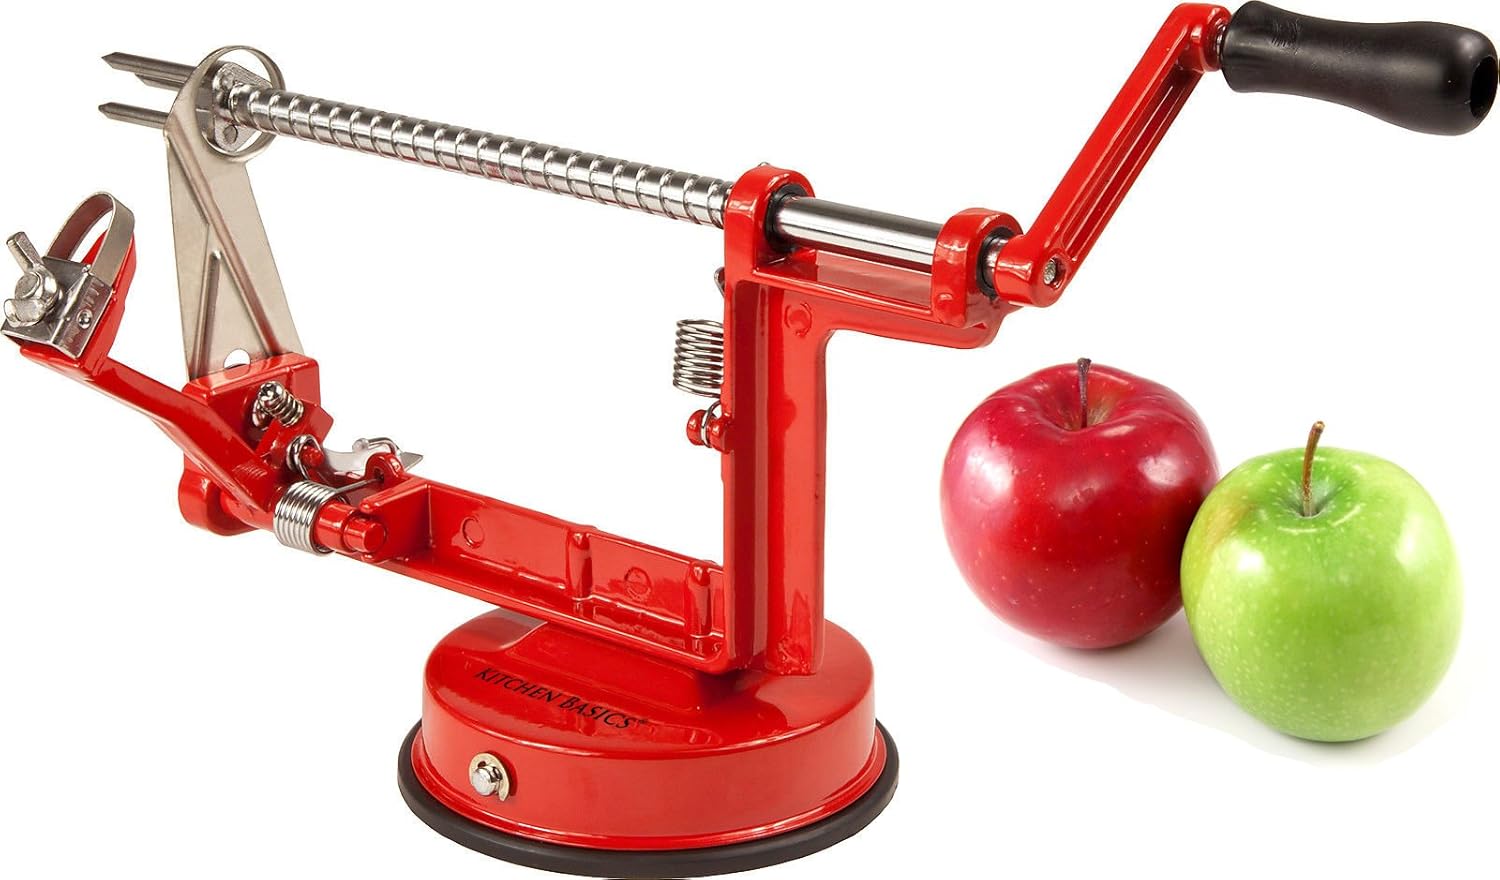
We also did some apples and mango. To help with the prep work and hassle, I picked up these from Amazon:

Apple Core and Peeler

Apple Core and Peeler

Mango PItter

Mango Pitter

These things made quick work of the fruit and allowed me to get it prepared and into the dehydrator in a matter of only 5-10 minutes. It was SO quick and simple that even my daughter was interested in at least watching, but not helping. This is definitely a step up from being completely ignored while doing things in the kitchen, so it must be really simple.

Once I got the fruit prepped and onto the trays, I sprinkled cinnamon and sugar on the apples. The mango was skinned, but left alone to dry. The drying process took about 10 hours for a good, complete dry. The product was definitely worth the wait, however. Over the course of 2 days the late teen/early 20 year olds in my home ate a full 1 gallon Ziploc freezer bag full of dried fruit. It was amazing and so very simple.

When I get home tonight, I will be prepping some more jerky and drying out some more fruit. As time goes on and I experiment with even more recipes, I will post them. The best combo for fruit I have found thus far involves a medium to heavy sprinkling of cinnamon and sugar mix. I will try more things, however and report back. Later on, I also plan on making some of my own backpacking soups from veggies and meat. We will have to see how it goes, but I have some faith in the process after having done the fruit and beef jerky this last weekend.

If you have any interest in getting into the whole dehydrating thing, I highly suggest you pick yourself up one of the Excalibur systems from the very beginning. The ease and simple design, the timer, and the even drying of the food really make it worth the money. This is definitely a recommended product. Also, let me know if you come up with some good recipes along the way. We get good, inexpensive produce so I can afford to play a bit.

Happy dehydrating!!!!

  • Share on Tumblr

S&W M&P 9mm – Grip Tape

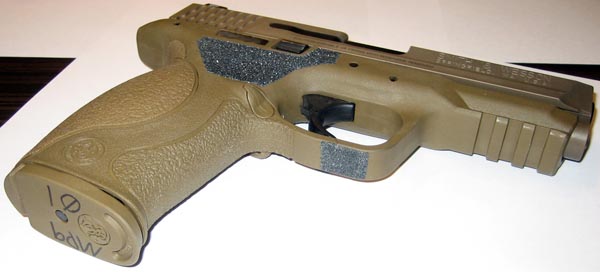
I’m relatively new to the pistol shooting world and I had some trouble getting a proper grip on my SW MP 9. I used a suggestion by Chris Costa from the Magpul Dynamics Art of the Dynamic Handgun dvd and put some  Black Magic grip tape on the gun.

I  put some tape on the left and right hand side of the grip and a piece underneath the trigger guard.  This really helped me get a proper grip on the gun and  made it fell more secure in my hand. After adding the tape I went to the range and refined the placement of the tape and I’m currently using the grip tape placement below.

The grip tape was an inexpensive way to improve the feel of the handgun. I looked into stippling but I was not comfortable with modifying the handgun in that way. Here is a great link on how to stipple a firearm using a soldering iron.

SW_MP_50_9_Bottom

SW_MP_50_9_Left1

SW_MP_50_9_Right

SW_MP_50_Feet

Target at Fifty Feet

  • Share on Tumblr

Restoring and Hafting an Old Axe

by Woodsbum

Having a nice axe around is pretty important for the bushcrafting type person. Unfortunately, they get really expensive for a good one. The best brands (Wetterlings, GB, or a custom) all run over $100. Even though it is a great price when considering the quality of the item you are getting, it is still over $100. This is where being thrifty and putting in a little elbow grease can save your tail. By watching for vintage axes on Ebay, garages sales, or thrift stores you can get a top quality axe head that just needs a little TLC.

Take these three axe heads for instance. Two were given to me and one was purchased for $.50 from a garage sale. The carpenter’s axe and single bit are both True Tempers and the hatchet is a forged head from Germany. All are great quality tools that will give many more years of service if restored properly.

Three axe heads ready for restoration

Three axe heads ready for restoration

In the restoration process, the first real step is to get all the rust and patina off the head. Some people are really into the whole “vintage” thing and want to keep the product in an antique state for resale or collectible purposes. When you are going after a usable tool, you want to make it as close to new as possible, in my mind. This is why I get rid of all that and work to remove all the scaling, rust, and patina to get back down to a bare metal. There are several methods to do this. One is to use vinegar. By soaking an axe head in vinegar, the main rust and scaling will bubble off and be removed. It also, however, does what is called a “vinegar patina.” I am not fond of the look and it actually bugs me. The carpenter’s axe and the single bit above were both done with vinegar. As you can see, it darkens the metal and essentially makes all the rust pits more visible. The hatchet is getting a different treatment.

To clean off the hatchet, I soaked it in a strong penetrating oil for a week. I then took a wire wheel to it and all the nastiness came right off. Here are some pictures of a how well the wire wheel works on an old axe head. This one is an old Collins double bit.
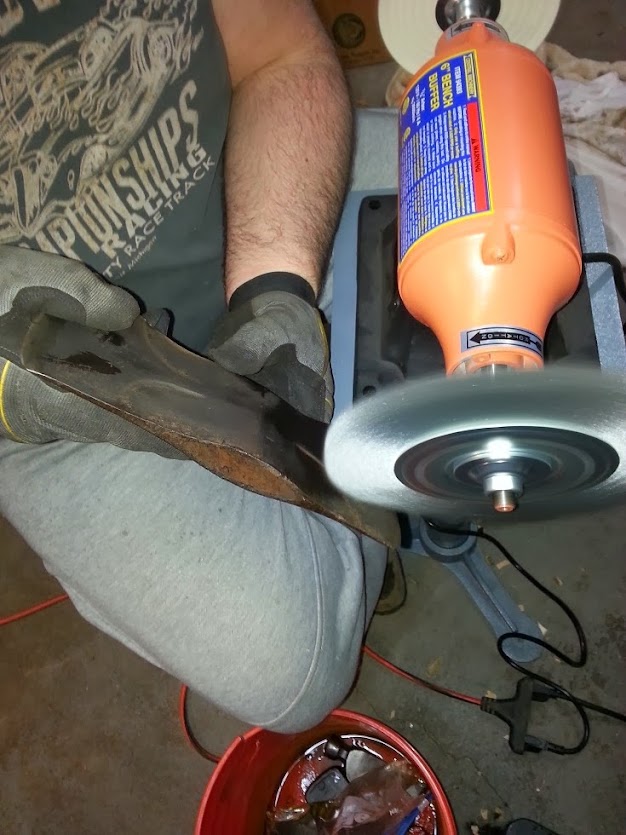
Wire wheel descaling an axe head after a penetrating oil soak

Wire wheel descaling an axe head after a penetrating oil soak

As you can see, the wheel really cleans and polishes it up quite well. Here is the old hatchet after the soak and polish.

German hatchet after getting cleaned up

German hatchet after getting cleaned up

Once you get the head all cleaned up, it is time to haft it. The hardest part of hafting an axe is the sanding that needs to be done in order for the handle to fit properly in the eye.
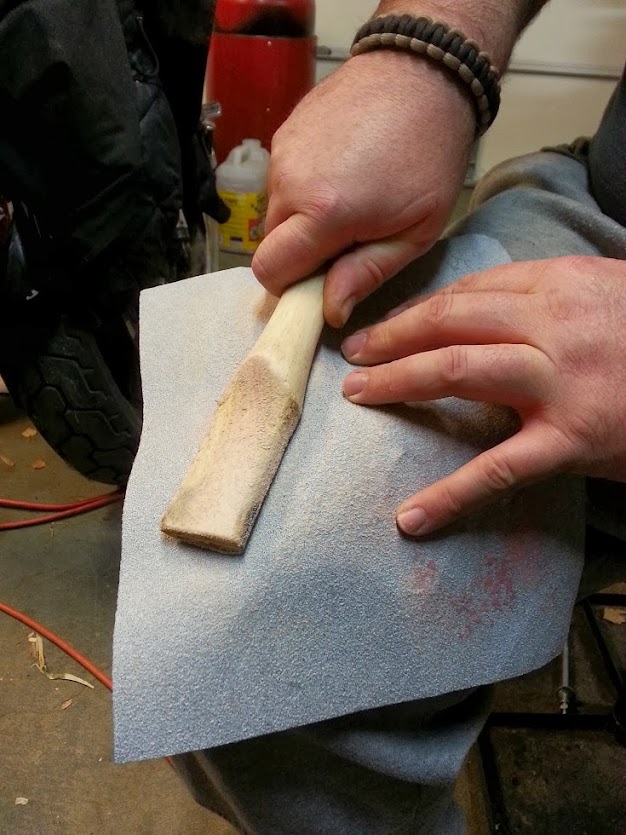
Sanding the handle

Sanding the handle

Once it slides most of the way into the eye and actually FILLS the eye with no real gaps. You want it nice and snug, but not to the point where you are shaving the wood as it goes on.

Handle sanded to fit

Handle sanded to fit

Once you get it perfect, the head should be tapped onto the handle through the use of gravity. Smack the handle straight down on the ground to let gravity drive the head onto the handle. This keeps the head from twisting and binding onto the new handle. Once it slides all the way onto the handle and will go no further, you can go ahead and put in the wood wedge. The wedge is gently driven into the slit at the top of the handle. Use of a mallet rather than a hammer keeps the wedge from breaking or splintering. Remember that the wedge should fit into the eye just like the handle. If you have to trim a little bit that is fine.

Wedge in a double bit

Wedge in a double bit

Keep driving until you have completely filled the eye of the axe with the wood from the handle and the wedge. It should bulge over the edges of the eye a bit. “Muffin top” is a good way to describe it.

Wedge driven in

Wedge driven in

When done with driving the wedge in, trim down the excess. Leave just a little bit of the “muffin top” above the top of the head. This helps keep the head fitting tightly and also gives it a classy look.
Double bit wedged and trimmed

Double bit wedged and trimmed

After all this is done, you can (if you want) put in a metal wedge to help keep the wood wedge from sliding out over time. The best way to do this is by driving the metal wedge in at a diagonal as shown in the picture below.
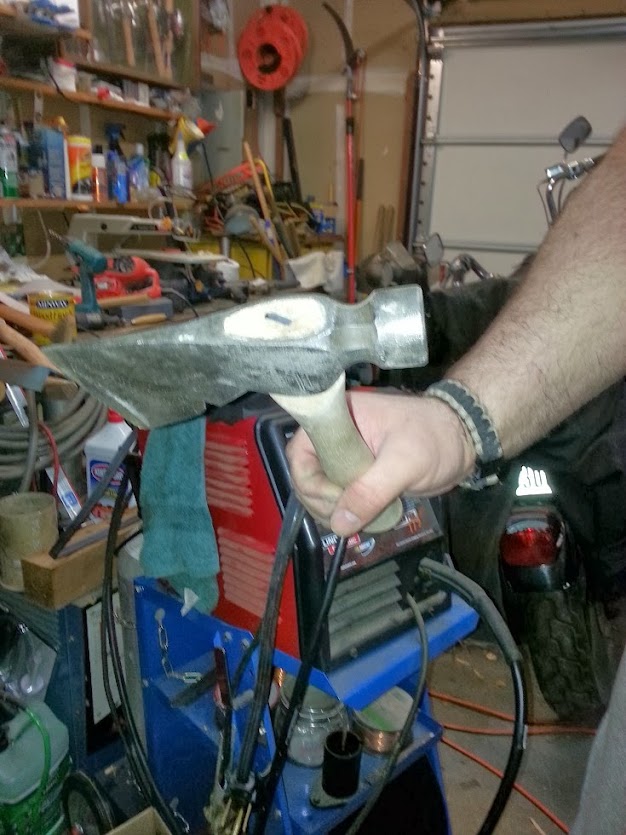
Handle totally done

Handle totally done

There is a lot of pride and fun that can be found in restoring old axe heads. To date, I have redone several dozen and put them back in service. Seeing an old tool that was a step above useless suddenly come to life with a little TLC can make even the most hardened woodsbum get a little twinge of emotion. Even more emotion that what a double bacon sandwich cooked over a campfire can create!

Well, happy hunting and hafting everyone. Get out there and find your Collins, True Tempers, Black Ravens, Hultsafor Bruks, Plumbs, and Norlunds. Make them awesome again. Most importantly, have some fun!!!!
  • Share on Tumblr