Category Archives: Emergency Preps

Anything that can be thought of as preparedness or preparedness related.

LASIK

by Woodsbum

I have been wearing corrective lenses since I was in 4th grade. My parents took me in at the beginning of my 4th grade school year to get me tested once they discovered that I could not see the rabbits we were hunting on opening day. They were only out about 20 yards, but it was a complete blur. I still remember the day I got my glasses. Everything was slanted, my peripheral vision no longer existed, and I was constantly getting headaches from the distortion when looking through the lenses. It was awful. The only up side was that I could see the kids making fun of me farther than 40 feet away.

It took me 4 years to save up enough money to get myself contact lenses. My parents would not pay for them and told me that I had to do it myself. I still remember the cost being $349 dollars at that time for the exam, lenses, etc. They also made me pay for my own contact solutions until I was in high school so I had to continue to save everything I could to cover costs. This was back in the 1980’s and we were pretty poor as a family with no health insurance, let alone something like VSP.

Once I was able to get contacts, a whole new world opened up to me. I could play sports. Hunting and fishing became SO much easier. My depth perception and peripheral vision with my contacts was almost nonexistent. Kids quit making fun of me quite as much since I didn’t look like Bubbles from Trailer Park Boys anymore. Life was much better. Luckily, I was prescribed RGP (Semi-rigid Gas Permeable) lenses. The first pair lasted almost 7 years. My second pair lasted about 6 and my third pair lasted about 6 as well. That was when I started having problems, but I will talk about that shortly.

The only problem (before I got a bad set of contacts) was that I had to be extremely careful at all times. Camping was difficult since I had to take my contacts out every night. Being outdoors could be a nightmare at times due to dust and floating contaminates. Getting up and trying to function before I put my contacts in was a nightmare. Without correction my eyes were 20/500. Basically, I couldn’t see the stupid “E” on the eye chart without my contacts. Remember that I never wore glasses because the vision that they did give me was horribly distorted and I lost depth perception, peripheral vision, etc. These problems made it difficult to do one of the most important aspects of maintaining my sanity: spend time outdoors.

Speed through my childhood and a good section of my adulthood…..

I finally had insurance for vision. The first time in my life, other than the crappy glasses that the Navy gave me, where I could go get seen and buy corrective lenses at a reduced cost. My wife’s friend recommended this guy that had an office near us so we made appointments and went in to get new “portholes” (Navy/Marine Corps slang for glasses/contacts – as in portholes to the world). He wrote me a new prescription for some RGP lenses and told me that my prescription was way off from what I had been wearing. I didn’t argue, but I found that very odd. Semi-rigid lenses disallow your eyes’ prescription from changing that much because they basically hold the lens of the eye in place. It doesn’t relax, flex, etc., like they normally do as you age. The curvature of my eye was supposedly much different than the contacts I was wearing, according to this eye doctor. Again, I didn’t question it too much because I thought this guy was a good doctor due to all the testimony from my wife’s friends. Long story short, I should have known better.

This visit and subsequent follow up visits to this doctor changed my ability to see decently and made my life miserable for about 10 years. I just could not see decently either distant nor close. It was almost like I had to pick either or. It was so bad that I had to keep reading glasses in my desk at work and a pair of magnifiers at home to do fine, detailed work on things. The answer that I got from follow on doctors was, “You are over 40 so you should just get used to the idea that you will need reading glasses or bifocals”. It really pissed me off because no one was taking the time to work through the bad prescription I got from that asshole my wife’s friends recommended. I could barely see well enough to do my job about half the time unless I took out my contacts for close, detailed work and then used them again for distance. My old glasses caused similar issues, but I could focus within a couple inches from my eye without corrective lenses. It didn’t make sense that “I was just getting older.” Life was really sucking……

Fast forward to now. Starting in late September I decided that it was time to look into corrective eye surgery. Of course my first step was to question those that I knew who had undergone corrective laser surgery.

My father had it back in the 1990s and was able to go without glasses for about 15 years. He can still pass a driving test, but he does wear glasses to shoot and have more clear vision at distance. He also uses reading glasses, but needed them before he got RK.

Both of my daughters received laser eye surgery while Active Duty and it made a huge difference in their lives. My younger daughter had similar issues as I was having with distortion, depth perception, night vision, etc., and was getting constant headaches with corrective lenses. Long story short is that all three of my family member’s lives were changed for the better after their surgery.

When I went in for my initial appointment, I was told that I would have to quit wearing my RGP contacts for at least 5-6 weeks before surgery. This created a problem because I can BARELY function in glasses. To help with this transition I first went to soft contacts for about 5 weeks and then wore glasses for one week. This allowed my eyes to reposition to their natural curvature prior to surgery. This is important so that the correction is appropriate and proper.

The next step really brought me to the day of operation. Of course there were about 5 visits to the eye doctor prior to surgery, but those were to check the curvature of my eye and see if everything had stabilized. On the day of surgery, I was beyond nervous. Suffice it to say that I was terrified. Considering how many issues I have had with my vision over the years, the thought of it either becoming worse somehow or completely losing my vision was far more horrific than death itself. Many won’t comprehend that, but things like that are all based upon personal experiences and fears. Being physically handicapped in any form is my worst fear in life.

I was given a Xanax and a Neurontin when I arrived at the doctor to calm me and help with pain after the surgery. We signed enough paperwork to establish a mortgage on a home, gave them our money, and were put in a “calming area” to wait. There was a nice waterfall thingie next to me and not a wet bar in sight. I could have used a shot or two.

Once they took me into the room, I was told lay down on a table. The doctor physically manipulated my head and shoved it into position. He really didn’t have much of a tender touch. Of course this also led me to become more anxious. Some additional drops were applied to my eyes, an eyelid pry bar was utilized and a weird suction cup thing came down on my eyes (one at a time) that blacked out my vision. Some weird noises and light were inserted into the process and then the repeated it for the other eye. It actually hurt a bit, but was probably more related to my fear than actual pain. This created the “flap” that was needed to get down to the part of my eye that they were going to saw on.

All the apparatus was removed and they then taped my eyelashes to my forehead, used the pry bar again, used some dental tool things to lift up the flap, hit me with some laser lights, put the flap back down, squeegeed the hell out of my eyeball and then repeated for the other eye.

Once done I had a second to kind of get my bearings before they had my stand up and walk over to an eyeball microscope. My eyes were checked, some clear bug shields were duct taped to my face and I was sent home.

Now, I was supposed to have been able to sleep due to the Xanax…..  The Titanic was supposed to float as well. I just rode home with my eyes closed and annoyed that my eyes felt like they were being scrubbed with gravel. I was also supposed to be able to sleep when I got home. That didn’t work so well either. I got home around 1830 (6:30 pm) and remember looking at the clock several times between then and about 2000 (8 pm). I finally was free from the gravel cleaner feeling in my eyeballs by 2130 (9:30 pm) and decided to get up and take off the stupid anti scratch devices that looked like bug shields. Most of the skin and a good portion of the tape residue remained, but the plexiglass walls were removed.

I COULD SEE…..  It was crazy. It is still crazy. For the first time in almost 10 years I can see both up close and far away, but I don’t need corrective lenses to do it. I am amazed…….

My suggestions, recommendations, wisdom to be passed on, etc., for those thinking about this surgery is quite simple. It really is a life changing event, especially for those with vision as bad as mine was. I don’t know how much more I can say, but my life will never be the same. I am truly beyond words to describe the change. My headache caused by eyestrain is gone. I have depth perception again. I can see both up close and at distance. Hell, I can even see decently at night.

If you have the means or ability to save up to get this done, I strongly suggest that you just go for it. One day out and I can only repeat how amazed I am at the change.

  • Share on Tumblr

AOD Wilderness Shirt

by Woodsbum

It has been a while since I first covered my Wilderness Shirt. This thing wears like iron, is warm in winter and allows just enough air flow/layering to span a huge temperature range.

Here it is in all its glory.

Wilderness Shirt

Wilderness Shirt

As you can see, I had to take pictures inside my office. This was because of a few reasons:

  1. I am a complete dufus about taking pictures when I am out in the woods. It won’t happen, thus the reason I have so few posts as of late.
  2. Someone hit me up and really wanted some pictures of the shirt this morning. This compelled me to take advantage of having snapped a few pictures and went forward with this post.

Here is some information about the shirt and how we came to make it.

The shirt was designed by my mother and I. She took care of the actual engineering and I gave all the specifics needed in the design. Although there are a whole pile of “Boreal Shirts” available online, I have not seen any that I actually liked. Either they were unlined and didn’t keep you warm enough or they had design flaws that I felt were lacking in some form.

If you notice, the arms and body of the shirt are quite long. I usually cuff the sleeves for normal wear. I wanted really long arms so that I could tuck the sleeves into gloves/mittens without having to worry about riding up. I also wanted the ability to “turtle” my hands if I did not have gloves. This design is perfect for that.

As for the body being extra long, I wanted the ability to keep my nether region and butt warm while wearing the shirt. When I want to keep a pistol or knife easily accessible, I wear a 2″ wide leather belt over the shirt. It is long enough to not bunch up and allows for the belt to be comfortably worn. This configuration also brings the shirt in closer to my body and keeps me even warmer. There is just enough air flow for spring/fall weather, but with the belt I can raise the 2 position wind flap to keep me quite toasty at temperatures around 0 degrees with only a t shirt on as a base layer.

Wind Flap Full Position

Wind Flap Full Position

Wind Flap Half Position

Wind Flap Half Position

The eyelets/grommets at the neckline allow for 550 cord lacing. Not only does this give me some emergency cordage, but I can cinch down the hood, the neck or both. Since the hood is so big, I can also put the hood down and cinch it all up so that it works to keep my neck warm while wearing a hat. I wear it that way a lot with a scarf or shemagh. It really keeps the air trapped inside the shirt to provide phenomenal protection and warmth when worn that way.

The entire shirt is flannel lined and well sewn. Many shirts I have seen use a wool blanket that doesn’t have as closely knit fibers as the wool we used. This, along with the flannel liner, cuts the wind much better and resists the elements more readily. As for the actual design, the shoulder seams are done in such a way as to disallow stretching even when completely soaked. We are toying with the idea of making an unlined oilskin anorak that will fit over the shirt. Since synthetics ALWAYS leak in extremely wet conditions, I have been pushing for the oilskin solution. We should have some prototypes and start testing that idea this fall. Being in Western Washington allows me to do some pretty intense wet weather testing.

Lining and Seams

Lining and Seams

As you can see, this has gotten a lot of wear over the last couple years. If you ignore the dog fur and remnants of fire prep from my last outing, you would not hardly believe that is was over 2 years old and worn 4-5 times a week in inclement weather.

Cuffs

Cuffs

For those that are wondering, no this does not have any pockets. We have experimented with several pocket designs, but I have not liked how they function. They tend to allow my to weigh my shirt down funny due to packing all my gear in my shirt. I also don’t like how all but arm pockets tend to interfere with my belt I wear. There just doesn’t seem to be that nice “happy medium” that allows for pockets without them becoming a complete hindrance in many situations.

At this time we are taking only a few orders. My mother is too busy building a companion set of bibs that will feature oilskin patches and a fully adjustable waistline. Once those are past the prototype and testing phases she will start accepting orders for the shirts and bibs.

Thank you for looking and hit me up with any questions.

The End

The End

  • Share on Tumblr

Leatherman Tread

by Woodsbum

My wonderful wife ended up getting two discount coupon codes to Leatherman that give special pricing. For my birthday she gave me the codes and told me to pick out what I wanted……

What a freaking AWESOME lady!!!!

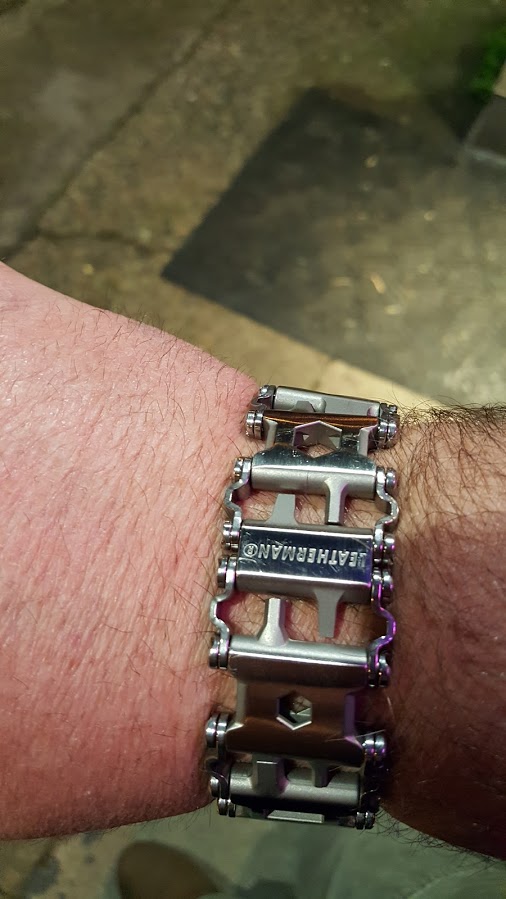
Leatherman Tread

Leatherman Tread

Anyway, one of the things that I picked up was their multitool bracelet called a “Tread.” I found it quite interesting and actually wanted to pick up the additional pieces that allow this to be a watch band. Fast forward about a month and lots of me looking for my watch, me messing with the bracelet, and testing this bad boy as much as I could. Here is what I found.

The Allen wrenches on this are SAE. For some stupid reason every Allen headed bolt that I run into is metric. I have yet to even come close to being able to use one. The screwdrivers have received quite a bit of use, however. Interestingly enough, the bracelet is MUCH easier to use as a screwdriver than a multitool. It seems that it is designed to fold flat with the tool sticking out, thus giving a good handhold to really torque on things. It works quite effectively. There is a cutter type thing that opens letters and cuts string quite well. That is all that I have been able to find to cut with it. The pokey thing that is described as a SIM car remover does work decently as an “Electrical Device Reset Button Pusher.” Other than the beer bottle opener, these are the tools that I have found a need for.

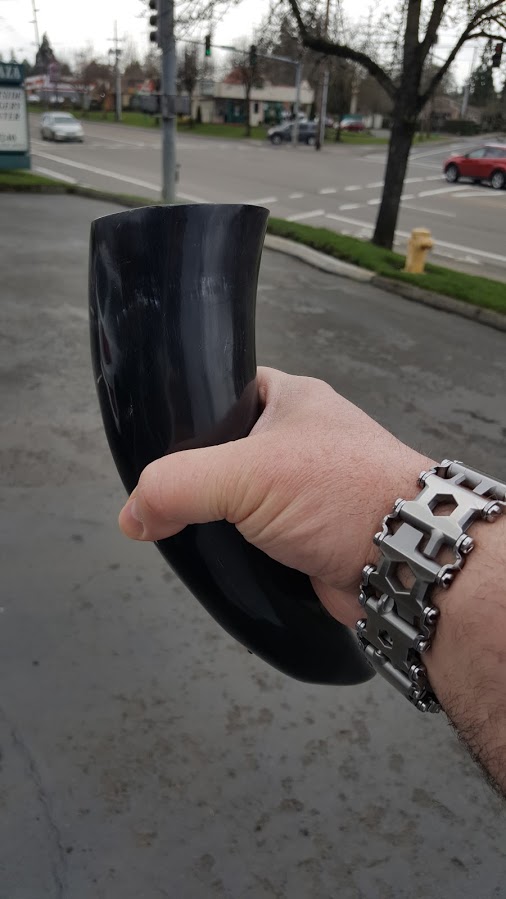
I think that swapping out the square headed bits for metric Allen wrenches would have been a better idea, but all said and done it does work well. For those of you with small wrists, you may have to take out a few links. Mine actually fits perfectly right out of the box. This is kind of odd because I have huge wrists and nothing every seems to fit them. Even my FitBit is on the last notch and pops off on occasion. The Tread is also quite heavy, which I like. It makes it feel like you are toting an actual piece of metal on your arm. Too many tools are just novelty items. This may be novelty and gimmicky, but it at least will take a beating.

Once I find my watch and get some batteries in it I will marry the two up and make it into a watch band with the adapter I purchased.

If I was to do it over again, I would definitely pick it up for the price I got it for. At MSRP, I would think twice just due to the lack of daily use. Spending $170 on a bracelet or $170 on a nice knife will always find me looking for things to cut. It is a great piece of gear, though.

Cheers!

Leatherman Tread

Leatherman Tread

  • Share on Tumblr

Hardtack

by Woodsbum

For those of you who are not sure what hardtack is, think of it like a horribly thick and hard cracker. What is nice is that it will literally last forever. It doesn’t go bad. What I like it for is tossing some hard cheese and meat on it, honey, or use it to dip into a soup. People also eat it as is, but it is a bit bland.

Here is the recipe:


  • 3 cups of white flour
  • 2 teaspoons of salt
  • 1 cup of water

Mix it all together and roll it out into a big square. Cut the dough into about 9 equal portions or just make them about as equal as you can get. Once you get these portioned and cut, use a nail to poke about 14 holes to make it resemble the holes on a saltine cracker.

Bake the pieces on an ungreased cookie sheet at 375 degrees for 30 minutes. Remove them from the sheet and let them cool. They should look like slightly browned, puffy crackers.

Each piece of hardtack is about 150 calories.


  • Share on Tumblr

Zippo Lighters

by Woodsbum

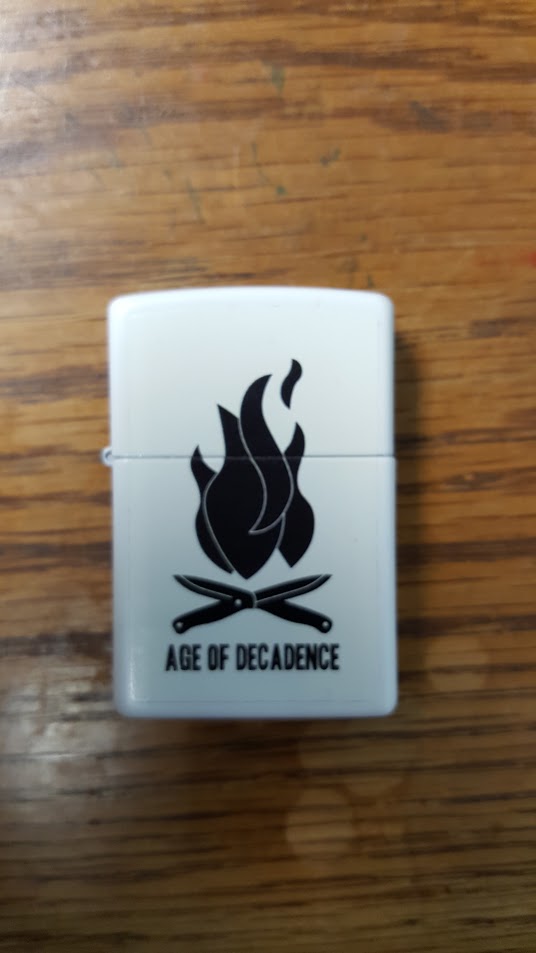
Well, here it is….  I did it again. I bought something with my logo on it.

Zippo

Zippo

I have carried Zippo lighters for years. Although I don’t smoke cigarettes, I do like cigars and tobacco pipes a lot. Cigars are a bit expensive so I do tend to just grab pipe tobacco and go at it that way. Carrying a lighter really isn’t about using it to light tobacco (or other stuff if you live in WA, OR or CO). These things are VERY handy in a variety of situations such as ridding your clothes of those pesky threads, melting the ends of paracord, starting campfires, lighting incense (or sage in my case), etc. Let’s face it, the savior of any birthday party is  the one that has a way to light the candles. Even Dr. Henry Jones carried his lucky charm that allowed him to escape the Nazis (movie reference for those that didn’t catch it).

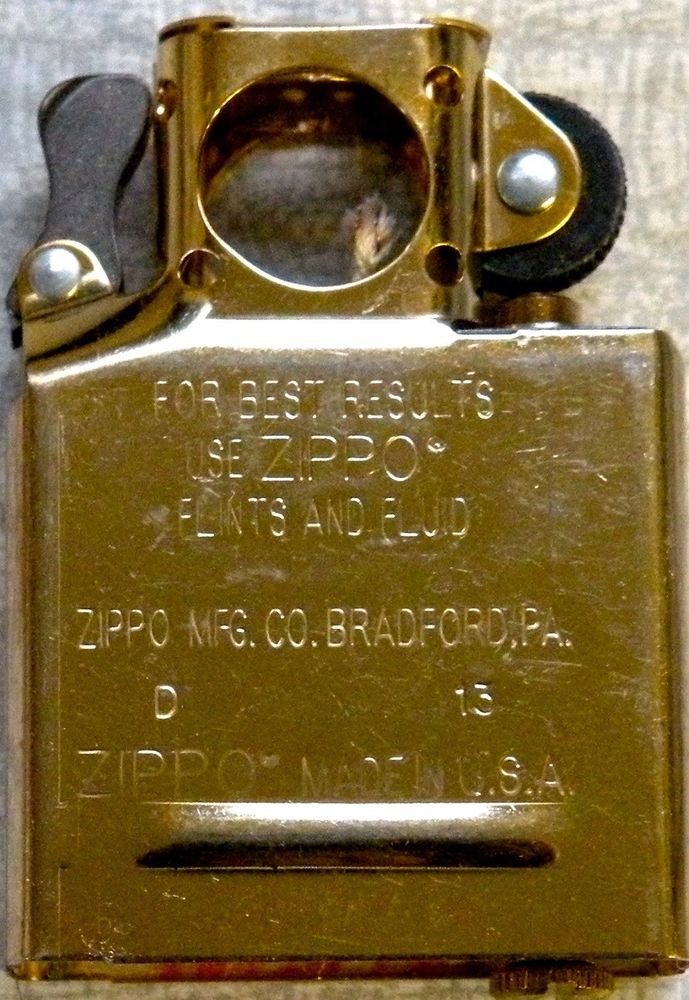
The way that I discovered that Zippo did custom orders was through sending them my older lighters for repair and swapping out standard inserts for pipe ones. The pipe ones have a big hole in them that allows the lighter to be turned sideways without extinguishing the flame.

Pipe insert

Pipe insert

If you have a Zippo, you can actually contact them at this page, send in your lighter and they will replace your normal insert with one designed for a pipe. They have two other lighters of mine right now getting swapped out. Interestingly enough, it is quite difficult to find Zippos with the pipe insert that don’t have a stupid pipe emblem on the bottom. Good luck finding one that is camo or has a Harley emblem either. They just don’t send them out that way. Personally, I think you should be able to buy them from Zippo directly with the option for the type of insert.

Ignoring the fact that I just complained about Zippo in the previous paragraph I really love their lighters and carry one most of the time. They are windproof/resistant, light even when it gets REALLY cold, are tough as hell, and are a piece of gear that you can really depend on as long as you keep it filled with fluid (don’t overfill and put it in your pocket if you don’t want funny rashes on your leg). For those that don’t have a Zippo, I recommend getting and carrying one. It worked for those in WWII, Korea, and Vietnam so if they NEEDED them for survival I guess I should carry one, too, just in case. I know that I am not in a war or having to fight my way from hilltop to hilltop, but if the reality is that a lightweight piece of gear was so important that everyone carried one at one time I have no problems tossing one into my pocket. It just makes sense to learn from my elders when it comes to that sort of stuff.

Now for the important part of this whole post: My Zippo is AWESOME. They really did a great job on it. All I had to do was import my image on the website, center it and pay with a credit card. You can do any number of different types of images from family pictures, personal logos, kid art, whatever. Giving a Zippo with a family picture to your pops for Father’s Day is a great gift idea. The cost is only $15 over the cost of the lighter plus shipping.

Go get yourself a lighter with your personal touch, people!!!

  • Share on Tumblr