Tag Archives: food preparation

Hardtack

by Woodsbum

For those of you who are not sure what hardtack is, think of it like a horribly thick and hard cracker. What is nice is that it will literally last forever. It doesn’t go bad. What I like it for is tossing some hard cheese and meat on it, honey, or use it to dip into a soup. People also eat it as is, but it is a bit bland.

Here is the recipe:


  • 3 cups of white flour
  • 2 teaspoons of salt
  • 1 cup of water

Mix it all together and roll it out into a big square. Cut the dough into about 9 equal portions or just make them about as equal as you can get. Once you get these portioned and cut, use a nail to poke about 14 holes to make it resemble the holes on a saltine cracker.

Bake the pieces on an ungreased cookie sheet at 375 degrees for 30 minutes. Remove them from the sheet and let them cool. They should look like slightly browned, puffy crackers.

Each piece of hardtack is about 150 calories.


  • Share on Tumblr

Plum Preserves

by Woodsbum

Due to travel, it has been a been over a week since my last post. I tell you, life is really crazy.

When I got home I found that the French improved plum tree in my backyard was ready for harvest. We grabbed several bags, one of which was pitted and put into my dehydrator. The other one was pitted and put into a pot for preserves/jam. The recipe we use is a 2 ingredient variety that just takes longer to complete than one that calls for pectin.

The recipe is as follows:

  • Use about a 20 small plum/prune to 4.5 cups of sugar ratio. 12 fruit to 4.5 cups of sugar for the bigger plums.
  • Stir the fruit and sugar up, then leave it to sit for about 2 hours.
Coated and slowly heating plums

Coated and slowly heating plums

  • Heat the mixture up slowly until all the sugar is melted. This should be done on 3/10 or 4/10 on your heat setting. Once the sugar becomes mostly liquid and not all grainy, bring your heat up to 6/10 and get it steadily bubbling.
  • Once your mixture is completely bubbling, turn your heat up to the lower portion of your high setting, 8/10, for about 10 minutes. Stir the mixture constantly.
  • Turn the heat down to about 3/10 and stir it until the bubbling subsides dramatically. Let it simmer for about 10 minutes.
  • Take the mixture off the heat and let it sit until it is cool enough to comfortably sit on the skin without burning.
After first heating

After first heating

  • Repeat the heating process another 4 times to complete a full 5 heating cycles.

Once the final heat is done, take the mixture off the stove and fill your sterilized jars. Just follow current canning standards.

The more times that you heat the mixture, the thicker the preserves/jam will be. If you happen to add too much sugar, you can always just use it as syrup or a sauce. The nice thing about making jellies and jams is that there is no such thing as a bad batch. You just improvise the label and use it a bit differently.

We were finishing our 3rd heating cycle last night so I don’t have any pictures of the finished jam yet. The whole process can take 2-3 days due to the heating and cooling cycles. Because of all the sugar you don’t have to worry about bacteria growing. It is fairly well preserved once the first heat cycle is completed, but the follow up cycles set your consistency and thickness.

Happy jamming!

  • Share on Tumblr

Dehydrating Vegetables

by Woodsbum

The time has come again where I bust out my dehydrator. This week I found a great deal on frozen peas, carrots, and green beans. Somehow I wandered into an almost 40% off deal on store brand bags, so I picked up something like 20 bags of my “soup 3” as I call them. I also ran into a deal on carne asada so I grabbed a package to test it out. In a few weeks our plums should be ready to pick, dehydrate and store.

The reason that I like frozen vegetables for dehydrating is that they are already blanched. It completely skips a tedious step in the process of food preparation. Before you dehydrate fresh vegetables, they need to be blanched first. This involves dipping them in boiling water and then putting them in ice water. Some people say that this is unnecessary, but I have found that they rehydrate better when blanched without turning into veggie flour.

When I dehydrate vegetables, I use my Excalibur unit on 125 degrees for about 12-14 hours. For some reason it seems to take longer to get food dehydrated or jerked here due to humidity. My jerky for example takes about 18-22 hours with all 5 trays full. The carne asada that I use for soups is kind of greasy, but doesn’t have to be cut or prepared before turning into jerky. You can just put it on the trays right after marinating for 24 hours. No cutting, no carving, no fuss involved in the process.

Once I get done dehydrating, I use my Foodsaver vacuum sealer for long term storage. The fruits seem to last a couple years if I completely dehydrate them and seal them in this manner. I end up using my vegetables and jerky before the year is out so I don’t have a good handle on how long they will keep. My sealed packages are kept in a food safe bucket and lid. You can also put them in Mylar bags to keep them longer, but the buckets seem to work well.

I also keep barley and bouillon on hand to make my soups. I start by boiling up some water and then add barley, bouillon, and jerky. After cooking about 30 minutes, I add my vegetables and finish cooking. It should take another 30-45 minutes to finish cooking, depending on altitude.

  • Share on Tumblr

Tips for Cooking Wild Meat

by Woodsbum

Cooking wild meat seems to be one of the many questions that I get on a regular basis. For some reason people don’t know that much about cooking game animals. It might be due to a drastic decrease in the amount of hunters. Maybe it is due to the decrease in the amount of people that can actually cook something that didn’t come in cellophane. No matter what the underlying cause, I hope these tips might help any of you out that are fuzzy on how to prepare and cook game.

Before I start I want to toss out this disclaimer: I am not a chef. I am also not a food preparation or cooking expert. I am just a slightly overweight guy that loves food and has been cooking for himself since he was a teenager. Since I grew up very rural and lived off a lot of wild game, I had to learn how to prepare it where nonhunters would eat it. This is not an easy task, but I have now gotten to the point where some of my preparations have wild game that is almost 100% undetectable to the common city dweller..

This list is not all inclusive, but will give you a little bit of a foundation from which to work from. As times goes on I will include some recipes and meal preparation ideas to assist you in creating some great meals.

The first item I will address is the common response when talking about wild game: “It just tastes too gamy.” This “gamy” taste is usually connected with meat that was not properly cleaned and drained of blood. Although old timers tend to like the flavor that wild meat tends to have, the average grocery grazer has no interest in anything that tastes out of what they consider normal. To keep this taste from overwhelming your dishes you need to follow the following steps.

Several of these tips are associated with grilling or hot smoking. Others are in reference to stewing.

  • Squeeze out all the blood from the meat. Start by soaking the meat for a period of time and then squeeze out all the blood while running the meat under running water. This removes much of the gamy flavor that people complain about. Some people claim that soaking for at least 2 hours in buttermilk, milk, boiling water, apple cider, or even salt water help. I address the apple cider boiling further down the list.
  • Ensure all the “slime” is off the meat. Wild game tends to have an odd slime on the outside of the meat. Before you cook the meat it is important to either brush off or scrape off this “slime.” Inner cuts of meat will not have this slimy layer so many of you who do not process your own game may not know what I am talking about. The think to remember is that you want the meat as clean as possible. Any impurities will cook off or burn off depending on how you cook (for the most part), but it leaves odd flavors in the process.
  • Use liberal amounts of seasoning. Although frying meat does produce its own flavor, grilling meat tends to do two things: adds smoke flavor to the meat and allows added spices or rubs to drip off. The meat will absorb flavor best (in my opinion and experience) when you first start to see the juices coming to the surface. This happens in two stages. Light juice is visible as the cooking side starts to seal up and the moisture is pushed to the top side of the meat. The second time is when the meat is cooked about 1/2 way through. This is when you see standing pools of juice on the meat. I will cover more on this later on.

    Use liberal amounts of seasoning

    Use liberal amounts of seasoning

  • Don’t use too high of temperature when cooking wild game. If you sear the bottom and don’t allow all the seasoning to be fully absorbed throughout the entire cut a lot of the gamy flavor will come out. You will also get an odd texture that many dislike about wild game. Cook the game slowly and over heat ranges (for light smoke/grill/campfire) around 225 degress Fahrenheit.
  • Only flip it once. Keep your eye on the meat and the way that the juices are accumulating on the top side. If you flip the meat too many times it tends to dry out and toughen up. This also changes the texture and changes it to one that people dislike.
  • If you are cooking an animal that tends to be greasy you can boil it for a short time before grilling, smoking or frying. I like to use apple of some sort for what are commonly considered “trash” or “greasy” animals. Such species include raccoon, squirrel, certain types of duck/geese, and bear when it has been living in and around human settlement. These animals all pick up odd flavors from the food that they eat and raccoons are a great example. I like to boil mine in apple for several minutes before I perform my finishing cooking method. Strong flavored meats such as types of goat or pig can be boiled in beer for a few minutes to remove odd game flavors. Both of these methods help with the slime that tends to form on greasy types of meat.

    Be careful when cooking after boiling meat. It will dry out quickly. I caught this squirrel just before it got too dry.

    Be careful when cooking after boiling meat. It will dry out quickly. I caught this squirrel just before it got too dry.

Watching the juice accumulation on the meat is very important. This tells you where in the thickness of meat that the cooking process has reached. As more and more juice accumulates on the top side of the cut, the closer to the center of the cut is cooked. For example:

  • Small droplets begin to form on the top of the cut on the grill. This means that the bottom side has seared shut and juices are beginning to be pushed to the top side. When this happens it is at the tail edge of when seasoning is pulled into the core of the meat. If you have not already seasoned the meat, you should do so quickly. This is also the point where you will end up with a rare cut if you flip it now.
  • Medium sized droplets of juice appearing on the top of the cut mean that you are getting to the medium rare to medium stage of the cooking process. There will be no real standing “puddles” of juice, but the droplets are starting to be big enough to run and join together.

    Shiny top of meat when it gets to the medium rare stage

    Shiny top of meat when it gets to the medium rare stage

  • Standing puddles of juice appearing on the top of the cut mean that the meat has reached the medium well to well stage. Flipping the cut now will leave no pick and an almost grey color throughout the entire cut. This is also the point where the meat starts to dry out and changes texture. Be vary careful at this point. When it looks like “blood” has started to accumulate on top of the cut you have cooked it too long. If you start to see the juices turning color and becoming less clear in nature it is very important to flip the meat quickly and season the other side before the cut dries too much.

These guidelines work great for cooking over open flame or frying, but things change a bit when you are going to stew out a critter. When you are making a stew or doing a “critter” with noodles type dinner it is important to keep an eye on the cooking process. You really need to make sure that the meat is really coming off the bone and the striations are separating with ease. Image that point with chili steak that allows you use a potato masher, but the meat doesn’t turn to mush. It is the perfect “pulled pork” spot. That is what you are looking for. Each section of meat coming off the bone stays together, but can easily be pulled apart. For whatever reason wild game tends to become more like a clam when over cooked in a stew and less like beef or chicken. There is a “perfect” spot, but if you leave it too long it doesn’t make it more tender. It shrivels and the texture becomes odd.

Lastly, a lot of the “drippins” that are used for gravy contain much of the gamy flavor that turns people off. If you can drain some of the juices and dilute it with some beef broth people will like it more.

Those are my main wild critter cooking tips. I will keep referring to them as I add recipes. Hope this helped!!!!

  • Share on Tumblr

Mountain Man MRE

by Woodsbum

For those of you who read my site regularly, this will come as no surprise. I not only like food, but I love doing research. Today I had someone pass along a post someone did about making their own MRE type meals. They called them Mountain Man MRE. What I like about his approach is the way that he takes the time to explain each step in the process of making a full meal. Truly, this is a great post and even if you don’t like the food he prepared you can made necessary modifications as needed.

****************************************************************************

Humans have been preserving their harvest well before modern conveniences like pressure canners and deep freezers were invented. Preserving the harvest was the art of delaying nature’s natural effect on food – spoilage.

how-to-make-modern-mountain-man-mre

Being resourceful… and just plain hungry, our ancestors figured out ways to make food safe to eat long after living food was dead. Fermenting, smoking, drying, grinding, pounding, salting, and/or curing were preservation methods Native Americans, frontiersmen, long hunters, mountain men, and pioneers used.

None of the above, are you?

Maybe you hike, camp, or hunt. What I’m about to share will even be useful to hungry desk jockeys looking for a  protein-rich, healthy snack you won’t find in the processed-food vending machine at the office.

The vast majority of us are not mountain men/women or Amazon explorers (not the online store). We’re simply on a modern-day journey of self-reliance. You have to eat now and later. Learning to preserve foods with traditional methods is a skill you’ll be glad to own when the power grid fails.

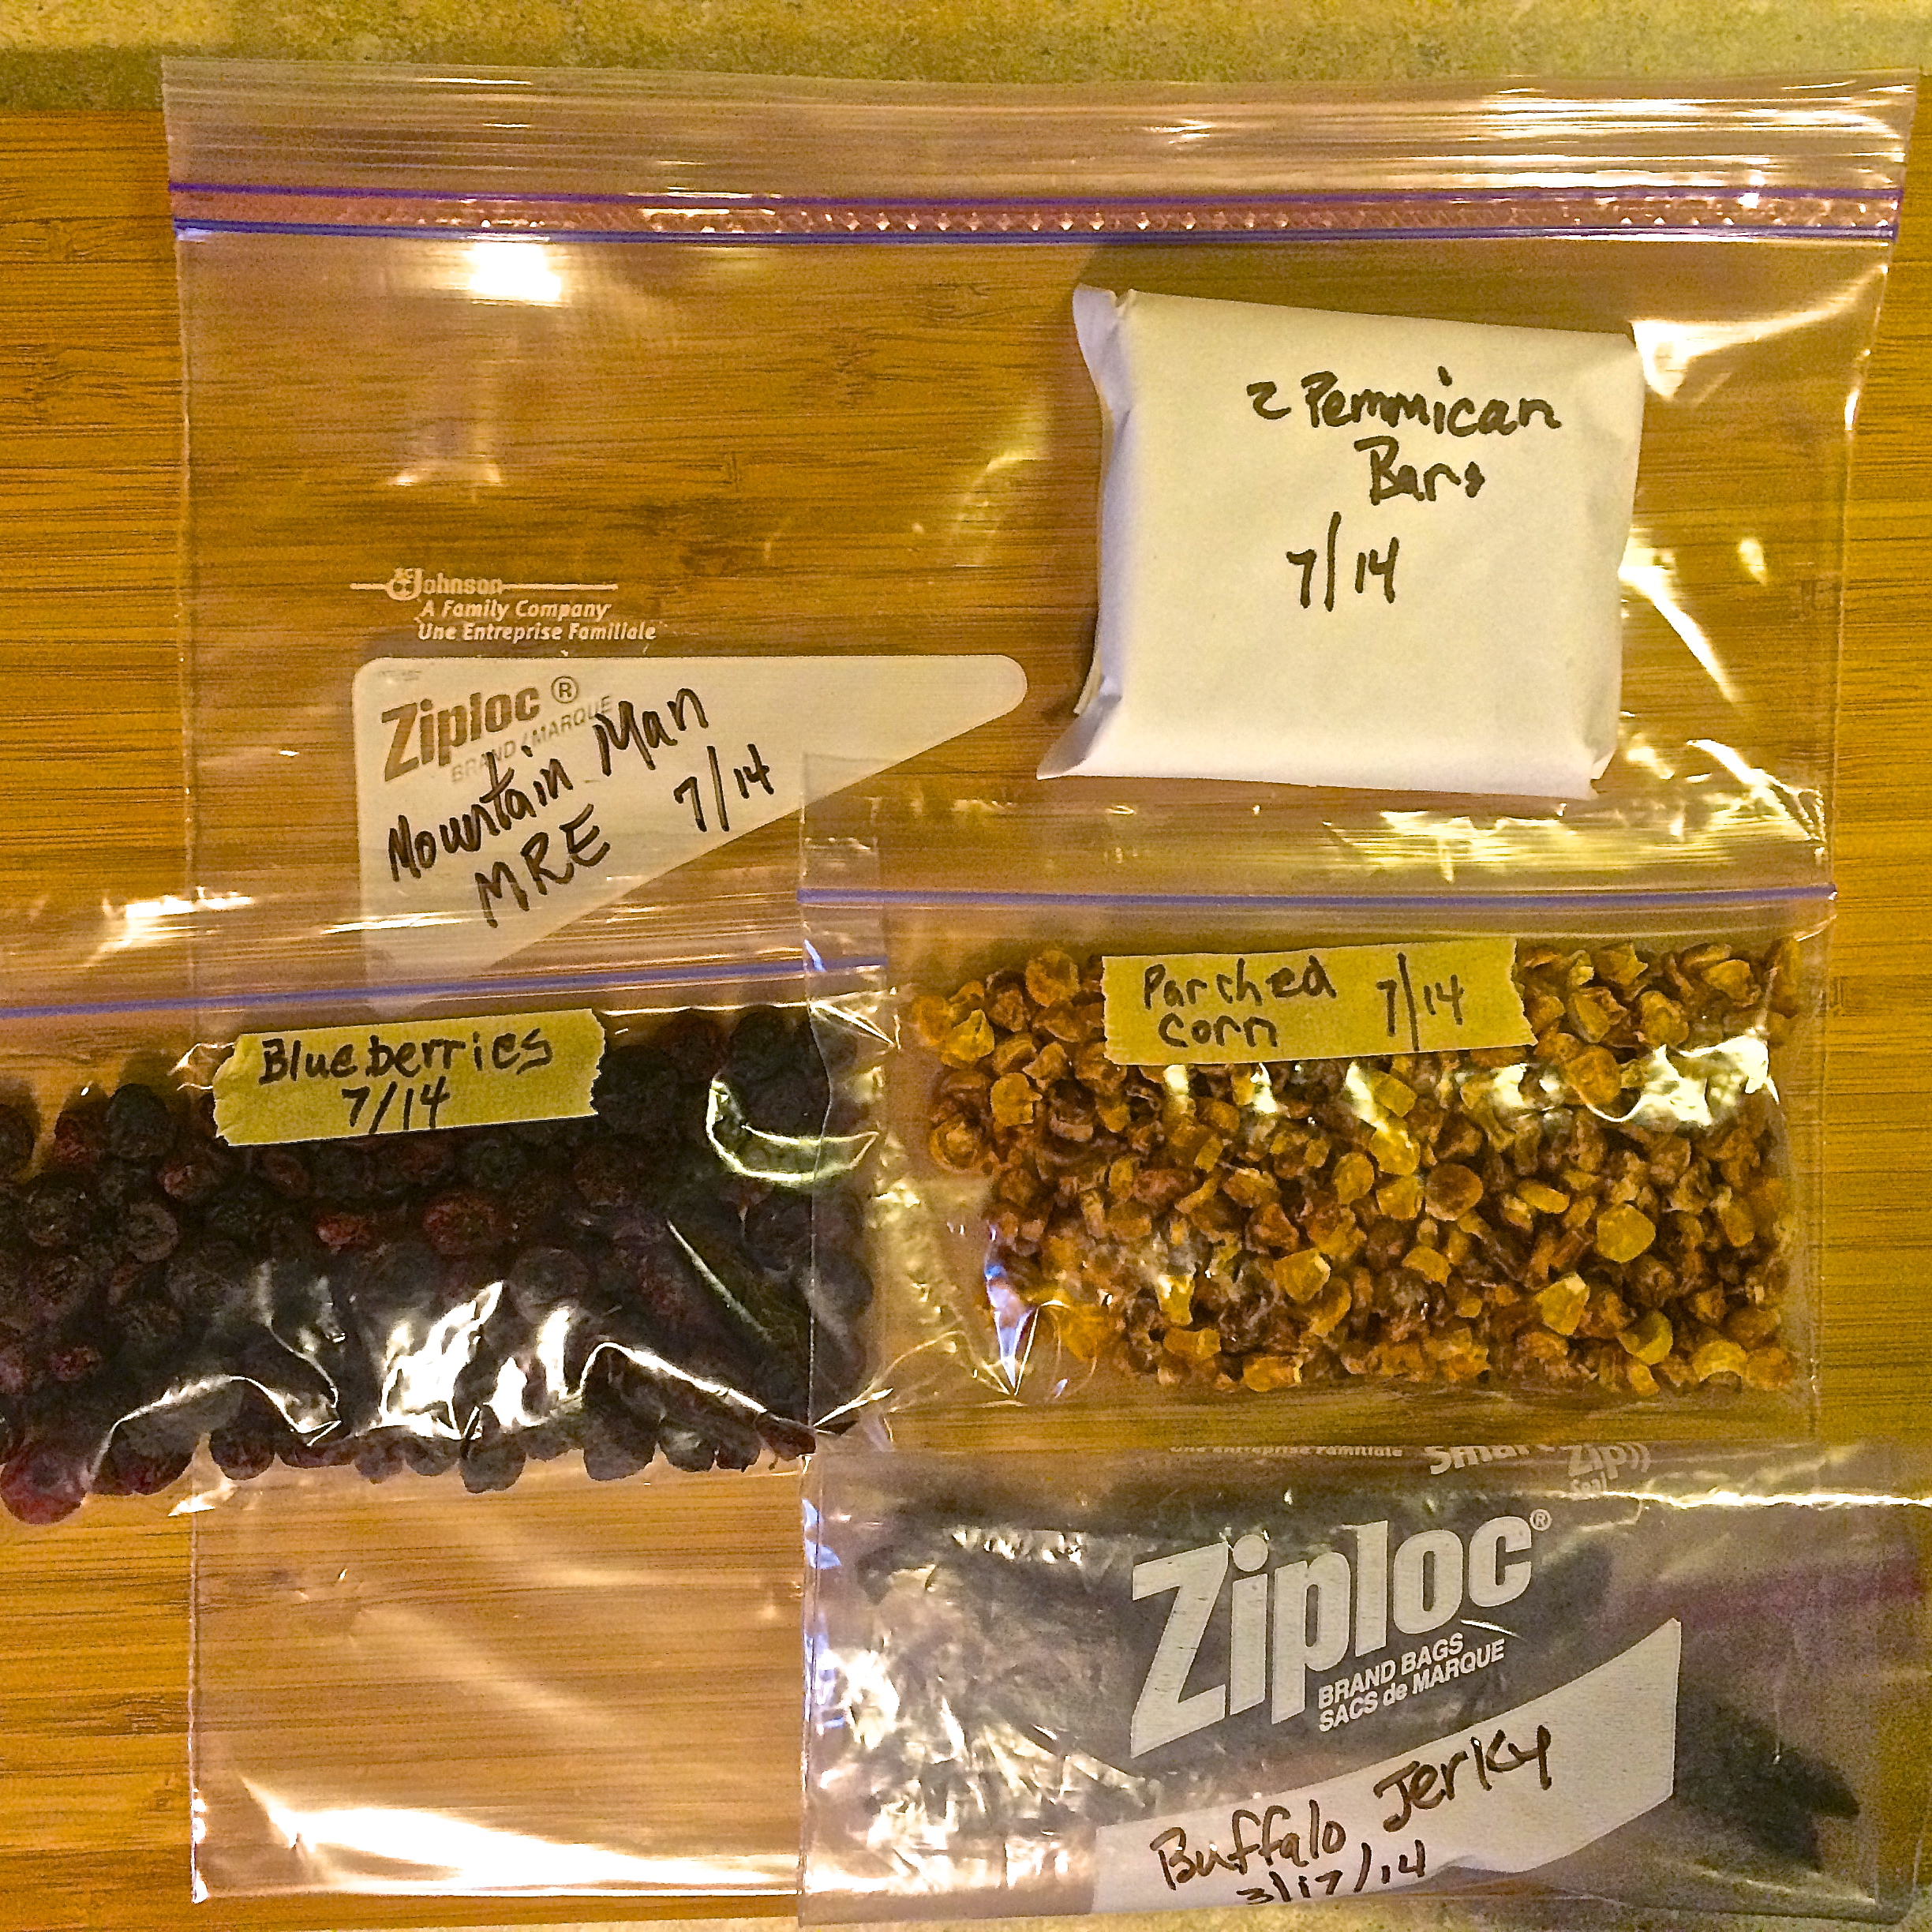
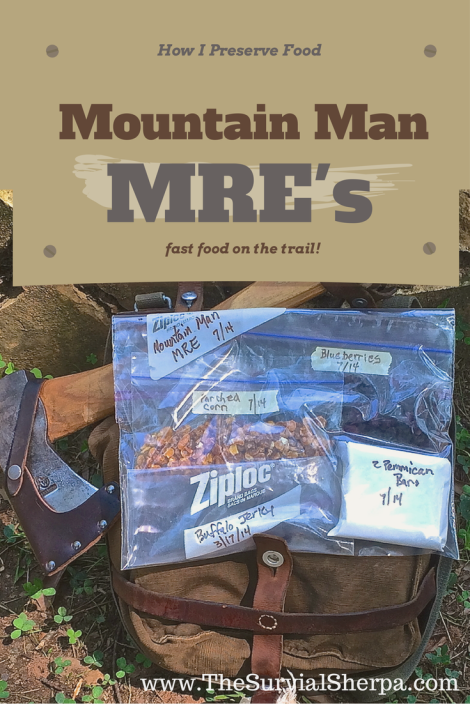
In the meantime, let’s make a Mountain Man MRE (Meals Ready To Eat). The MRE will consist of four items; pemmican, jerky, parched corn, and dried blueberries. Here is another article on our site for pemmican with dried fruit mixed in. Parched corn is being added to the MRE with a brief tutorial. Today’s post will focus on making jerky in traditional fashion – over an open fire.

Modern and old ways will meld together. For instance, I used our electric Excalibur dehydrator for drying corn to parch and made jerky over a fire pit. This is my modern version of traditional trail foods eaten by Native Americans, fur traders, and mountain men.

Our Mountain Man MRE’s need to meet the following criteria:

  • Convenience – similar to pre-packaged, processed fast food – only ours is whole food and healthy
  • Storable – long-lasting without modern refrigeration
  • Transportable – dense, compact, and light-weight (less than 1/2 pound)
  • Tasty – an acquired taste by some but I love this primal stuff

Onto the first item of your MRE…

How to Make Jerky

If this is your first attempt at making jerky, you may want to read how to safely dry meat in my Definitive Guide to Making Jerky.

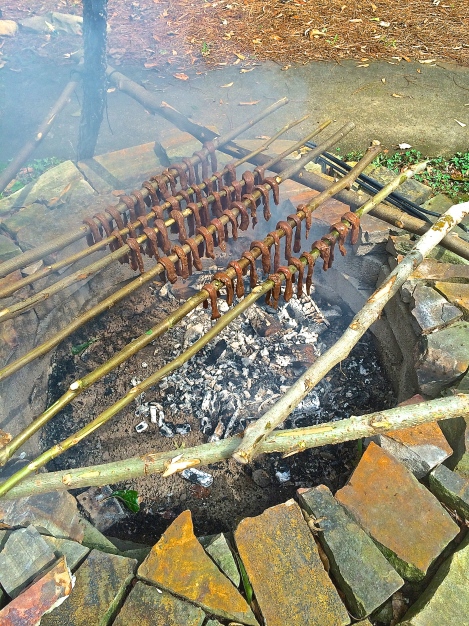
Being a Mountain Man MRE, this was a fine opportunity to dry meat over an open fire. I’ve cooked many meals over campfires but never made jerky this way.

What new stuff did you do today?

Every new preserving technique we own, no matter how small, is one step closer to food independence.

Step 1

Start a fire with hard wood to create a coal bed. A fire pit is nice if you have one. A charcoal grill may work for you.

Step 2

Design a way to hang the meat. I used poplar and sweet gum saplings lashed to my outdoor kitchen tripod.

How to Make Modern Mountain Man MRE's

Step 3

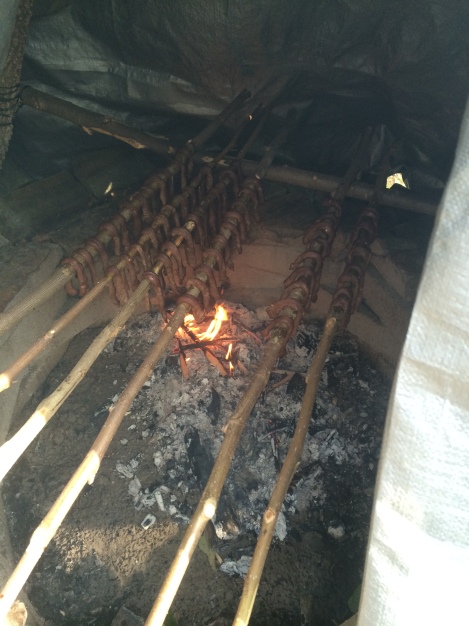
With a bed of coals underneath the rack, place the meat over the heat. The rack was about two feet over the fire.

how-to-make-modern-mountain-man-mre

Jerky hanging

Then the rain came down. I improvised and wrapped a tarp around the tripod which did two things; protected the fire, and created a smoke chamber accidentally.

how-to-make-modern-mountain-man-mre

Smoke house teepee

Step 4

Wait. The meat took about 4 hours to dry on the fire. I keep the coals going from time to time by adding wood at the back of the fire pit. The key here is to keep a constant heat (shoot for 225-250º F) inside the smoke house. Low and slow. You not cooking the meat.

Step 5

Check for doneness. If the jerky strips bends and no fibers are exposed at the bend, it’s not ready to be used for pemmican. You want a very dry meat that can be ground into powder.

how-to-make-modern-mountain-man-mre

Now you’re ready for the next item on our MRE package…

How to Make Traditional Pemmican

Down and dirty (traditional) pemmican consist of dried meat and rendered fat. I’ve seen a few fat-free pemmican recipes on the internet but that idea is just plain ludicrous and feeds the big fat lie. Stick with healthy, grass-fed fat for a satiating trail food. Ever heard of rabbit starvation? If you hate the thought of eating fat, substitute honey as a binding agent instead of tallow. Peanut butter pemmican is another option.

For today’s recipe, we’re using rendered tallow and jerky made over an open fire – mountain man style!

Disclaimer: This was my first attempt at jerking meat over a fire. Not an easy task in the rain – but doable. After the jerky was ready over the fire pit (approximately 4 hours), for added safety, I tossed it into our Excalibur for an extra hour. Also, modern kitchen appliances were used to grind and prep the jerky. The old school method is to place the dried meat on a stone and pound it to a powder. Gotta gather me some stones next time!

 Step 1

You’ll need equal parts of tallow and ground jerky. Here’s how I render tallow. You may add dried fruit to the mix if you like. I prefer the taste without the fruit.

how-to-make-modern-mountain-man-mre

Jerky dried over an open fire

For time’s sake, I used our Vitamix blender to turn jerky strips into a fine powder. Dump the powder in a mixing bowl while your tallow is warming on the stove.
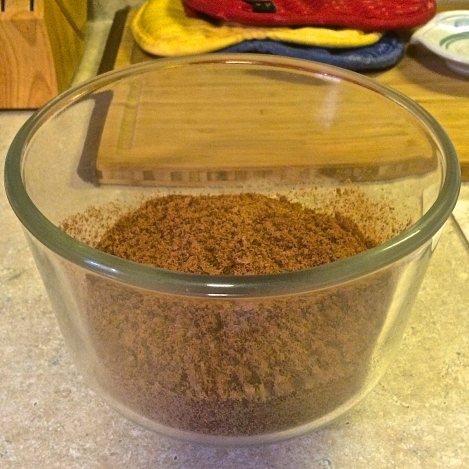
how-to-make-modern-mountain-man-mre

Jerky powder!

how-to-make-modern-mountain-man-mre

Pre-made tallow melting

When heating the tallow, don’t allow it to get so hot that it smokes/burns. Low to medium heat here.

Step 2

Pour a small amount of tallow into the powdered jerky and stir. Don’t pour all the tallow in at once. It’s easier to add more tallow than to grind more jerky.

how-to-make-modern-mountain-man-mre

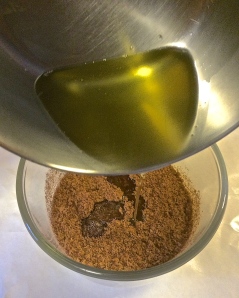
It took two pours of tallow for the correct consistency

Step 3

You’ll know when you’ve got enough tallow mixed in with the jerky when it compresses without crumbling.

how-to-make-modern-mountain-man-mre

Needs more tallow

Add too much tallow and the pemmican’s jerky flavor will be overwhelmed by tallow. Mix while your tallow is warm to better saturate the meat powder.

Step 4

When the right consistency is achieved, add mixture to a loaf pan. Press it down evenly into the bottom of the pan. Place a piece of wax paper on the counter and, with one motion, drop the upside down loaf pan onto the paper. Lift the pan and you should have perfect pemmican. Another option is to form pemmican patties or balls. I’ve thought about sprinkling powered sugar on top and slipping these on the snack table at faculty meetings. 😉 I’ll video the response and get back with you.
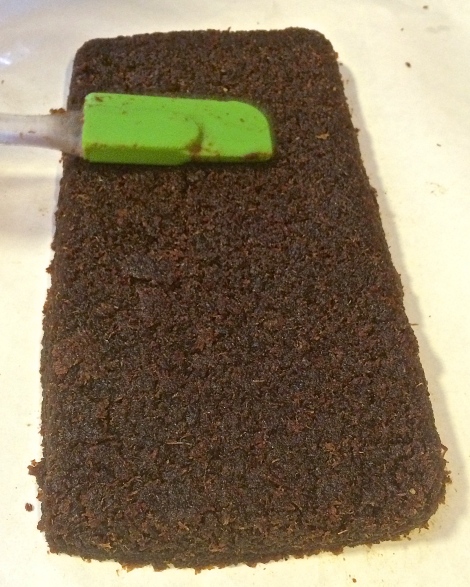
how-to-make-modern-mountain-man-mre

Pemmican loaf!

Wrap the wax paper around the loaf and place it in the refrigerator until the tallow hardens. Slice into individual serving sizes and wrap in wax paper. Place in a container (ziplock bag or paper bag) for your next adventure. Wax paper and ziplock baggies have redundant uses… wax paper = fire starter; ziplock bags = container.

Or – go fur trader style and stash your fresh pemmican in a “parfleche” – an untanned animal skin bag. For further reading on the benefits of this amazing trail food, check out my article on Bread of the Wilderness.

Pemmican may be eaten as stand alone snack/meal or added to beef up wild onion soup for a hot trail meal.

Add the third item to your MRE…

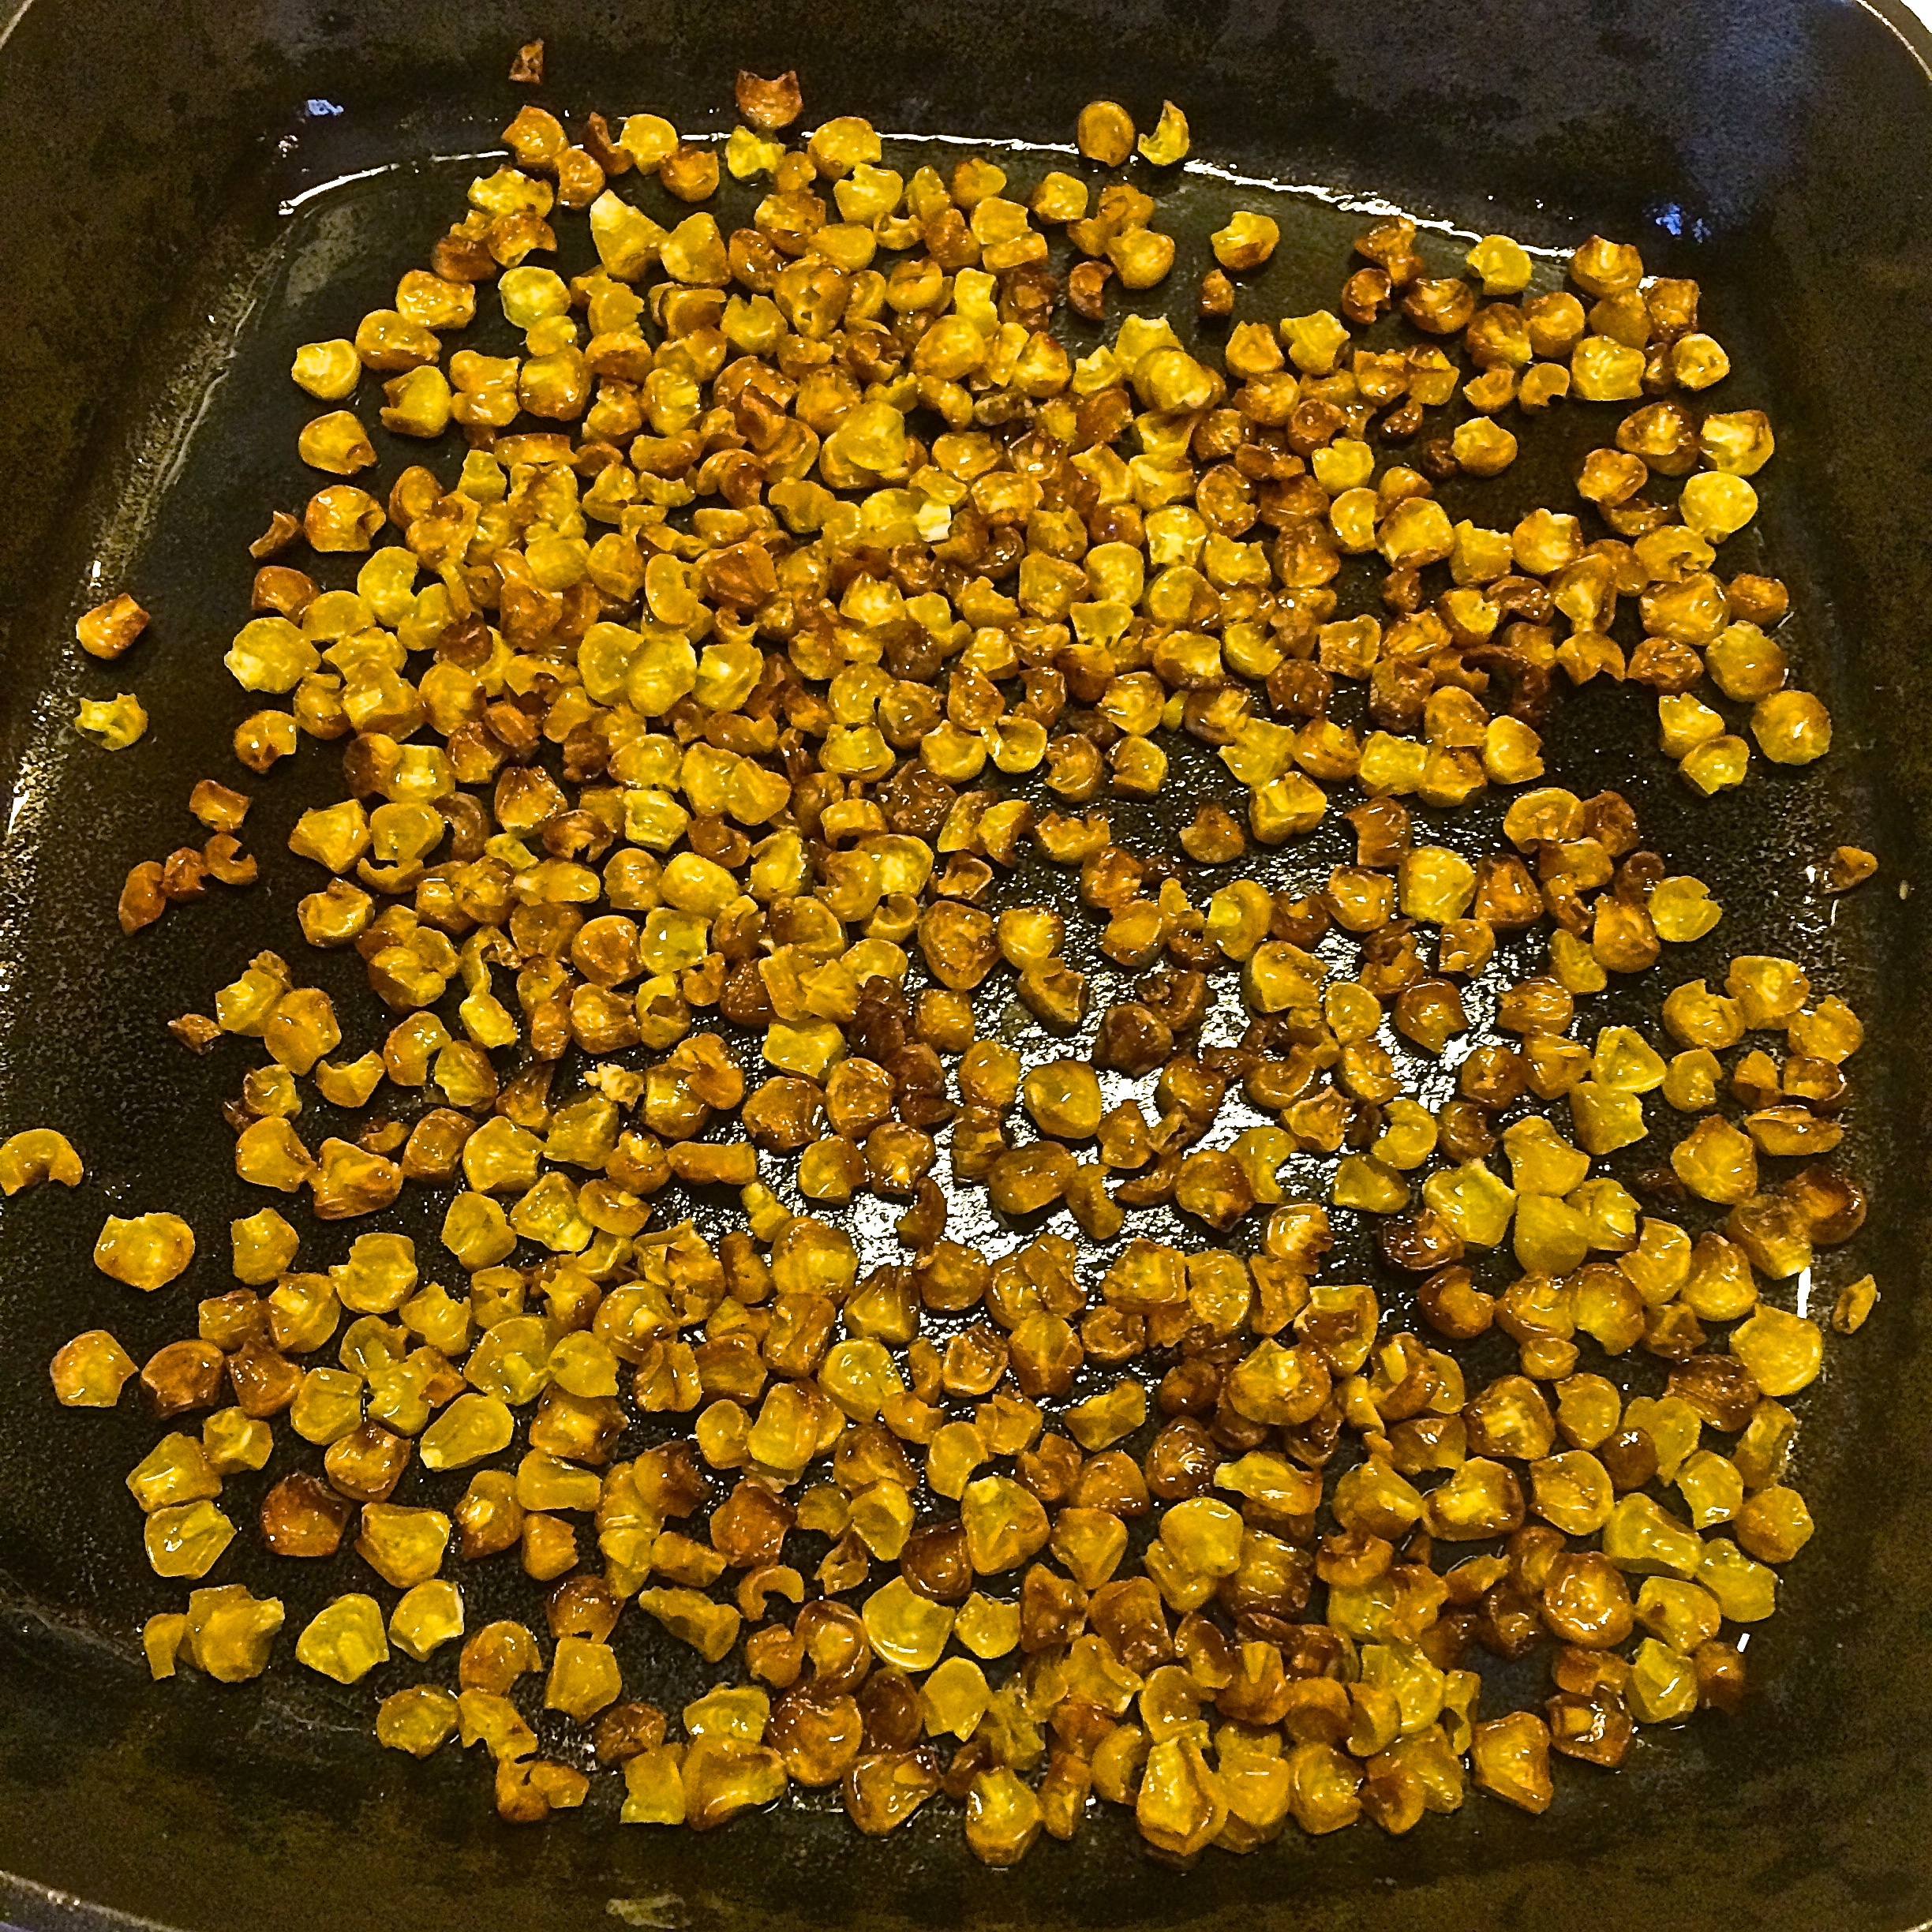
How to Make Parched Corn

Dried corn that has been roasted is called parched corn. Removing/reducing he moisture content makes the corn last a long time. Parched corn is easier on the teeth than plain dried corn. You’ve bitten a popcorn kernel before, right?

Ideally, you’d walk out to your corn crib and grab a few ears. If you’re like me, you may not have access to dried corn on the cob. Dirt Road Girl and I took a road trip looking for dried corn. We stopped at a local organic farm we buy from, but their corn crop was gone and stalks plowed under.

We ended up buying two green ears for this experiment. I shucked them and tossed them into our dehydrator as a test – along with a bag of frozen organic grocery store corn. The bag corn was cut from the cob. Traditionally, you’d want the whole kernel. We adapted and used the cut corn. Dehydrating corn on the cob was a big waste of time.

Step 1

Heat a pan/skillet over medium heat. You can parch corn in a dry pan or with oil added. I tried both and found the dry pan batch tasted the best. You’d think bacon fat would make anything taste better. Not with the corn.

how-to-make-modern-mountain-man-mre

Parching with bacon grease

Add salt or other spices (optional) to the pan and cover the bottom of the pan with a single layer of dried corn. Shake the pan to keep the corn from scorching. A spatula is also helpful for stirring. Keep the pan and corn moving for a few minutes until it turns golden brown. Dump that batch and add another.

Step 2

Allow it to cool and bag and tag your snack. Pretty simple.

how-to-make-modern-mountain-man-mre

The completed Modern Mountain Man MRE!

Pictured above is the full-meal deal: Two bars of pemmican, one bag of parched corn, one bag (about 8 pc.) of water buffalo jerky, and a bag of dehydrated blueberries. The entire Mountain Man MRE weighed less than 1/2 pound (0.418 # to be exact).

Where’s the bread? Since I don’t eat bread, I didn’t include traditional hardtack in the MRE. Survival News Online has a great how-to for your reference if you’d like to make your own.

Hopefully, this light-weight, nutrient dense MRE will keep you moving on your next outing. Toss it in your coat pocket or haversack and you’re set for mobile fast food on the trail!

To see how a few of my Prepared Blogger friends preserve foods, check out our “How We Preserve Foods” round robin below with over 20 articles to help you achieve food independence!

Keep Doing the Stuff of Self-Reliance,

Todd

****************************************************************************

Now I am not sure how many people will actually go out and make these full meals for themselves. To be totally honest, there is little doubt in my mind that I will. There is a huge chance that I will take the time to do the fruits and pemmican to supplement my already massive jerky batches that I do. The parched corn just doesn’t seem like something I would like considering how bad my stomach reacts to greases. If I could find a way to parch it without actually frying it, I might give it a try. That would mean that I was grilling it, however, and the individual kernels will almost definitely fall through the grates during the attempt….

Have fun and stay safe everyone!!!

  • Share on Tumblr