Category Archives: Emergency Preps

Anything that can be thought of as preparedness or preparedness related.

Fireplace Inserts

by Woodsbum

I lucked out the other day and ended up getting a fireplace insert for $50. Of course it was used, but the fan worked and the overall structure seemed to be without any visible flaws. Yesterday I stopped by the local wood stove shop and picked up the insulation I needed to install the insert and get it ready for use this winter.

We have regularly used our fireplace, but have found that it doesn’t work as well as we really would have liked. There always seems to be more of a draft and less heat produced than what we need to truly heat the house. My father has fireplace inserts in his home, both upstairs and downstairs, and they heat his entire house quite efficiently. Getting this insert should really help us out, especially on those cold nights where anything but wood heat just seems to leave you chilled to the bone.

Here is a picture of the monster we picked up.

Fireplace Insert

Fireplace Insert

I know that I have some work to do with regard to the surface rust. At this point I have not decided if I want to use Rustoleum type grill paint on it or if I should treat it like a cast iron skillet and just season it. Either way I know that the house is going to get a bit stinky and the wife will have to be elsewhere when I do the work. I also know that I will need to get a fire resistant carpet in front of the doors to ensure I don’t burn my carpet. If that were to happen my wife’s dog, which is the butt you see in the picture, would not be happy. That spot she is sleeping in is really her “spot.”

For those that don’t have the money or desire to mess around with wood burning stoves, I highly suggest fireplace inserts. They are easy to work with and do the same job without all the installation hassles. The insert also keeps all the cold air and drafts from fighting with your electric heat if you have that. Either way it is definitely a win/win situation if you can get one at a reasonable price.

  • Share on Tumblr

Signs of Hot Reloads

by Woodsbum

Because I ran some ladder tests and worked up some reloading information for my 45-70 that I was going to post on Wednesday, I felt that it would be prudent to post information regarding the signs of hot reloads and excessive pressure.

The following video covers this quite nicely and has some really good examples of extremes to look for.

Here is another video that goes over pressure and how to evaluate hand loads.

This video discusses how to take listed reloading data and check to ensure you have not exceeded the maximum powder charge.

  • Share on Tumblr

Feed Family Of 4 For 1 Year at $300 Cost

by Woodsbum

My aunt forwarded this link to me about putting enough food back for an entire family. I thought that some might like to see this recipe and article.

Before I start, as I always do, I put out there that I don’t think of myself as a “prepper.” In my life I have seen enough hard times to know that everyone should put things back to cover themselves and their family in case of hard times. Times such as a job loss, downturn in the economy that makes meeting bills almost impossible, weather issues where resupply of food isn’t timely, etc. There are just too many instances where having food and supplies put back is necessary. I guess if you are waiting for the end of times, this article would be good for you too.

I would also like to point out that I AM NOT A NUTRITIONIST AND DID NOT WRITE THIS ARTICLE. If you have any comments against the veracity of this article then follow the link that it come from and argue it out with them. It is important to mention that even if you only do this for supplemental purposes, you can use the dried beans for a multitude of other purposes. Dried beans can be ground into flour and uses as such or even ground up with water to become a butter or oil substitute.

******************************************************************************

This plan is THE fastest, cheapest and easiest way to start a food storage program.  You are done in a weekend. AND there are no hassles with rotating.  Pack it and forget.  It’s space efficient – everything is consolidated into a few 5-gallon buckets.  You’ll sleep content in knowing that you have a one-year food supply on hand for your family should you ever need.


With the exception of dairy and Vitamin B12, this bean soup recipe will fulfill all your basic nutritional needs.  It won’t fill all of your wants, but using this as your starting point, you can add the stuff that you want. 


All of the food and storing supplies listed below plus 2 55-gallon recycled barrels to be used for rain catchment cost me $296, including taxes.  I purchased rice, bouillon and salt from SAM’s Club.  You can buy small bags of barley at the grocery, but if you don’t mind waiting a few days, special ordering a bulk bag from Whole Foods was cheaper.  All of the beans I purchased from Kroger’s in 1-lb bags.  Buckets, lids, Mylar bags and rain barrels were from the Lexington Container Company.  Their prices are so good, with such a great selection that it’s worth a drive even if you are not in the local area.   I went on a second-Saturday of the month because that’s when they host free food storage courses taught by Suzanne, an energetic, delight of prepping wisdom.  http://www.lexingtoncontainercompany.com/


What you need:

8 5-gallon buckets

8 large Mylar bags

8 2,000 cc oxygen absorbers

8 gamma lids

A handful of bay leaves 

90 lbs. of white rice

22 lbs. of kidney beans

22 lbs. of barley

22 lbs. of yellow lentils

5.5 lbs. of split green peas

5.5 lbs. of garbanzo beans

1 lb. of salt

A big box of beef and chicken bouillon. 

A measuring cup


What you’ll do

Install the gamma lids on the bucket and insert Mylar bags.  Place 2 or 3 bay leaves in the bottom and fill the buckets, adding more bay leaves after each 1/3 to full.  Place an oxygen absorber in the top.  Label buckets with the contents and date. 


Fill

  • 3 buckets with rice (shake it down good.  Get it all in there!)
  • 1 bucket each of kidney beans, barley, and yellow lentils
  • In 1 bucket store the split green peas, garbanzo beans, salt, measuring cup and bouillon.  (I removed the bouillon from the box and vacuum sealed it as bouillon contains a small amount of oil.)
  • Yep, that’s a total of 7 buckets, so far. 


I place a broom handle across the bucket and wrap the ends of the Mylar bag over the broom handle to give me some support.  Then slowly and smoothly run a hot iron over the Mylar bag to seal all except the last 2 inches.  Then I press out as much air as possible before sealing the remaining 2 inches.  Make sure your Mylar is completely sealed from end to end.  Now, stuff the bag into the bucket and rotate the gamma lid into place.    This will protect your food for about 25 years.   You’ll have excess Mylar bag at the top.  Don’t cut it off, that way if you have to cut it open to get into it, you have enough bag remaining to reseal.


Where you’ll put it

It’s pretty easy to find a place for 7 to 8 5-gallon buckets even in the smallest of apartments.  Discard the box springs and lay the kid’s mattress on top of the buckets, line the back of a large closet with the buckets.  I made a couch-table by stacking buckets two high between the couch and the wall.  The buckets are about 6” taller than the back of the couch.  Add a shelf and drape and it looks fine; a convenient place for a lamp and books.  Get creative.


Making your bean soup

Measure out
·        8 oz of rice
·        2 oz of red kidney beans
·        2 oz of pearl barley
·        2 oz of lintels
·        1 oz of split green peas
·        1 oz of chick peas/garbanzo’s


Add 6-7 quarts of water.  Add bouillon or salt to taste.  Then add any other meats, vegetables, potatoes or seasonings you have on hand. Bring to a boil and then let simmer for two hours.  You should have enough to feed 4 people for two days.  This is thick and hearty.  You will be warm on the inside and full with one large bowl.  Kids usually eat half a bowl.  


When the emergency is over

This system allows you to open the Mylar bags, retrieve as much of the ingredients as is needed and then reseal everything after the emergency has passed.  Just be sure to replace the ingredients used so that you always have a one-year supply.


The 8th bucket – other stuff I would want

This list isn’t included in the $300.  This falls into the “what I want” category.  As money and resources became available, I’d just go crazy adding all of my indulgences, starting with coffee!  You can add what you want, but I’d fill it with:

  • Dry onion.  Let’s face it, what’s bean soup without onion! Sprinkle on the onions just before serving.
  • “Just add water” cornbread mix packets.  I just can’t eat bean soup without cornbread.
  • Beef jerky and Vienna sausages.  Add protein and zest to the bean soup
  • Instant oatmeal.  Do you really want bean soup for breakfast?  Freeze the oatmeal for 3 days before packing to kill any bugs.
  • 10 lbs of jellybeans.  Now, don’t laugh – it’s a bean.  Jellybeans don’t melt like chocolate might.  The high sugar content is quick energy, and a morale booster – with just enough of a high to help you over the really bad days. Easter is about here – stock up!


Before you fill the 8th bucket

Buy small bags of the ingredients and fix a big pot of bean soup for dinner.  Eat the leftovers the second night, and 3rd night, until it’s all gone.  Find out now – rather than later – what your family might like to add to it.  Anything tastes great the first meal, but quickly becomes boring after the 3rd or 4th repeat.  Don’t wait until the emergency happens to discover what you SHOULD have stored in your 8th bucket. … Maybe some Beano!

******************************************************************************

Again, I am not saying that I believe there will be some “End of the World as We Know It” type event. I am saying that everyone has a responsibility to take care of themselves and theirs in case of a disaster so planning ahead is a very responsible thing to do.

I will be putting this pile of chow together in the next few months to enhance my current food supplies. One doesn’t know what may or may not happen so having the extra food on hand if uninvited guests show up, things go bad for a long time, or you just want to outfit your camper with a food cache this recipe is a good way to do that inexpensively.

  • Share on Tumblr

Proper Fit of Body Armor

by Woodsbum

Now that I have body armor and have been wearing it around a bit to see how well it wears, a thought kept creeping into my head, “Is this expense really fit properly and am I wearing it correctly?”

When I was in the military we wore flak jackets. Considering it was simply a vest that you put on, it was quite difficult to wear it incorrectly. Even the new military armor systems are difficult to wear incorrectly because they are also vest type construction that offers very little adjustment.

Here is the article that Gunguy found and sent to me:

******************************************************************************

Body armor is meant to keep you in the fight.  It should protect the vital organs which, if hit, would quickly take you down and prevent you from putting rounds on target. The possibility of saving your life is a secondary benefit of body armor.  With this purpose in mind we must understand those structures we need to protect which we can realistically protect while still maintaining a great degree of mobility.

Our primary concern is the heart and the large blood vessels which sprout from the top of the heart: the superior vena cava, the arch of the aorta and the pulmonary trunk. These vessels are collectively referred to as “the great vessels”.

The heart is important for its obvious function of providing pressure to circulate blood to the lungs via the right side of the heart and then on to the body via the left side of the heart.  Within the body the heart lies left of center, with its apex near the left nipple.  Thus, while fitting a plate as a general guideline we must select a plate which will cover the nipples to ensure the entire heart is protected.  Note that in some individuals the nipples may be more lateral than the apex of the heart.

The great vessels of the heart lie directly behind the uppermost portion of the sternum, known as the manubrium, and sit directly on top of the heart.  The great vessels wrap and twist around each other, making it likely that a hit to one will likely perforate another and result in massive hemorrhage.

Arguably the most important of the three great vessels in the Aorta, due to its size and high velocity of blood flow, 5 liters a minute.  The average 165 pound man has 5 liters of blood in his body and thus can completely bleed out within one minute if the Aorta is dramatically perforated.  Loss of consciousness can occur with less than 40% of blood loss, approximately two liters, and thus can occur in well under a minute.

Of equal importance to the heart is the respiratory diaphragm, the muscle which, when contracting, allows you to decrease air pressure within your lungs and thus draw in air. Destroy the diaphragm and you destroy one’s ability to breath.  Protecting the entirety of the respiratory diaphragm is not realistic, but the majority of it will be protected by a properly fitted plate.  The diaphragm is dome shaped, following the bottom of your rib cage and doming up into the chest cavity.

Protecting the vertebral column goes without saying -we wish to protect as much of this as possible without sacrificing mobility. Unfortunately, protecting the entire vertebral column is not realistic at this time.

It is important to note that a hit to the lungs may prove to eventually be lethal through blood loss or tension pneumothorax, but is not nearly as lethal as quickly as a hit to the heart and its great vessels. The liver and kidneys, while highly vascular, are also not immediately incapacitating and thus are of secondary concern.  The rest of the viscera in your abdomen are of tertiary concern.

Finding Balance:  Protection vs Mobility

When properly fitted a chest plate should not impinge on the anterior deltoids or pectoralis major muscles when punching out with a handgun or carbine.  Any impingement on the shoulder may create discomfort, premature fatigue and possibly even aggravate certain shoulder conditions.  In some cases too large of a plate may prevent a shooter from assuming an ideal hold on their weapon.  This, and even discomfort, can translate to misses down range.

A slightly smaller chest plate which fits with no impingement while punching out will not expose the heart as long as it still covers the nipples.  A smaller plate will translate to a small increase in exposure of peripheral lung tissue and abdominal viscera, but these are organs which can take a hit without immediate consequences to the shooter.  As stated previously, a shot to the lung, liver or kidney is not immediately fatal.  This should be considered when choosing a plate that fits properly.

NORNAVEOD i Meymaneh i Afghanistan

Positioning of the Front/Chest plate

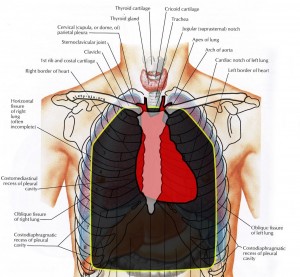
The top of your chest plate should be at the level of your suprasternal notch, which is also known as the jugular notch.  Tracing the sternum with a finger superiorly, the soft spot you reach at the top of the sternum is the suprasternal notch.  If you press in with your finger and choke yourself you are in the right spot.  The chest plate should ride at least level with the top of your sternum while standing.  An easy way to ensure this is to place a finger in your suprasternal notch and position the plate such that the top of the plate touches the bottom of your finger.

Reference image (anterior view)

  • Red is your heart and related blood vessels
  • Dark Grey/Yellow is a properly positioned plate.
  • The sternum and clavicle are white with black outline

proper_wear_of_armor_2

Positioning of rear/back plate

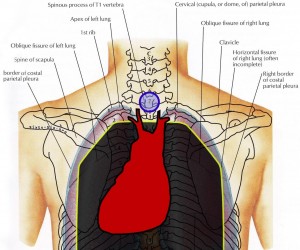
Find the most prominent bony eminence at the base of your neck. This is your vertebral eminence. Count down two bony spinousus (or measure down about 1.5 inches) and that should be above the level of the superior aspect of your sternum and thus level with the top of your front plate. Positioning at least this high will ensure your entire heart and the great vessels are protected from a shot to the back.  The front and back plate should be level with one another when viewed from the side.

The vertebral eminence is marked in the diagram below in blue.
proper_wear_of_armor_3

Side and Shoulder Plates

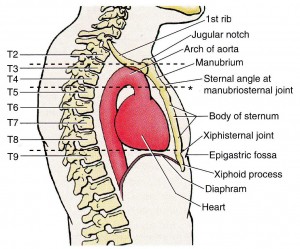
Side plates are intended to protect the highly vascular elements of your abdomen. They were introduced to prevent troops from bleeding out in the chopper on the way to the field hospital. Side plates were not necessarily intended to protect the heart, but if you wear them high up into your armpits you can protect some of the lower portion of your heart.

Protecting your heart from a shot to side is accomplished by shoulder plates, such as the ones manufactured by Crye Precision.
proper_wear_of_armor_4

To Sum it Up

  • Chest/Front plate:  Even with top of the sternum while standing and covering the entirety of each nipple.  For best fit, the plate should not impinge on the shoulder when presenting a weapon.
  • Back/Rear plate:  Should lie no lower than an inch below your vertebral prominence.  A back plate one size larger than a chest plate is optimal.
  • Side plates:  The higher they ride the better.

An example of proper chest plate positioning

proper_wear_of_armor_5

An example of improper chest plate positioning

******************************************************************************

Hopefully, this article will help you to understand how hard plates work. Obviously, you will not be walking around like a juggernaut and completely bulletproof from toenail to beanie. You also don’t want to go into a dangerous situation in a Speedo and flip flops. Find what works for you and just make sure you wear it as intended.

Good luck!!!!

  • Share on Tumblr

Grain Mill

by Woodsbum

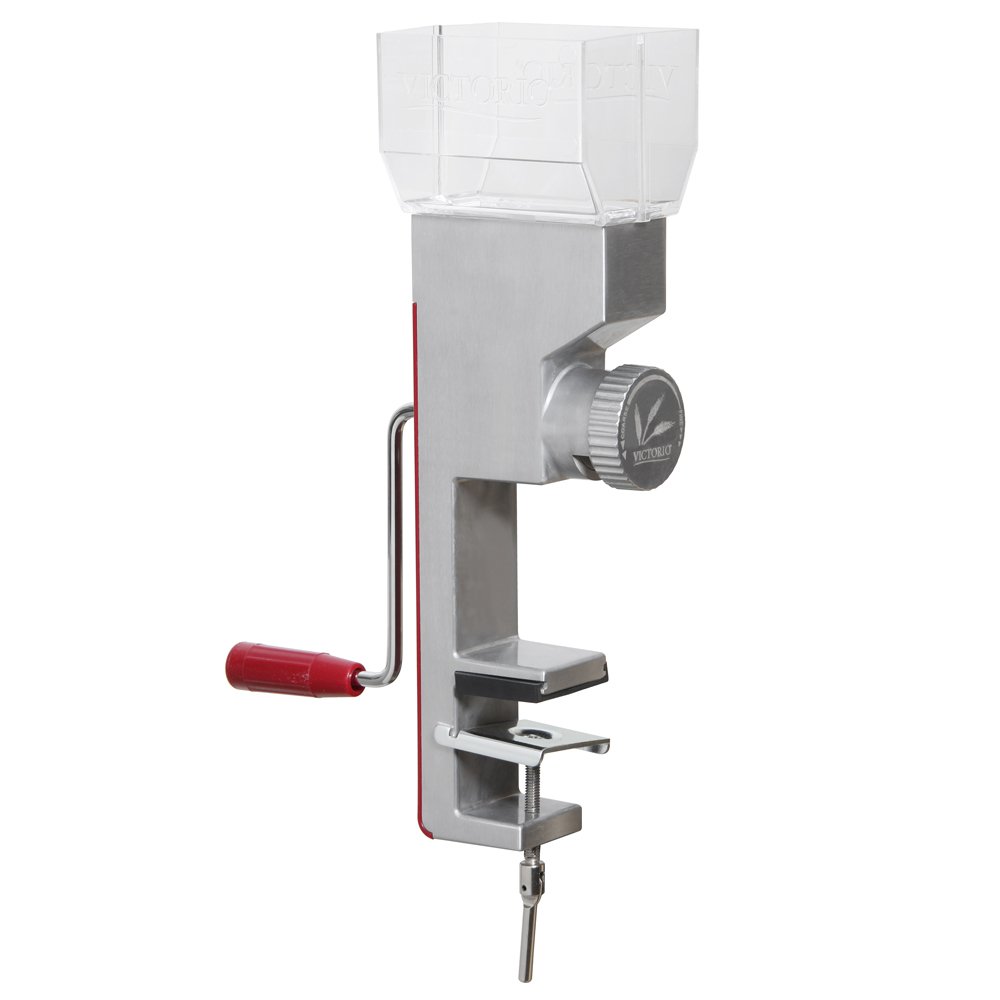
Over the last several years I have been on a mission to lower my dependency on stores and manufactured products. Of course there is little to no way to get completely independent, but I have been making as many strides as I can reasonably make toward that end goal. Having a way to mill grains and make flour for cooking is one such leap I had yet to make, until recently.

The criteria for my milling system was fairly straight forward. I wanted something that was NOT electric, but I could attach a motor to it later on if I so desired. Other than that I just wanted it to be sturdy and actually work as advertised.

Since our family is not a huge bread consumer, this device would not be expected to produce pounds of flour every week. I figured that a few cups at a time was more than sufficient. Even my big bread recipes only call for a max of 6 cups. My son can grind away for a few minutes to get us that amount.

Now that I knew what I wanted (usable, durable, inexpensive, and manual) I went to work on Amazon in search of something that would suffice. There in lies the rub……  I had NO clue what I was buying really. There are hundreds of devices out there in a multitude of configurations and they all claim to be the best thing since mortar and pestle. Getting some rocks and grinding didn’t sound like fun so I just read some reviews, bought something, and crossed my fingers.

Here is what I got:

Grain Mill

Grain Mill

It had great reviews and I had a coupon to get a solid discount, so I figured I couldn’t get too badly hurt if it turned out to be a bust. Interestingly enough, it seems to work pretty good. We have only used it 5-6 times, but it works as advertised and I get a good arm workout in the process. The wheat berries we picked up are some sort of hippie stock, GMO deprived, organically sealed and hermaphrodite free or some such crap. The flour tastes okay so I guess I picked well.

Wheat Berries

Wheat Berries

We have not figured out how many berries it takes to get a cup of flour, but I can tell you that it seems to be a lot. Several refills of the hopper are required to get enough flour for a pizza crust. That is about as scientific as I can get on it, but I have discovered a few things that I would like to pass along to everyone.

  • Cleaning this thing is not for the faint of heart. Holy sheep shears…….
  • The table clamp scratches the crap out of your table so only use it when you wife is gone and you can use thick socks to protect the table. Don’t tell my wife.
  • The flour from this allows dough to raise more than store bought flour. The taste seems to be the same, though. For all the work I wanted it to taste like fluffy gold and it doesn’t.

For those that have considered jumping into this purchase for themselves, I would recommend what I got. It works and hasn’t killed me yet. Nothing fancy, just functional. This being said, I would have to say that this isn’t just a prepper tool. Anyone that likes fresh cooking components would be happy with this setup in all honesty. Just the fact that I can store the berries in small, vacuum sealed packages and just make the flour as needed keeps all my ingredients fresh. If nothing else it makes me feel like I am doing something “special” for my family when I bust this guy out. That and it is kinda nostalgicly amusing.

Have fun with the arm workout!!!!

  • Share on Tumblr