Tag Archives: body armor

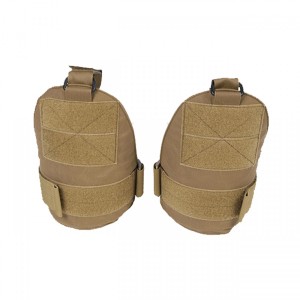
TAG Deltoid Protector

by Woodsbum

For those that have been keeping up with my posts, this will come as no real surprise. New readers might think that I am a bit goofy and in need of professional help above what Dr. Jack Daniels can provide. Either way, I did it again. I ran across a great deal on ballistic Level IIIA deltoid protectors so I picked them up.

TAG Deltoid Protector

TAG Deltoid Protector

The only color that was available was black, but you can get an idea of what they look like from the picture above.

What these bad boys do is add ballistic protection to your deltoid region. This might not seem like a big deal to some people, but having that added pistol protection is a potential life saver if you actually need your armor. With your auxillary, subclavian, and brachial arteries all easily accessed by a bullet entering that area I feel that the money spent on this is a great investment.

So you can get an idea of what these look like when attached to a carrier, here is a picture for reference. The attachments I am referencing are the part that cover the upper arm/shoulder region. The collar bone/clavial region and throat attachment piece is also not included. This does give you a good idea of the various pieces you can buy, however.

Full Armor With Deltoid Protection

Full Armor With Deltoid Protection

What really struck me as the negligible weight of these ballistic protectors. They only add less than a pound to your gear, for the pair. I also like the fact that they will help protect you against potential shoulder strikes with blunt or cutting weapons. They are not designed for such attacks, but common sense tells you that a semi rigid structure that is 1/4 thick will be hard to cut through and will help against blunt force trauma.

Either way, I was really happy to find these little guys. They were on clearance from Tactical Assault Gear for about $70 shipped. Unfortunately for anyone wanting to pick up a pair like I did, they are now out of stock and discontinued. A web search did show many for sale on Ebay as well as other sources.

If you run across a set of these, I highly recommend them as a great addition to your body armor kit. The weight is nothing compared to the protection you receive from them.

  • Share on Tumblr

Proper Fit of Body Armor

by Woodsbum

Now that I have body armor and have been wearing it around a bit to see how well it wears, a thought kept creeping into my head, “Is this expense really fit properly and am I wearing it correctly?”

When I was in the military we wore flak jackets. Considering it was simply a vest that you put on, it was quite difficult to wear it incorrectly. Even the new military armor systems are difficult to wear incorrectly because they are also vest type construction that offers very little adjustment.

Here is the article that Gunguy found and sent to me:

******************************************************************************

Body armor is meant to keep you in the fight.  It should protect the vital organs which, if hit, would quickly take you down and prevent you from putting rounds on target. The possibility of saving your life is a secondary benefit of body armor.  With this purpose in mind we must understand those structures we need to protect which we can realistically protect while still maintaining a great degree of mobility.

Our primary concern is the heart and the large blood vessels which sprout from the top of the heart: the superior vena cava, the arch of the aorta and the pulmonary trunk. These vessels are collectively referred to as “the great vessels”.

The heart is important for its obvious function of providing pressure to circulate blood to the lungs via the right side of the heart and then on to the body via the left side of the heart.  Within the body the heart lies left of center, with its apex near the left nipple.  Thus, while fitting a plate as a general guideline we must select a plate which will cover the nipples to ensure the entire heart is protected.  Note that in some individuals the nipples may be more lateral than the apex of the heart.

The great vessels of the heart lie directly behind the uppermost portion of the sternum, known as the manubrium, and sit directly on top of the heart.  The great vessels wrap and twist around each other, making it likely that a hit to one will likely perforate another and result in massive hemorrhage.

Arguably the most important of the three great vessels in the Aorta, due to its size and high velocity of blood flow, 5 liters a minute.  The average 165 pound man has 5 liters of blood in his body and thus can completely bleed out within one minute if the Aorta is dramatically perforated.  Loss of consciousness can occur with less than 40% of blood loss, approximately two liters, and thus can occur in well under a minute.

Of equal importance to the heart is the respiratory diaphragm, the muscle which, when contracting, allows you to decrease air pressure within your lungs and thus draw in air. Destroy the diaphragm and you destroy one’s ability to breath.  Protecting the entirety of the respiratory diaphragm is not realistic, but the majority of it will be protected by a properly fitted plate.  The diaphragm is dome shaped, following the bottom of your rib cage and doming up into the chest cavity.

Protecting the vertebral column goes without saying -we wish to protect as much of this as possible without sacrificing mobility. Unfortunately, protecting the entire vertebral column is not realistic at this time.

It is important to note that a hit to the lungs may prove to eventually be lethal through blood loss or tension pneumothorax, but is not nearly as lethal as quickly as a hit to the heart and its great vessels. The liver and kidneys, while highly vascular, are also not immediately incapacitating and thus are of secondary concern.  The rest of the viscera in your abdomen are of tertiary concern.

Finding Balance:  Protection vs Mobility

When properly fitted a chest plate should not impinge on the anterior deltoids or pectoralis major muscles when punching out with a handgun or carbine.  Any impingement on the shoulder may create discomfort, premature fatigue and possibly even aggravate certain shoulder conditions.  In some cases too large of a plate may prevent a shooter from assuming an ideal hold on their weapon.  This, and even discomfort, can translate to misses down range.

A slightly smaller chest plate which fits with no impingement while punching out will not expose the heart as long as it still covers the nipples.  A smaller plate will translate to a small increase in exposure of peripheral lung tissue and abdominal viscera, but these are organs which can take a hit without immediate consequences to the shooter.  As stated previously, a shot to the lung, liver or kidney is not immediately fatal.  This should be considered when choosing a plate that fits properly.

NORNAVEOD i Meymaneh i Afghanistan

Positioning of the Front/Chest plate

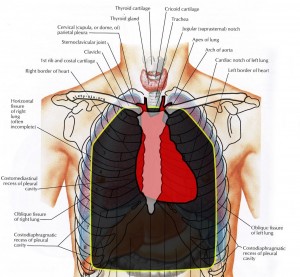
The top of your chest plate should be at the level of your suprasternal notch, which is also known as the jugular notch.  Tracing the sternum with a finger superiorly, the soft spot you reach at the top of the sternum is the suprasternal notch.  If you press in with your finger and choke yourself you are in the right spot.  The chest plate should ride at least level with the top of your sternum while standing.  An easy way to ensure this is to place a finger in your suprasternal notch and position the plate such that the top of the plate touches the bottom of your finger.

Reference image (anterior view)

  • Red is your heart and related blood vessels
  • Dark Grey/Yellow is a properly positioned plate.
  • The sternum and clavicle are white with black outline

proper_wear_of_armor_2

Positioning of rear/back plate

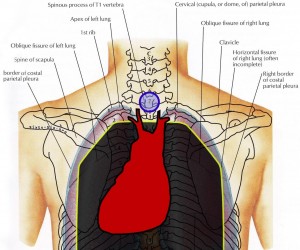
Find the most prominent bony eminence at the base of your neck. This is your vertebral eminence. Count down two bony spinousus (or measure down about 1.5 inches) and that should be above the level of the superior aspect of your sternum and thus level with the top of your front plate. Positioning at least this high will ensure your entire heart and the great vessels are protected from a shot to the back.  The front and back plate should be level with one another when viewed from the side.

The vertebral eminence is marked in the diagram below in blue.
proper_wear_of_armor_3

Side and Shoulder Plates

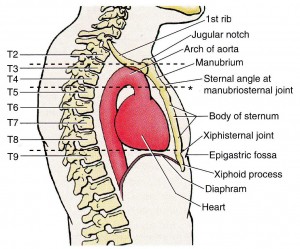
Side plates are intended to protect the highly vascular elements of your abdomen. They were introduced to prevent troops from bleeding out in the chopper on the way to the field hospital. Side plates were not necessarily intended to protect the heart, but if you wear them high up into your armpits you can protect some of the lower portion of your heart.

Protecting your heart from a shot to side is accomplished by shoulder plates, such as the ones manufactured by Crye Precision.
proper_wear_of_armor_4

To Sum it Up

  • Chest/Front plate:  Even with top of the sternum while standing and covering the entirety of each nipple.  For best fit, the plate should not impinge on the shoulder when presenting a weapon.
  • Back/Rear plate:  Should lie no lower than an inch below your vertebral prominence.  A back plate one size larger than a chest plate is optimal.
  • Side plates:  The higher they ride the better.

An example of proper chest plate positioning
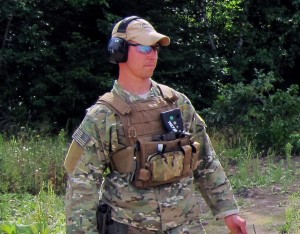
proper_wear_of_armor_5

An example of improper chest plate positioning
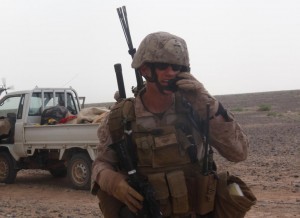
******************************************************************************

Hopefully, this article will help you to understand how hard plates work. Obviously, you will not be walking around like a juggernaut and completely bulletproof from toenail to beanie. You also don’t want to go into a dangerous situation in a Speedo and flip flops. Find what works for you and just make sure you wear it as intended.

Good luck!!!!

  • Share on Tumblr

Body Armor – Part 3

by Woodsbum

Yesterday the UPS driver finally delivered all the boxes that were supposed to have been dropped off last Thursday. It only took an extra 2 working days due to holiday laziness. I guess I should actually be happy that it arrived at all with only 1 of the boxes having been opened up and rifled through. The reality of having received the latest addition to my body armor has made me a bit giddy. I am not sure how odd it is to want to sit at a desk all day in Level III plates and work on computers. HR would probably send me in for an evaluation.

This post is Body Armor – Part 3. If you are looking for Part 2 or Part 1 of the series you can follow those links to get caught up.

Since my first post, I finally have my AR500 plate kit that includes both front and back plates as well as 6×8 side plates.

My AR500 Deal

My AR500 Deal

I originally picked up some ceramic plates that were 12×10, but they were WAY too small for my torso. These are 14×11 and fit much better. They also fill out the whole carrier pocket so there is less fabric flopping around the sides of the plate. The coverage is also MUCH better as is the overall fit with the thinner, metal plates. I felt like Raphie’s brother in A Christmas Story where he can’t even drop his arms.

Carrier and plates now

Carrier and plates now

A couple thoughts on these plates and this carrier:

  • They are about 2x heavier than the ceramics I had. Even though they are 2 inches taller and 1 inch wider, this additional 30-ish square inches of steel vs ceramic adds a lot more weight.
  • The thinner construction actually allows more unhindered movement with the steel plates. All four plates are actually the same thickness of one ceramic plate.
  • Steel is a lot easier to deal with in regard to “being careful.” Ceramic can easily break or chip. These steel plates are much more sturdy and thus allow for easier transport without fear of damage.
  • My carrier with plates is almost the same weight as my daughter’s Army IOTV (current issue military body armor), maybe even a touch lighter with both all geared out.
  • As opposed to ceramic, these plates can withstand more shots. The tags alone on my ceramic state that it is rated for 3 hits and these plates are rated for 6. I am no rocket surgeon, but I think that is twice as much……

Here are a few pictures of the tags and the plates themselves. I do wish that the side plates were curved, but it really isn’t too big of a deal. I plan on wearing them upright and forward so as to create more frontal protection. This will also work well with the abdominal plates and carrier that I ordered. The IIIa will cover the rest of my side and kidney area. Although my back will not be nearly as covered as my front, I feel fairly confident that most bullet impacts I should fear if I really need this armor will be from the front. My kids are not THAT bad of shots and they like me so back armor is less important. If I keep a 2nd LT bar off my body, I should be fine (that was a joke in case you were wondering)…….

Side Plates

Side Plates

The plates themselves are rated to take 6 shots of 148 gr .308 (ok – 7.62x51mm) hits. If you were buying plates for a SHTF (Shyt Hit The Fan) type scenario, this might be a good choice. If you are buying it because you are the main protector of your family and you don’t trust that cops will show up in time to save everyone then these are perfect. Since I am getting this setup due to the later and not former reason, I think I have a winning combination.

Armor tag

Armor tag

I guess that everything really depends on your particular needs. Since I won’t be going into direct combat (hopefully) with mine, I think the $200 price tag for a complete set of plates is a great deal and I couldn’t be happier about it. Even if you use this equipment daily or regularly to protect you, I also think that this is a great setup. My daughter is actually looking at getting the Level IV version of these plates for her upcoming deployment. All the ceramic ones she has been issues are bulky and have cobwebbed edges, so at least she knows these will take a beating and still protect.

The next update in this series will either be when my side plate carriers come in or when I get the abdominal plate. Either way, I will keep you guys informed as I upgrade my load out.

  • Share on Tumblr

Body Armor – Part 2

by Woodsbum

This is the second installment of my Body Armor series. Body Armor – Part 1 can be found here.

Body armor is a very odd thing for most civilians to have. There is even legislation presented to keep civilians from possessing any sort of armor. I find this quite disturbing considering the world that has been created for us to live in. On the weekends, I work as a bouncer at a bar and I am also a hunter’s education instructor. Both these activities present me with the distinct possibility of physical injury either at the hands of a disgruntled drunk (or violent socialist Canadian race baiter like last weekend – long story) or new shooter that just doesn’t have the motor skills to be completely safe. Either way body armor is a great way to ensure I at least am taking precautions against injury or death.

Finding the right body armor to fit your needs is difficult. As I presented in my first installment of the series, you need to find the right armor with the right fit at the right price. Setting up my plate armor was a very expensive process, but I did not want to spend that much on soft armor. Ultimately, my main criteria was as follows:

  • Must be concealable. I already have an outer wear body armor that is big, bulky and not that easy to hide. This armor needed to be lightweight and very easy to be overlooked in a crowd.
  • Was available at a reasonable price. I already have over $750 in my plate armor setup with all the pouches and accessories. This needed to be cheap and complete upon receipt.
  • Was not bulk in any fashion. Because I wanted something so concealable and hard to detect, all but the very expensive sets of Level IIIa armor were off the table. Level II seemed to be my best bet although it doesn’t stop all the pistol calibers. When thinking about it I didn’t think that the lack of coverage was worth the extra bulk and lack of concealment.

What I ended up with after a whole bunch of evaluation and weighing options was a set of police surplus armor from Bulletproofme.com. I did look at other sites and sources such as Body Armor Outlet and Bulletsafe. Their products are great, but I really needed to keep price down as much as possible and needed into a set that was going to fit without a whole lot of overlap. The guys at Bulletproofme did a great job of finding something that fit well, can easily be concealed, and isn’t cost restrictive.

This is the set I ended up with.

First Choice Level II armor

First Choice Level II armor

My only complaints are with the carrier color and the velcro straps that are supposed to hold it in place. These two straps are around 12 inches long or more so the front and back are not fully retained in place. The front seems to move separately from the back and thus end up bunching funny. This makes it quite uncomfortable to wear.

As for color, I prefer black or foliage colors. This can be fixed with money and/or time. The only thing that does need to be fixed sooner than later are the velcro straps that hold at the sides. I do have my mother making me a shorter and wider set of straps that will definitely hold the vest onto my frame much better. Here is a good look at the straps.

Velcro straps

Velcro straps

The meat of this vest are the ballistic inserts. These are definitely used, but luckily don’t have the normal funk smell that seriously used inserts have. I am not sure if they soaked them in Febreze or they just didn’t get that funky, but luckily they don’t smell.

Insert

Insert

The vest came with a trauma pad at the sternum. This is probably a good thing, although I find it interesting that the trauma pad is on the outside of the soft armor. I am not sure why this is the case, but I will go with it since that is how the instructions read.

Trauma pad

Trauma pad

Now many people will wonder why I went with police surplus that was about 10 years old. If you read this abstract some light might be shined upon why I chose surplus. I find it interesting that the only places I can find this article are fairly well buried or the original links are no longer valid. I can see how police departments will get rid of armor once the warranty period is expired, but this older armor seems to be still serviceable for those of us who will not be using it every day.

Now another tidbit of information is that First Choice Armor is no longer around. They ended up getting sued and shut down by a government law suit around 2013. The building is now an adult day care center. This does concern me a bit, but on the other hand this product was never named in the suit with regard to the use of Zylon and it was made after they discontinued the use of that product. What is even more interesting is that most soft armor manufacturers used Zylon in their vests from the 1990’s through 2005. At least I don’t have one of those that was recalled.

The way I am looking at it is as such: I bought a vest that is used and is not on a recall list anywhere. There is research from federal organizations that say that 10 and 11 year old armor functioned just as well as brand new armor. I don’t see why I should worry, especially since I am keeping it in my closet 99.9% of the time.

The next installment of my series of what and why I bought certain items will be completed once my new plates arrive in the mail. I ordered AR500 plates to increase the coverage of protection. My previous plates are only 12×10 where as the new ones are the extra large size (14×11).

  • Share on Tumblr

Body Armor – Part 1

by Woodsbum

Although I don’t like to be called or considered a “prepper” per se, I do believe that it is the responsibility of every adult to ensure the safety and welfare of their family. This includes safety items such as guns and associated equipment. Lately, I included body armor as part of that equipment due to some recent national and local incidents that truly gained my attention. I have started buying body armor and tactical pieces for my son, my wife, and myself. There are also additional reasons that I feel that this is important such as: I am a bouncer at a bar on the weekends and I teach hunter’s safety classes with live fire. Either way, it has become an item that was high on my list of required equipment.

The first post in this series (Body Armor – Part 1) will cover what I initially purchased and branch out to what changes I have made to my initial investment. More correctly it will explain what I purchased and why, then will add more depth to the already murky water I have entered in my search for proper/appropriate ballistic protection. Body Armor – Part 2 is located here. It will cover the information about the police surplus armor I picked up, my thoughts on it, and what I plan to do to it so that it will fully suit my needs.

When I first started looking at body armor, step 1 for me was the carrier. I was VERY persnickety about the carrier and what I wanted in a carrier. My criteria were as follows:

  • Multicam or Coyote in color. I did not want digital or black…. ESPECIALLY ACU. I am not fond of camo built only for rock quarries.
  • Padded shoulders that make it actually comfortable.
  • That it fit, which means that it be capable of fitting a large framed person.
  • That it not be as breathable as possible.
  • Something less than $300.

What I ended up with was the Mayflower APC.

Mayflower APC

Mayflower APC

I am not fond of having all sorts of crap hanging off my chest so I only added a kangaroo pouch for 3 magazines to the carrier for normal wear. I do put my 1911 on the front in a military surplus flapped holster when I am not wearing my battle belt. My other mag pouches, holster and dump pouches are on that battle belt. Eventually a radio pouch will be added for my HAM radio, but I have been having a hard time finding a pouch that I like and fits my Yaesu. Basically, what you see now is what I use on my carrier. Of course everyone is different so other people might have things dangling left, right and sideways.

I felt that using a Taz blanket in the background was completely appropriate considering we are showing tactical items.

Mayflower APC

Mayflower APC

When I started looking for plates, I was interested in saving as much weight as possible while providing the most protection all for the cheapest price. This was tough to do since most lightweight plates are not big enough and those that are big enough are pretty much only the AR500 materials. Since I did not have $1000 per plate to spend on custom poly plates I was really stuck with either ceramic or steel. It ended up with me purchasing Level VI – in conjunction with – plates from BulletSafe. They have a video where they shoot the crap out of one of their plates and it seems to stack up quite nicely against other manufacturers. Add the $180 price tag per plate and I was sold. Now I have found that the 12×10 plates are just too small for my large frame. I was originally going to get Level IIIA backers and just run with what I had, but then I ordered a Level II vest to wear concealed as I needed. This changed my outlook on my plates and I ended up ordering some AR500 plates instead. These ceramics will be passed along to my wife.

Plates

Plates

The side panels I picked up are Level IIIA soft armor. Level III side plates seemed to all be of the steel construction or only 6×6 sized in ceramic. This left me thinking that 5×13 was bigger than 6×6 so I went with soft armor for at least a little bigger area getting some protection.

Since I found an AR500 kit in 14×11 front/back plates with 6×8 side plates, I figured I would increase my coverage area and forgo the Level IIIA backer plates. The weight difference is still going to be a total of 6 lbs between both ceramics with backers and the AR500 plates. Now I am wondering if I should either add the plates to the front corners of my vest to work as added abdominal/side protection in addition to my side panels or keep the current Level IIIA soft armor as is and give the side plates to either my wife or son.

Side Panel

Side Panel

Another wrench to throw into my whole quagmire of bulletproofing is that I picked up a Level III abdominal plate that is still 7 weeks or so from being built and delivered. It will look like this.

Abdominal Ballistics System

Abdominal Ballistics System

Because I have added this additional piece, now have extra large steel plates for front and side, have Level IIIA side panels, and am getting a Level II soft vest I really need to sit down to figure out how I am going to divvy all this out. Either that or I can go walking around like a juggernaut. The reason I picked this up was due to my experiences in the field dealing with GSW victims. Many victims I saw had been gut shot where vascular structures or such items as kidneys were hit. This can cause someone to bleed out and die as quickly as a chest wound. It only made sense to me that abdominal protection was needed to properly protect me in the even that this gear was worn for real.

The argument that pelvis and upper leg protection, neck protection and even upper arm protection would be needed if I was go so far as to include abdominal protection. I don’t think I will end up going that far because a reasonable expectation of movement must also be factored into the whole process. If I add all this additional ballistic protection I will be moving like the kid from Christmas Story when his mom bundles him up. If I fell over I would be like an overturned turtle trying to break dance. All in all it would be bad.

So at this point, I have spent a crap load of money and am still not sure how I want to outfit my family or myself. I do believe that it has helped me to start off small and then add to this project so I can pass things down the line that don’t work. My only concern is that I will end up wasting money in the long run on items that don’t fit into any of our “kits.” Only time will tell, but I do have quite a good base to start with.

Next week I will show you my soft armor in Body Armor – Part 2 and continue with my saga.

  • Share on Tumblr