Category Archives: DIY Projects

Garage born and raised projects that are done because no one else seems to be able to build it like you would. In another words, you did it yourself and it rocked!

Kia Spectra Engine Rebuild

by Woodsbum

These last two weeks have been busy as all get out……

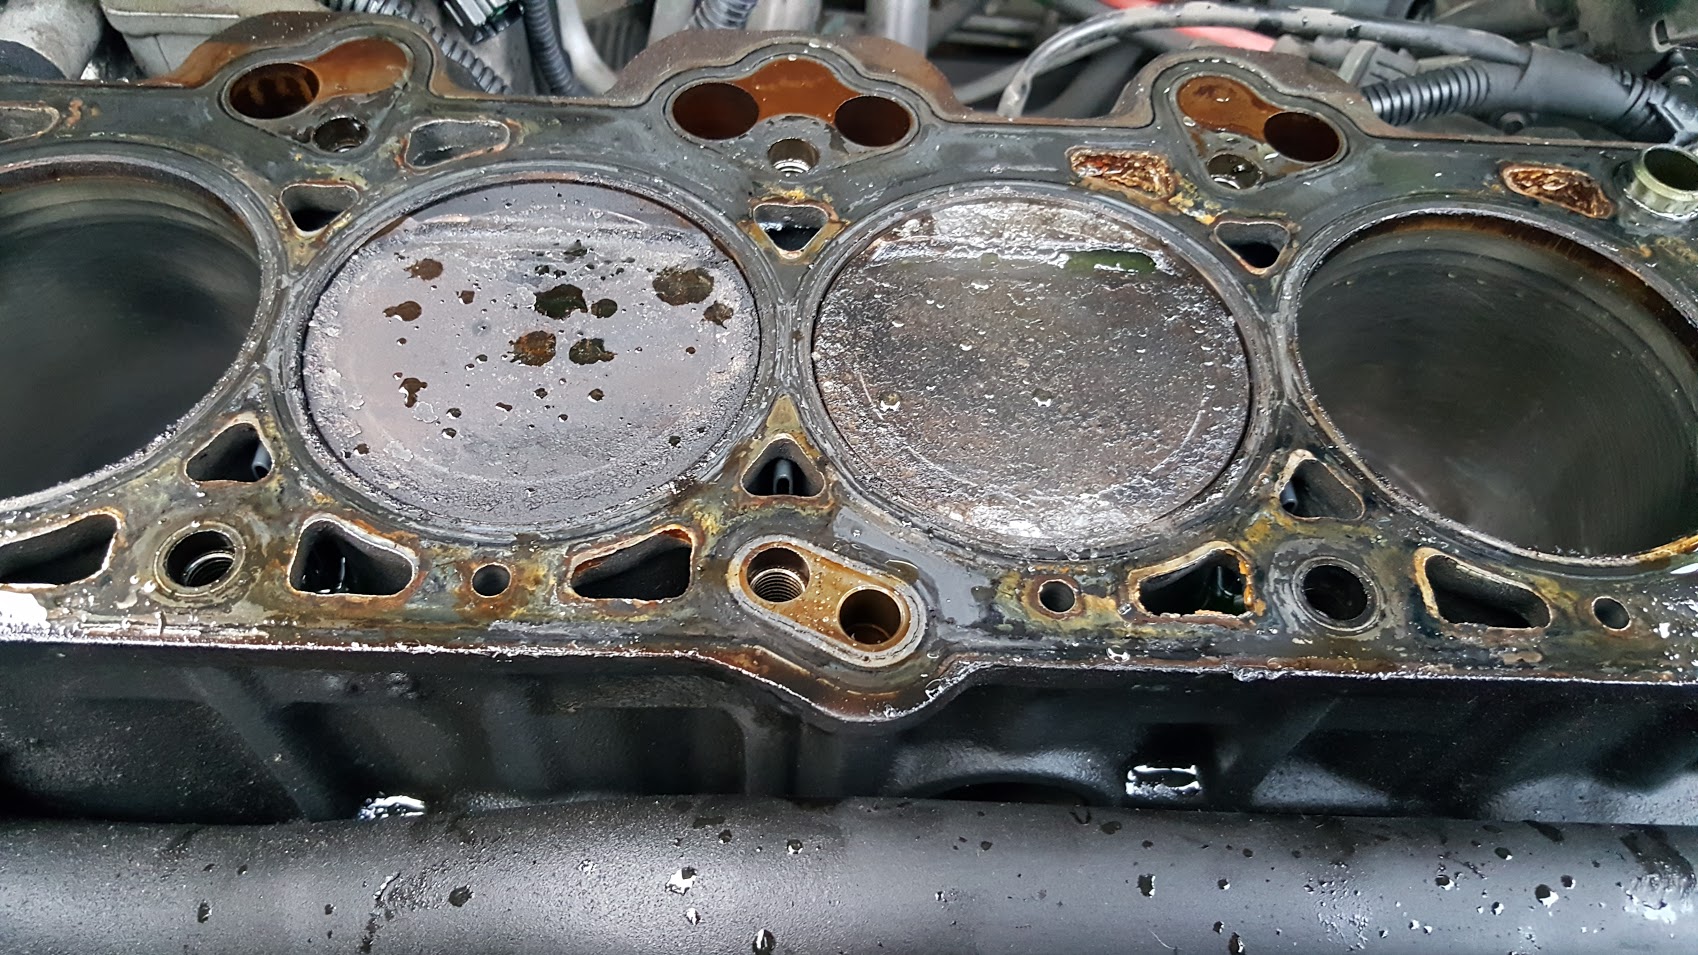
Since I purchased my new truck, due to my old 4×4 blowing an engine and the S&J Motor I picked up being a piece of shit, I have been trying to get my wife’s 2005 Kia Spectra sold. We cleaned it up and took it down to get the oil changed when suddenly it went into a “Safe Mode” operation. Upon investigation I realized that I had one cylinder running at about 20 psi compression. After freaking out and saying a variety of curse words in a multitude of languages, I set out to rip it apart with dreams of a fix. Here are the heads after disassembly.
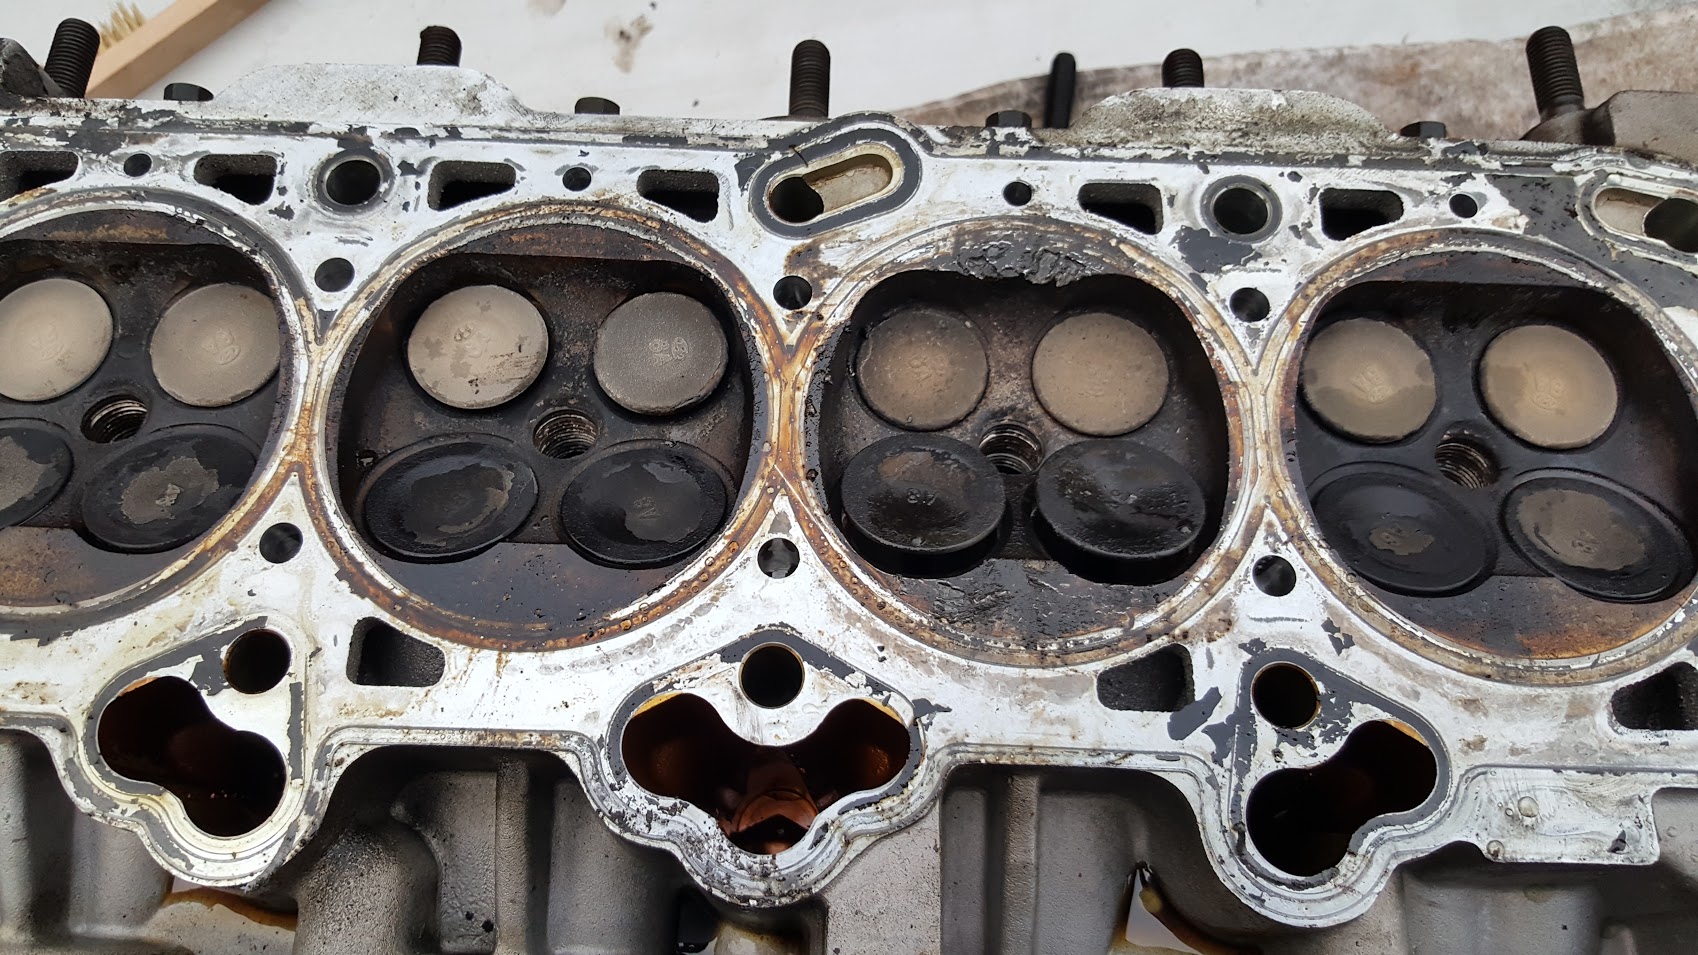
Kia Heads

Kia Heads

You can see the third set of valves are a bit burned. Luckily, they were more coated with crap than any real damage having been done.
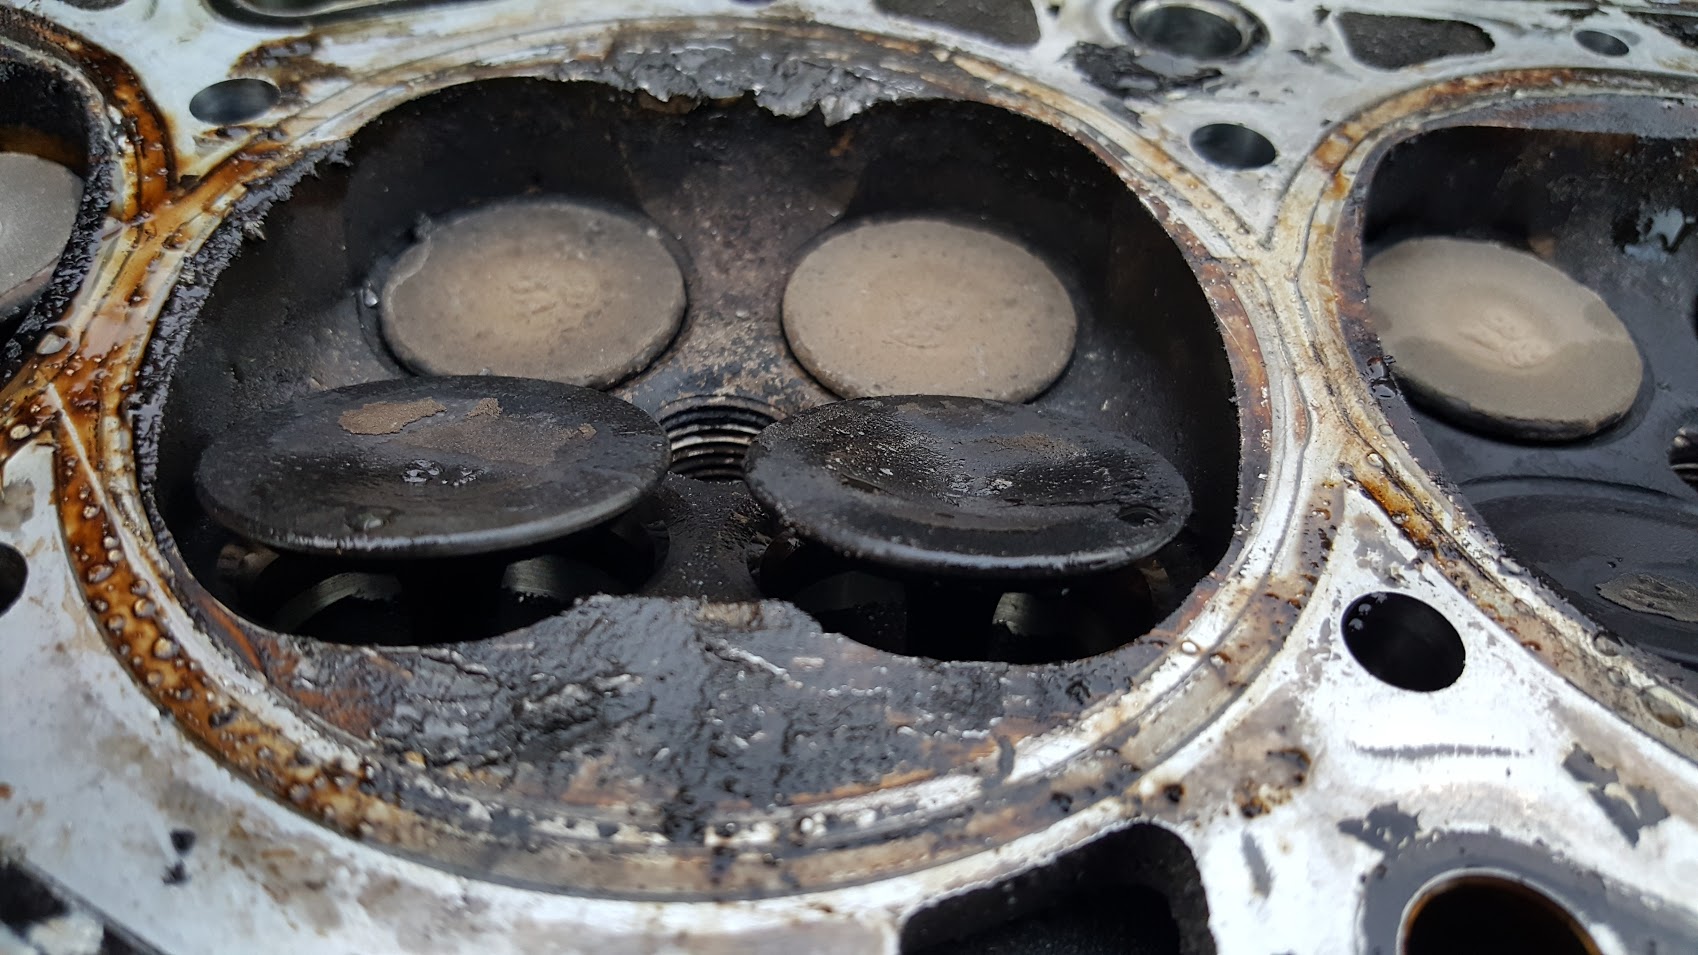
Crapped out valves

Crapped out valves

As you can see, the valves were not that bad. I went ahead and replaced all four of them for this cylinder, though. It was only $50 to replace them and I had to pull everything when I lapping anyway. Swapping to cleaner and new valves saved me some work. Everything lapped well and ended up coming out very nice.

The pistons definitely needed some love, however.

Kia pistons

Kia pistons

You can see where the piston hit the valves when the timing belt went a few months ago. It did much more damage than I had thought. There were actually some chunks of metal just floating around in the chamber. That really isn’t a good thing for those that didn’t know.
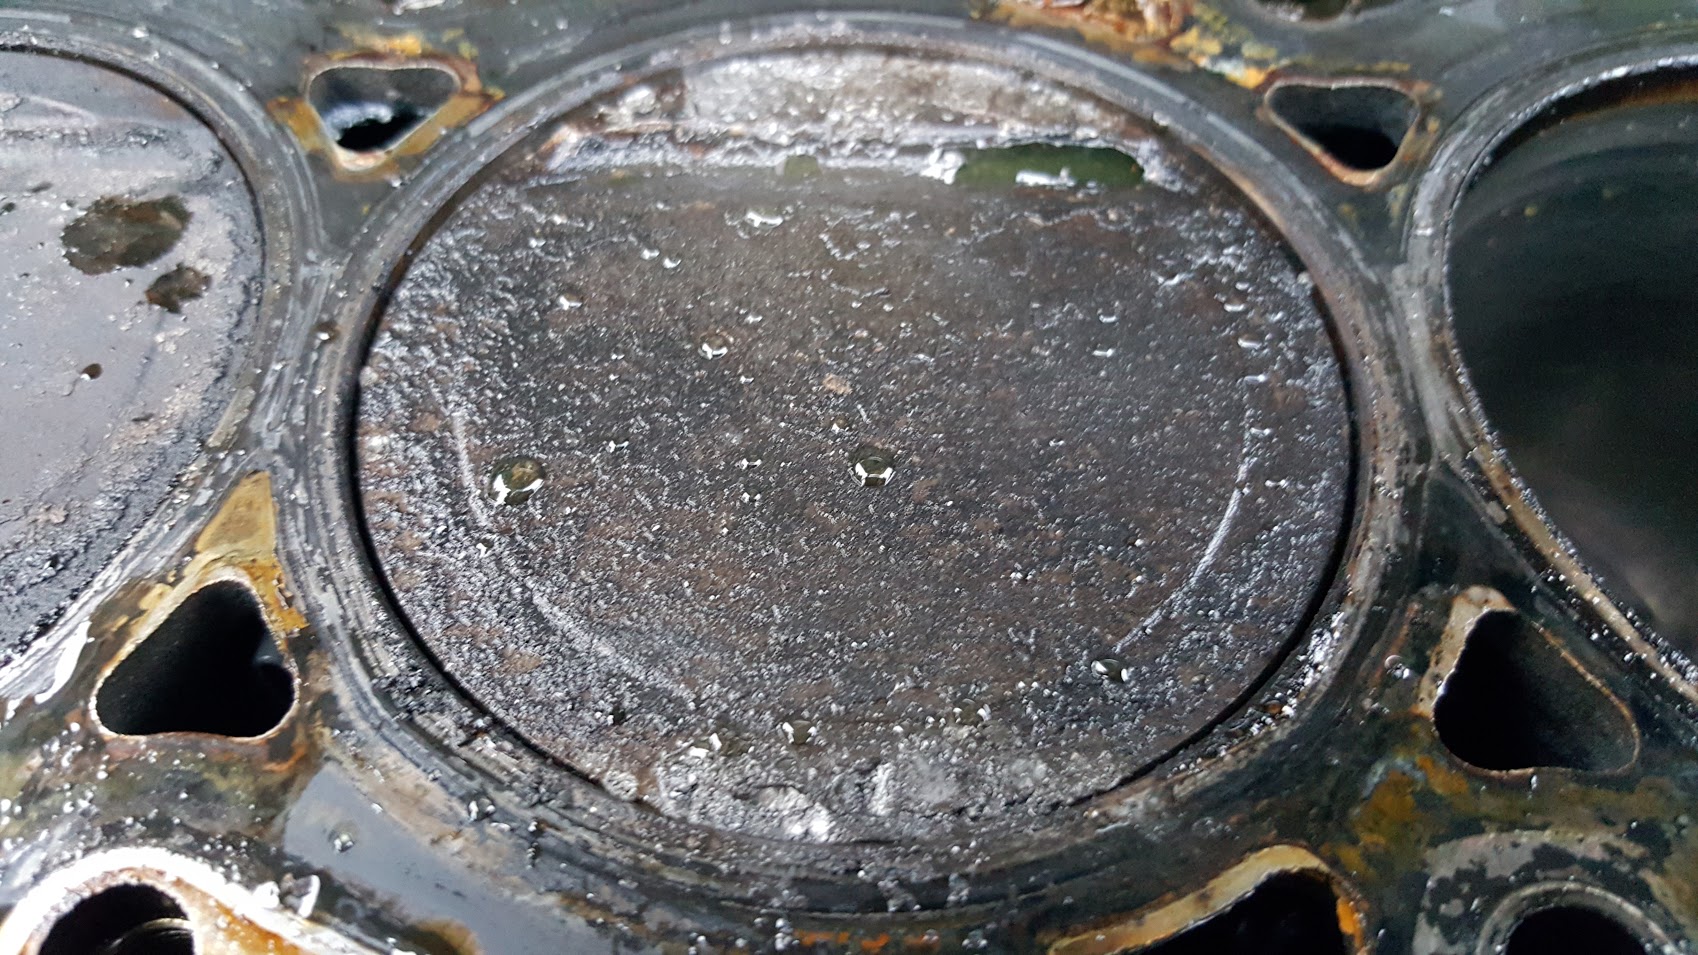
Chewed up piston

Chewed up piston

Once I got the pistons out I noticed that this one actually was all gunked up to the point where the rings didn’t even move. No wonder I had almost no compression in this cylinder. Pressing out the wrist pins and putting the new pistons on the connecting rods was a bit of a pain. It took about 5 hours to make the support, press the pins and install the new pins. Even worse was the fact that I had to do it all over at a friend’s house because I don’t have a press…..  yet.

As of last night, the pistons and rings are all installed into the block and the connecting rod caps are all torqued. My son is going to finish buttoning everything back up and putting the heads back on. If all goes well I should have this guy back up and running by either tonight or tomorrow so I can get it to the new buyer. That should be nice. We will be back down to 5 cars (my two trucks, wife’s Subaru, and my son’s two VW’s), a boat and my flat bed trailer all shoehorned around the trees at my house. Hell, I should even be able to get the heads of my old 4×4, rebuild them, and get it running pretty soon. Then I can get my motorcycles going and start on more enjoyable projects like building pipes, kuksas, and spoons.

Keep your fingers crossed that all these mechanical problems we have dealt with lately will be remedied soon. I am getting tired of broken down vehicles all over the place.

  • Share on Tumblr

Hardtack

by Woodsbum

For those of you who are not sure what hardtack is, think of it like a horribly thick and hard cracker. What is nice is that it will literally last forever. It doesn’t go bad. What I like it for is tossing some hard cheese and meat on it, honey, or use it to dip into a soup. People also eat it as is, but it is a bit bland.

Here is the recipe:


  • 3 cups of white flour
  • 2 teaspoons of salt
  • 1 cup of water

Mix it all together and roll it out into a big square. Cut the dough into about 9 equal portions or just make them about as equal as you can get. Once you get these portioned and cut, use a nail to poke about 14 holes to make it resemble the holes on a saltine cracker.

Bake the pieces on an ungreased cookie sheet at 375 degrees for 30 minutes. Remove them from the sheet and let them cool. They should look like slightly browned, puffy crackers.

Each piece of hardtack is about 150 calories.


  • Share on Tumblr

Homemade Applesauce

by Woodsbum

I searched for quite a while before I found a good applesauce recipe. Most call for all sorts of weird things. I really like this recipe because it is simple, basic and tastes great.

Here are the ingredients per my batch. Some math may be required:

  • 18 lbs of apples
  • 3 cups of water or apple juice/cider
  • Juice of 3 lemons (approx 1/2 cup)
  • 1 1/2 cup brown sugar (packed of course)
  • 5 teaspoons of Cinnamon

First thing you will need is your apples. I used half Gala and half Granny Smith. They are much better if you use them before they get too soft.

Make sure you pick up one of these:

Apple slicer

Apple slicer

These slicer things make short work of peeling, slicing, and coring an apple. When you pull the apple meat off the device, just cut the whole apple coil in half, then throw it into the pot with the ingredients. There is no need to play games with adding things one at a time. Just toss it all in and put it on low heat to start cooking down.

Cut and ready for cooking

Cut and ready for cooking

Once it is all cooked down and the apples are soft, you need to pull the apple out and blend them. I use a Ninja like this one:

Ninja

Ninja

The hot applesauce will be a bit running, but it will be perfect to just jar up and can. I left about 1/2 inch of headspace on my jars and then water bath canned them. The 18 lbs made a little over 6 quarts of applesauce.

Ready for canning

Ready for canning

The whole process took about an hour and half from start to finish. The best part is how great the applesauce turned out. I don’t think that I have ever had any store bought or homemade applesauce that tasted better.

As a side note, I do things a bit different with my cinnamon. I purchase the sticks in bulk and then grind it myself as I need it. This gives a stronger taste without the bite that you get with the preground stuff in the stores. Even the smell is better.

Have some fun and good luck. I am getting ready to can some peaches that we picked up in Wenatchee sometime this week.

  • Share on Tumblr

Plum Preserves

by Woodsbum

Due to travel, it has been a been over a week since my last post. I tell you, life is really crazy.

When I got home I found that the French improved plum tree in my backyard was ready for harvest. We grabbed several bags, one of which was pitted and put into my dehydrator. The other one was pitted and put into a pot for preserves/jam. The recipe we use is a 2 ingredient variety that just takes longer to complete than one that calls for pectin.

The recipe is as follows:

  • Use about a 20 small plum/prune to 4.5 cups of sugar ratio. 12 fruit to 4.5 cups of sugar for the bigger plums.
  • Stir the fruit and sugar up, then leave it to sit for about 2 hours.
Coated and slowly heating plums

Coated and slowly heating plums

  • Heat the mixture up slowly until all the sugar is melted. This should be done on 3/10 or 4/10 on your heat setting. Once the sugar becomes mostly liquid and not all grainy, bring your heat up to 6/10 and get it steadily bubbling.
  • Once your mixture is completely bubbling, turn your heat up to the lower portion of your high setting, 8/10, for about 10 minutes. Stir the mixture constantly.
  • Turn the heat down to about 3/10 and stir it until the bubbling subsides dramatically. Let it simmer for about 10 minutes.
  • Take the mixture off the heat and let it sit until it is cool enough to comfortably sit on the skin without burning.
After first heating

After first heating

  • Repeat the heating process another 4 times to complete a full 5 heating cycles.

Once the final heat is done, take the mixture off the stove and fill your sterilized jars. Just follow current canning standards.

The more times that you heat the mixture, the thicker the preserves/jam will be. If you happen to add too much sugar, you can always just use it as syrup or a sauce. The nice thing about making jellies and jams is that there is no such thing as a bad batch. You just improvise the label and use it a bit differently.

We were finishing our 3rd heating cycle last night so I don’t have any pictures of the finished jam yet. The whole process can take 2-3 days due to the heating and cooling cycles. Because of all the sugar you don’t have to worry about bacteria growing. It is fairly well preserved once the first heat cycle is completed, but the follow up cycles set your consistency and thickness.

Happy jamming!

  • Share on Tumblr

Finishing My Pipe

by Woodsbum

Actually, this is my son’s pipe that I made.

In woodworking, I have always had problems with finishing the project. For some reason, I can bend metal or carve very intricate things without issue. Getting it to look all nice and shiny after I am done has always been an issue. The folks over at Woodcraft actually steered me in the right direction this time.

The product and method that the Woodcraft guys suggested was similar to the method that people turning pens use. Doctor’s Woodshop Pens Plus polish and finish is what they suggested. Here is what they had me do:

  1. Load up a polishing wheel on my bench polisher.
  2. Polish up the pipe using several loads to the polishing pad.
  3. Coat the pipe, let it dry, and then buff it back out.

I still have to do the final polish/buff on the pipe and apply a couple more coats. It did turn out really nice, however. The final wood color was only a shade or two darker than when the wood was wet.

Mostly finished pipe

Mostly finished pipe

The color and the way that the grain was made to just pop is really exciting. Both of the other blanks I did had a much lighter colored wood. With the etching that Jerry is doing I am thinking a dark stain to the etched area and then use this polish for the rest will be perfect.

Due to my son’s inability to wait to test the pipe out I still have another coat and some polishing to do on this build. He said that the draw was actually quite nice and the tobacco stayed lit longer than his other pipes. This made me feel pretty good about the time and energy I spent building this thing.

Here is a good picture to the polish/finish that I used:

Polish/finish

Polish/finish

Again, just load your pad and go to buffing. It will polish and apply the finish all through the use of the buffing wheel.

  • Share on Tumblr