Tag Archives: diy pipes

Finishing My Pipe

by Woodsbum

Actually, this is my son’s pipe that I made.

In woodworking, I have always had problems with finishing the project. For some reason, I can bend metal or carve very intricate things without issue. Getting it to look all nice and shiny after I am done has always been an issue. The folks over at Woodcraft actually steered me in the right direction this time.

The product and method that the Woodcraft guys suggested was similar to the method that people turning pens use. Doctor’s Woodshop Pens Plus polish and finish is what they suggested. Here is what they had me do:

  1. Load up a polishing wheel on my bench polisher.
  2. Polish up the pipe using several loads to the polishing pad.
  3. Coat the pipe, let it dry, and then buff it back out.

I still have to do the final polish/buff on the pipe and apply a couple more coats. It did turn out really nice, however. The final wood color was only a shade or two darker than when the wood was wet.

Mostly finished pipe

Mostly finished pipe

The color and the way that the grain was made to just pop is really exciting. Both of the other blanks I did had a much lighter colored wood. With the etching that Jerry is doing I am thinking a dark stain to the etched area and then use this polish for the rest will be perfect.

Due to my son’s inability to wait to test the pipe out I still have another coat and some polishing to do on this build. He said that the draw was actually quite nice and the tobacco stayed lit longer than his other pipes. This made me feel pretty good about the time and energy I spent building this thing.

Here is a good picture to the polish/finish that I used:

Polish/finish

Polish/finish

Again, just load your pad and go to buffing. It will polish and apply the finish all through the use of the buffing wheel.

  • Share on Tumblr

Carving Pipe Blanks

by Woodsbum

Well, the wife has another reason to be completely annoyed with me. I discovered that there is ANOTHER way for me to waste time and money. The pipe store has drilled briar wood pipe blanks. That is correct….  PIPE BLANKS!!!!

Now I not only have the opportunity to sit and smoke my pipe, drink beer, and hang out with my dog. I have the opportunity to make it look like I am doing something OTHER than smoking my pipe, drinking beer and hanging out with my dog. By finding these little gems I now look like I am working on some sort of project.

The pipe blanks are actually pretty simple. The stem is already set as are all the drilled holes. All that is required is some elbow grease to form the bowl. Here are some pictures of where I started and the progression until almost completed. It is not done yet because I have to get my friend to etch in a Navy Chief’s Anchor onto it and then polish.

Briar Block

Briar Block

After some sanding, filing and carving, I got to this point.

Pipe in progress

Pipe in progress

Here is another angle after some more carving, filing and sanding.

Pipe in progress

Pipe in progress

Although I have got it to the point where I am ready to do final sanding and polishing, I want to wait until I get it actually done in case I have to go back and fix something.

These pipe builds are actually pretty sweet. Thus far I have got 3 to the point where I just need to polish them. The shape for all 3 has been the same, but I will soon be doing some creative work on one or two. Although I am not fond of straight stem pipes, I will probably grab one because that is all the local store has left in stock. I can do a shorty, rounded bowl straight pipe that won’t look too bad.

Once I get the polishing done I will post some more pictures.

  • Share on Tumblr

DIY Tobacco Pipes

By Woodsbum

For a long time I was very partial to cigars, but was not pleased with the incredible price that a premium cigar would command. Eventually, I picked up smoking a pipe instead of a cigar while out in the bush. Not only are pipes easier to carry without crushing everything, but more important to my wallet is the price for tobacco. It means that I can smoke just as much as I want without wasting an entire cigar if it just doesn’t hit the taste buds properly.

Now a good pipe can cost in excess of $100 and can just skyrocket from there. Because I have something wrong with my cranial wiring, I always think that I can figure out a way to do as good or better……   Enter a post on BushcraftUSA that discusses building your own pipe.

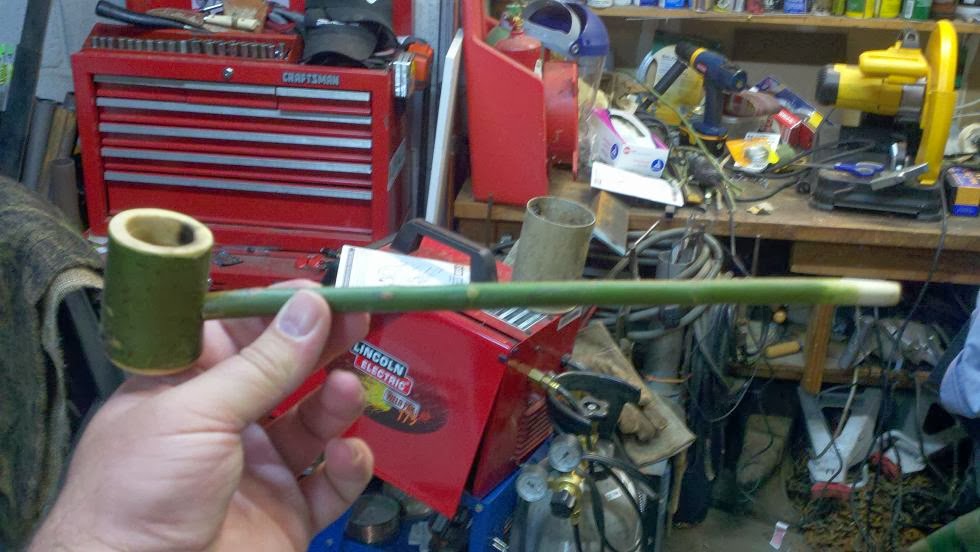
In the post, the guy “SkogKniv” who now is known by his real name of Leif, there is a method of drilling out the center pith of a tree branch so that it can be used as a pipe stem. Once I started playing around, I figured out how to drill out some very long tree branches to make myself a homemade pipe.

Getting the right materials and tools together is always a chore. Knowing that the hardest part was going to be drilling the stem, I decided to start with that part first. The first hurdle was to find the right wire for drilling. I went through several types to include coat hangers, tie wire, hanging wire for pictures, gardening wire, and several others. What I found to work best is 16 gauge stainless steel wire that is sold at Ace Hardware and Home Depot near all the fasteners. It is the perfect combination of flexibility and durability so that it won’t bend or break off during the drilling process. The next thing you will need is one of those cable, survival saws. They have the key rings on either end that you put your fingers through and it is made of a rough wire material. Lastly, you will need a good drill.

What I did was just like the post describes. I rounded out the end of the wire, chucked down the other end, and then started drilling through the center of the stem. It took a little bit, but wasn’t as hard as I thought it would be. I then cut the end off the survival saw and used that to clean out the inside of the stem I drilled. It worked just like sandpaper. With a little maneuvering and manipulation of the saw, I was also able to taper the ends of the stem so that it looked cleaner as well.

Here are a couple things that I learned:

  1. Don’t pick a dry stick. It needs to be green.
  2. Don’t pick a stick that has any twigs growing out of it. Those cause a knot in the stem that you will not be able to drill through very well.
  3. Make sure you hold and guide the wire as you drill. Otherwise it will bend in the middle and slap your finger nail completely off….  Don’t ask.
  4. Trying to do it all with a wire as opposed to sanding with the saw will only get you a mouth full of sawdust.

Once you get the stem drilled and ready, all the rest consists of is:

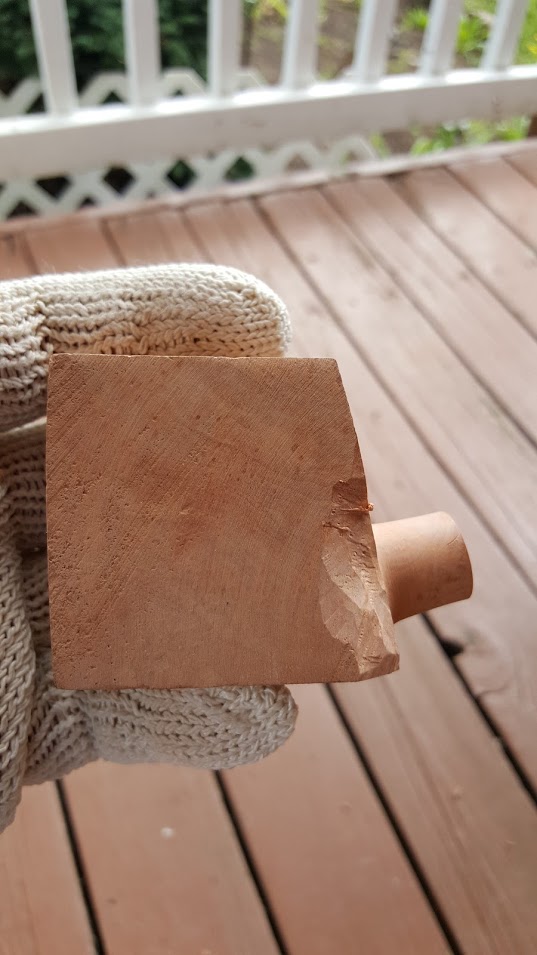
  1. Drilling the bowl. Use a drill press and some decent bits. I like the 3/4 inch bits from Harbor Freight.
  2. Drill the hole for the stem to press into. Measure it out and pick the right sized bit from there. Make sure you drill so that it will be just below the hole you drilled for the bowl.
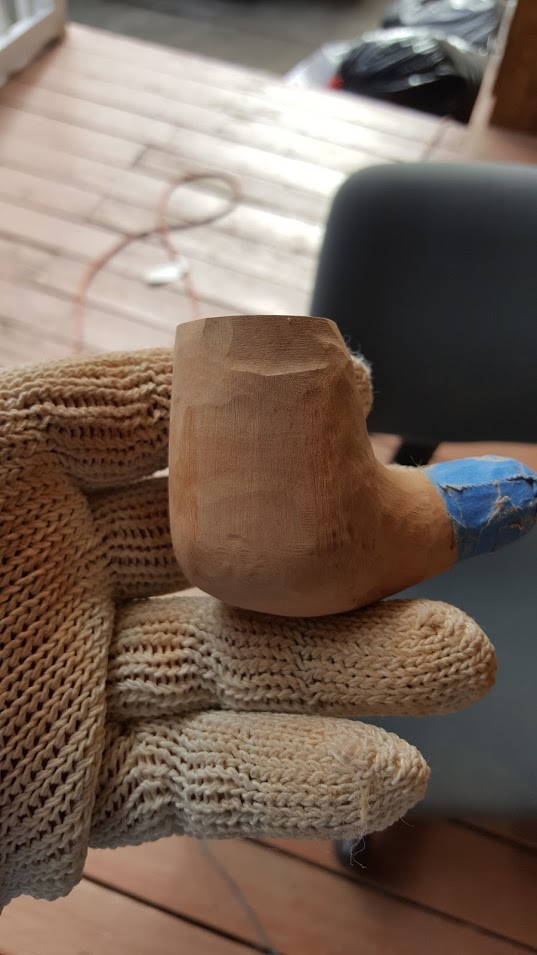
  3. Dremel out a small hole to attach the bowl to the stem hole. This is called the draw hole. I like using the wood carving bit in my Dremel and making a little channel as well as the hole. It makes the pipe smoke better.
  4. Sand and wax with carnuba wax, then polish.

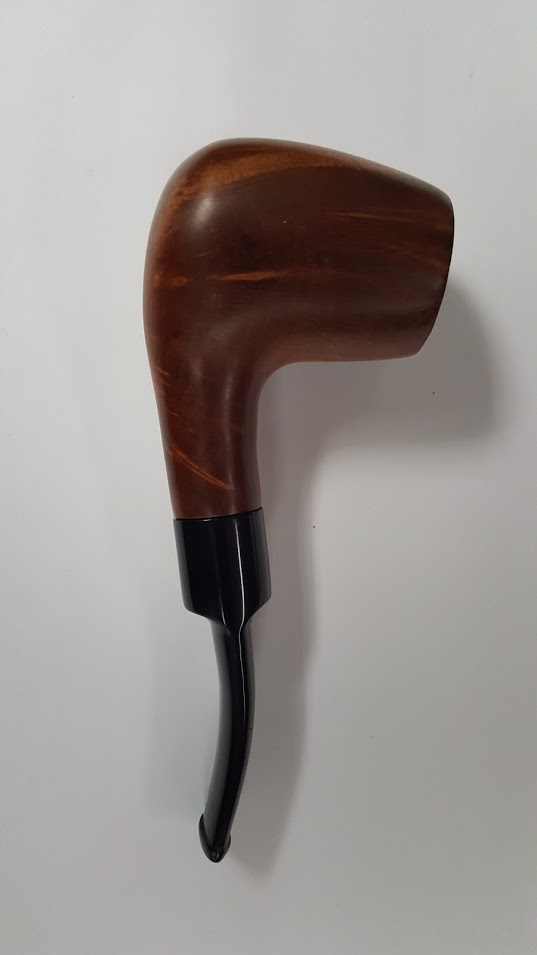
It really is almost too simple once you get your stem drilled. Here are a couple pipes I have made.

Homemade pipe

Homemade pipe


Homemade pipe

Homemade pipe

Homemade pipe

Homemade pipe

Homemade pipe

Homemade pipe

  • Share on Tumblr