Category Archives: Camp Techniques

Outdoors and camping techniques to help guide you with your outdoors lifestyle.

EZY Repellent Hanger

by Woodsbum

Every late summer and early fall, I spend a good part of my day hanging out in a tree stand in hopes that a deer will pass beneath me. This is a wonderful past time, is relaxing to me, and very little can really make these type moments anything other than pure enjoyment. I get to watch squirrels racing around. Birds buzz right past me due to curiosity as to why a ground walking human would be 20 feet up in a tree. Then it starts to cool off and the potential for unpleasantness occurs. Mosquitoes and biting insects suddenly come out of nowhere and try to mug me for my blood. Until now I used 550 cord to tie my Thermocell to my safety strap, but I will have to do that no more. In yesterday’s mail came my EZY Repellent Hanger!!!

EZY Repellent Hanger

EZY Repellent Hanger

This device is nothing really to look at, but it does its job quite well. As you can see from the picture it just allows your Thermocell to slide down into the brackets and sit there doing its thing. Here is a picture of how it comes in the mail.

EZY Repellent Hanger

EZY Repellent Hanger

All you really do is screw it into the bark of a tree and use it. It is very simple, isn’t too heavy and I really can’t wait to use it this fall. For those of you in places like Alaska, you might consider buying two. My Navy buddy up there says that mosquitoes are the Alaska state bird.

Just so you get a good look at the instructions and the actual hanger here is one last picture for you.

EZY Repellent Hanger

EZY Repellent Hanger

I have a couple other EZY products on order so I will screw them into a tree when they all arrive so you have an idea of how they all work. For the price, functionality, and ease of use I am very happy to spend the money on this little field luxury.

  • Share on Tumblr

The Last Trapper – Documentary Style Film

by Woodsbum

This video is actually a movie, but it is almost documentary in style and look. If you are looking for a good movie with epic scenery, this is worth the watch.

  • Share on Tumblr

Smoking Meat at a Campsite

by Woodsbum

I have been smoking meats while at camp like this for a while, but do not have a video camera to record the process. One of these days I will purchase a GoPro, but just have not spent the money yet. This video shows the basic idea and premise for smoking meat over a campfire. I have found that using bark to build a little structure around several wooden racks works quite well. I am also partial to using my squirrel cooker to put the meat on and then surround my dinner with a bark structure, that way I can use the rotisserie feature of the cooker. When it gets a bit drier I will do a post on squirrel cookers.

Here is the instructional video. Very well done.

  • Share on Tumblr

Collapsible Grill or Pot Holder

by Woodsbum

Especially during the spring and fall months, I tend to spend a lot of time in my garage making things. Here is one of my creations that didn’t take that much to build, but is VERY useful when out bushcrafting/camping. It is a takedown grill that also turns into a pot holder for use over your campfire.

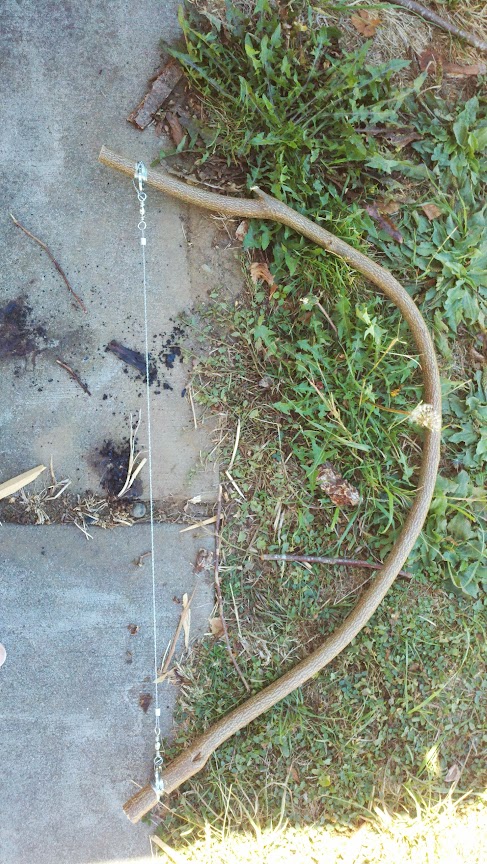
Here is a good look at my contraption:

My Pack Grill

My Pack Grill

As you can see from the picture, I made loops at the end of each of the cross pieces as well as a loop and hook on the end of the longer side pieces. This allows me to adjust the spacing, location or even take the entire thing apart for transport.

Here is a picture of it for use with a pot:

Hooked at the end to hold a pot

Hooked at the end to hold a pot

This is how it looks with a tea pot on it:
Making some tea

Making some tea

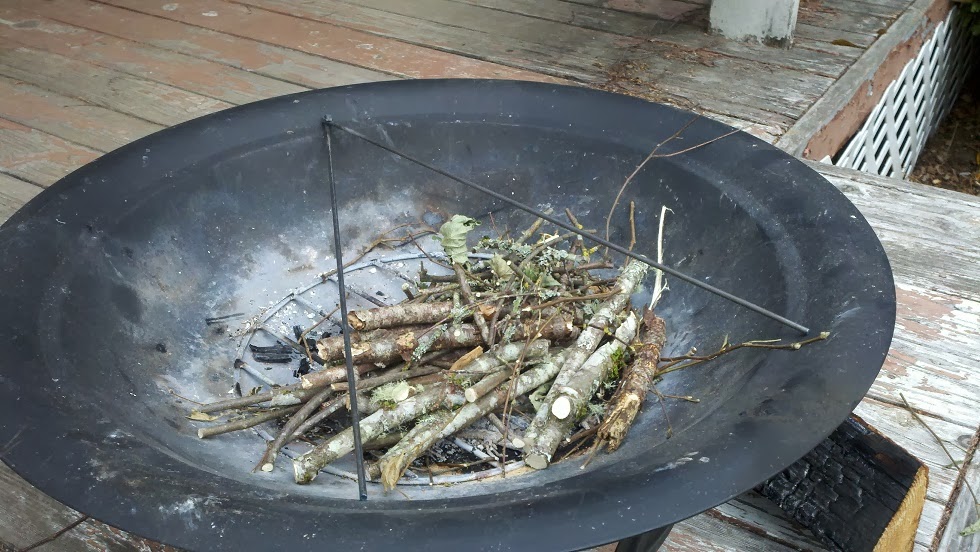
As a grill, it works quite well. I have used it to a large degree as a way to cook steaks and brauts, but I am sure it will work for any number of things you could cook on a grill. Here is a good picture of how it looks cooking some nice slabs of steak.
Cooking some steak

Cooking some steak

To make this, I just fired up a blow torch and bent the ends of the round stock metal into the desired shape. All told, I think I have less than an hour in the whole thing. This includes cutting my transport/carrier.

For transport, I actually carry it in a PVC pipe with caps that I just tie onto the side of my pack. I did this for transport so that I didn’t have to even clean the grill before I put it away. I could just burn off the extra food that was stuck onto it and then just slide it into the pipe after it cooled off.

Remember that anything you can think of as possibly useful in the bush can probably be fabricated in your garage. Just take some time and play around to see what you can come up with. All told, I love this little grill and wonder all the time as to why I didn’t build one earlier in my life. It would have saved me a lot of hassle with the Weber replacement grills that I used to carry.

  • Share on Tumblr

Impromptu Bow and Buck Saws

by Woodsbum

A while ago I was asked about the use of saws while bushcrafting. I carry a very nice buck saw that I picked up from a vendor at BushcraftUSA.com. You can see it here. Many times, however, carrying the extra weight of a complete buck or bow saw is not a viable option. Instead you can carry the blade or cutting portion of the saw and make your own frame for it. Here are a couple examples of how to build your own bow saw and buck saw while out in the bush.

The first real “secret” to building field bow saws is making sure that you get some wood that either already has the natural bend to the shape or to get some nice, green wood that will bend without breaking. Either way you need something that can take the bow shape but is strong enough to not bend too much while under use. As you can see from the picture, it is preferable to make some notches in the ends of the wood to allow your saw blade to remain stationary while under load. The easiest way is to use your saw blade to make some slits and then use your knife to remove the chips. In the case of the saw I have pictured below, I was able to just slide the rings over the branch and rest them into the notches.  I like using snare wire to keep things in place, so that is why you see the wire around the ends of the saw blade. This isn’t necessary, but it is more standard practice for me than anything else.

Impromptu Bow Saw

Impromtu Bow Saw

In this instance, I took a dead branch that was still just green enough to bend and not break. The saw blade is one of those “survival” saws that come in a kit. Although using it is kind of slow compared to other saws and methods, it definitely works.

When making a buck saw, the hardest part is getting the middle branch to stay put under stress. If you don’t notch or drill your holes correctly, that middle brace will squirt off to the side and collapse the whole saw in upon itself. The best way to keep that from happening that i have found is to ensure you drill holes and use some sort of a pin. What I did on the saw below was a little different. I cut the notches for the cross brace and carved in some pins to insert into the holes I carved into the upright braces. This gave me both a solid up and down stability and a twisting stability from the pins. I have also seen holes drilled and dowels carved. This also works, but I was using a large knife and didn’t have a decent carving knife or a drill to use. To tighten up the whole saw frame you can just use some 550 cord or such and wind it up with a stick like you see below. It works quite well and when the cordage stretches you can take up a few more turns on the cord to tighten things right back up.

Impromptu Buck Saw

Impromptu Buck Saw

The easiest part is the slit for the saw blade. As you can also see, I again used snare wire to keep the blade on. This is just something that I do and have found works quite well. Since I have rolls of snare wire and carry a roll to the field with me in my survival kit, many field projects find themselves completed with the aid of snare wire.

Next time you are in the field and want to so some fire preparation do yourself a favor and make a saw frame. With some practice and testing you can come up with a great design that works well for your needs. In case you were wanting a step by step build of the buck saw, I have embedded a video th assist you. Again, it is quite easy and works very well.

  • Share on Tumblr