Author Archives: Woodsbum

The Real Deal Brazil Hat

by Woodsbum

Before I joined the BushcraftUSA forum, I really had never heard of a “RDB” or Real Deal Brazil hat. I had seen Zombieland and thought that the hat Woody Harrelson wore in the movie way AWESOME. I also like the one that the sniper in the movie The Losers wore. There was not much more thought than “that’s sweet” that really went into it. Then I saw where they came from and had to get one.

This is what they look like:

The Real Deal Brazil

The Real Deal Brazil

Here is the one from Zombieland:

Tallahassee

Tallahassee

Here is the one from The Losers:

Cougar

Cougar

The one that Cougar wears seems to be waterproofed or something. Maybe a bit of Sno-Seal melted into it? I think I might have to do a bit of playing around with one of mine.

Back to my post:

These things are made of the canvas tarps that the cargo trucks use to cover goods in Brazil. Literally, they are Brazilian truck tarp. There are patches on some. Others have no patches. Spots, stains, wear spots, bad fit of the crown to the brim, irregular sizing, the whole thing. This makes them absolutely AWESOME!!!!!

Here are some pictures of the two that I have and the one my son wears:

One of my RDB hats

One of my RDB hats

My other RDB hat

My other RDB hat

My son blowing charcloth embers to flame in the rain while wearing his RDB hat.

My son blowing charcloth embers to flame in the rain while wearing his RDB hat.

As you can see, they really are customizable and vary in their construction. All three hat bands were purchased from their website. I like the one in the top picture. It is a bunch of beer bottle tops and I did the whipping on the feathers that hang down the back. Those feathers are from my Patagonian conure. As for the brim, there is a wire that is sewn into the edge. You can use that to bend your brim into the shape you desire. The crown does not have any support, so any modifications to it must be done with a sewing machine and skill….  I have the sewing machine, but lack the other. That means that I have been stuck with a crooked crown on one since I got it. Everyone that sees it, however, just call it character.

These hats do have a lot of character. There is NO doubt about that. They are also really easy to modify and customize because of this. Anything that you might mess up or misalign somehow just adds to that character.

The second picture is the one that I did the most modifications to. What I did with that one was as follows:

  • Sewed in a terry cloth sweat band
  • Put in a couple grommets for a stampede string
  • Whipped the stampede string back into the paracord hat band

This is what I did on the sweat band:

Real Deal Brazil Sweat Band Mod

Real Deal Brazil Sweat Band Mod

This is what the stampede string and grommets look like:
Real Deal Brazil Stampede String Mod

Real Deal Brazil Stampede String Mod

Since the hat does not float (not even a little – probably could be used as a sea anchor) the string to keep it on your head is a great idea.

I have really let the pictures and easy customization of this hat speak for the product. These things really are one of the toughest hats I have ever worn. In the summer they do get fairly hot, but what I have found that works well is to get it wet and let the evaporation cool your head. It works quite well. For this winter I will be melting in some sort of wax based sealant into the one pictured above to help with rain. When I wear these in winter, they do get sopping wet after a day out in the woods. Having a lighter version of an oilskin Outback-ish hat for the winter months would be nice. Especially with the terry cloth band to keep the cold tarp off my forehead.

If you decide to actually order one of these, I suggest that you measure your head carefully and make notes for off sizes. Ask for either a smaller of one size or larger of another size to get a good fit. Another important fact about these hats is that they do not stretch. What you have is what you will always have with regard to sizing. Keep this in mind and think about sewing in your own sweat bands as needed to adjust the sizing.

Ultimately, this hat is an ugly duckling. You can shape it and create what you want out of it. Think of it as a blank “canvas.”    <get it? canvas?>

For a tough outdoors hat, I highly recommend and suggest you look at one for yourself.

  • Share on Tumblr

Thoughts on Ammunition and Resupply – SHTF Post

by Woodsbum

I was surfing around and ran into a few comments that got me a bit annoyed. Normally I don’t like to get into SHTF type discussions and really never wanted to get into one on this site. What I read just bothered me enough that I had to write something.

What could have got me all fired up? Well, it seems that many SHTF/prepper types seem to have these very odd ideas about ammunition for their firearms. Let me list their misguided belief of how ammunition and resupply would work in a disaster….

  1. Their oddball firearm that is all tricked out to shoot sub-MOA will be able to just miracle up their “special ammunition” that shoots best in their firearm. Of course nothing else but this one brand functions correctly, but this is their “battle rifle.”
  2. Their 1k-2k rounds of ammunition that they have put back is the perfect amount to cover all their “End of Days” scenarios.
  3. Because they have a “special need” to shoot .300 Blackout or 6.5 Grendel, they can easily get more ammunition later on….  Somehow….. And their way is the best because that is the caliber they chose.
  4. Reloaded ammunition opens you up for some sort of automatic jail time if you have to use your firearm to protect yourself.

Let’s face it…..   I don’t understand any of this because it deviates from common sense. Let me just clump some of these misguided thoughts together for easier responses.

Finding Ammo:
For those of you who have tried to find .22lr lately, it is not easy. Most places are sold out all the time and it sells off in minutes of the time that it is stocked. Think back to all the problems people were having around Christmas this year. There was nothing at all on the shelves, no matter what caliber. Even 12 gauge shells were a bit scarce at times. Now multiply this by 10, because ammunition will not be shipped before food or water. How can you expect to order your 75 gr Hornady TAP if you can’t even get in a bottle of water? This makes no sense.

Now add the vogue cartridges that some like to shoot. Try going into a WalMart and buying a box of 6.8 SPC. How do these guys expect to find any more, EVER? This is especially true if the shooter of such specialty rounds refuses to reload? I can answer this question….  They will have a very pretty club because it won’t go “boom” anymore.

Volume on Hand:

If something ever does happen, how does the magic number of 1k-2k of ammunition seem to crop up as THE amount to have on hand? I have always wondered this. When I was in the military the Marines all carried 6 30 round magazines. This gave them 180 rounds that were ready for use. They also would get a bandolier of boxed up ammunition on stripper clips. These hold 210 rounds or 7 mags if you count it that way. This gives the combatant 390 rounds of ammunition for each patrol, firefight, encounter, etc. So 2k of ammunition put back would give you about 5 good firefights worth of ammunition. Considering that I don’t plan on getting into any more firefights in my life, I would think that this amount was more than acceptable in most short term SHTF type scenarios.

BUT, here is the problem with all this logic: These guys seem to think that 5 firefights worth of ammunition is all that you will ever need for the duration of whatever is taking place. They have a “battle rifle” with the sole purpose of tactical response of some sort. They take all their training classes where they shoot off around 800 rounds per class. These guys are all suited up and ready for their SHTF, EOLAWKI, Hellfire and Brimstone, Life Sucks type scenarios. If this were all true and they would never get resupplied how does 5 firefights worth of ammunition add up to a lifetime of potential (or imagined) Mad Max type living?

Are they planning on getting more when Cheaperthandirt is back up and running?

I think that they really need to either reevaluate their ideas on how much fighting they want to do or think more about how much ammunition they will need to be a part of their apocalypse fantasy.

Reloading Defense Rounds Will Get You Jail Time:
Huh? I have heard this several times on forums. According to their claims, anyone that reloads their ammunition will be arrested for premeditated murder if they use self defense hand loads to defend themselves. I just did several Google searches for this claim. Every article I read did not say that the whole case was hinged upon the fact that they reloaded their own ammunition. Some overzealous prosecutors back East did try and increase the charges because of this fact, but other forensic evidence did not support the defendant’s version of events in every current case that I saw. Of course I am not a lawyer, but keeping the lot number of the ammunition labeled on the magazine to protect yourself just seems silly. Couple that with the fact that I cannot find any evidence that this actually is an issue. All in all, I must discount this whole idea unless someone can provide me with specifics that prove otherwise.

My Final Thoughts:
My thoughts on this whole conversation about ammunition stock and resupply is simple. Keep as much ammunition available as you need to. If you are in an urban environment and plan on getting into massive firefights with your fellow survivors, then you better keep more than 5 firefights worth of supply. For those that are more rural and plan on “heading to the hills” might want to think about a small supply. Either way, stock what you think you will need.

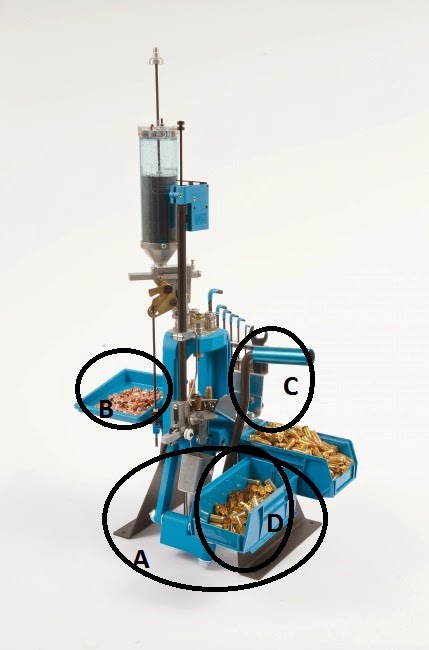
Get some reloading equipment and components. By saving brass, having reloading equipment and components on hand, and knowing how to use this equipment, you have increased your ammunition supply dramatically. Not only can you collect your own brass, but you can collect other people’s as well. Every time I go shooting in the hills, I bring back several hundred 9mm and .223 brass. I seriously doubt it would be much different in a SHTF type scenario. After everyone is done firing at each other, they won’t police up their brass. It will be literally laying around. Just look at pictures of war torn countries. Sites of previous firefights and battles have massive amounts of brass and discarded ammunition laying around.

Make sure your firearms are NATO or Soviet ammunition compatible. It wouldn’t really hurt to have both types of weaponry or both uppers for your AR. This way you can resupply any time that you find surplus military gear laying around. Again, look at war torn countries. Kids run around playing with mortars and RPG’s…… This gives you a way to resupply.

Also, ensure your weapons are able to fire any type of ammunition effectively. Don’t spend thousands on an AR that can only fire specific brands of ammunition. My suggestion is to get some cheap Wolf ammo (steel case) and blow out the chambers a bit to give some leeway in the ammunition you can fire. Not all brands are made within a tight tolerance. It also will make it easier when you reload so that you don’t have to be as anal about the final tolerances yourself.

The long and short of it is this: Do what you want, but use some common sense. Even those that lived through urban survival situations, civil war, invasions, and bad sitcoms tell you how hard it is to get anything special and out of the ordinary. What you have when the bad situation starts is what you will have throughout the duration. Don’t make it even harder on yourself by being “special.” As my friend Gunguy says, “be the Grey Man.”

  • Share on Tumblr

Cooking Over Flame at Home – Fire Pit

by Woodsbum

Many of my friends and family are amazed at how well I can coordinate an entire meal through the use of a campfire as my heat source. Until recently I just told them that I was so good at it because, “Generations of country run through these veins!” Either that or I would look at them and sing, “Red-red-red-red-red-red-neck!” Either way it was amusing for me. Not that either of these isn’t a true statement, but it also helps to practice up a lot when not out in the bush. Now I confess and let them know how to practice.

A lot of you might not live in a place where having a full blown fire pit or campfire in your yard is an option. For those of you who want to practice up, but don’t have the facilities, can use one of these type fire pits.

Inexpensive Fire Pit

Inexpensive Fire Pit

Even if you have to purchase wood from the local store, this is a great way to get the knack of cooking with actual fire. My first suggested dinners include those that are built in a Dutch oven and on aluminum foil. “Cowboy casseroles” and bannock are two great dinners to start with. For “Cowboy casserole” do the following:

  1. Cook some steak to medium rare or some brauts to a point right before they are truly cooked.
  2. Pour some drained, baked beans into your Dutch oven.
  3. Add some spicy BBQ sauce to the bean. Add enough to make them a little bit soupy.
  4. Cut up whatever meat you previously cooked. Make sure it is in small pieces. We are talking smaller than a bite. Add this to the beans.
  5. Toss in some cut up bacon.
  6. Cook to the point where the bacon starts turning color. Add some biscuit mix (mixed up of course) to the top. You can also mix flour, a table spoon of baking powder, salt, and enough water to make it into a batter, then pour it on top. Either way, it needs the biscuit type material on top.
  7. Cook it the rest of the way. If you added the biscuit type layer after the bacon had already started cooking, everything will get done at the same time.

For bannock:

  1. Take flour, a table spoon of baking powder, sugar, cinnamon, and enough water to make it into a biscuit type mix.
  2. Cook it like you see in the picture below.

Cooking bannock and Cowboy casserole

Cooking bannock and Cowboy casserole

As you can see, I took some foil and put it over some tree bark. You can put it right on the bark if you want, but expect a bit of dirt that way. I did the foil because my wife was eating with us and she complains about the dirt and grime in her food.

If you are not sure how it should look when you are cooking your steaks, check out this picture.

Cooking steak over a fire pit.

Cooking steak over a fire pit.

Almost done

Almost done

When you get a bit more experienced, you can even cook with a pot over the fire pit. Just take some metal rods to make yourself something like the following to put your pot over. I wasn’t cooking with the pot, but wanted to give you an idea of what it would look like with the fire pit.
Cooking with a pot over a fire pit

Cooking with a pot over a fire pit

As you can see, the only limitations on how to cook with one of these fire pits is your imagination. We have had ours for several years and have put several cords of wood through it. During the summer we use it at least three times a week and cook with it about half the time. We use it during the winter as well, but only two to three times every couple weeks. Still, it is enough to get good at open flame cooking.

In conclusion: You will never get good at something unless you practice. If you live in a city that frowns upon bonfires in your backyard, you have to get a bit creative. This simple fire pit not only gives you the opportunity to practice building fires any time you feel the need, but it also allows you to practice your bush cooking. For the $40-$50 we spent on this bad boy, we have been able to do the following:

  • Teach my family how to cook over open flame.
  • Teach all my family how to build a camp fire.
  • Teach my son how to do flint and steel fires as well as friction fires.
  • Spend countless hours of quality time with my family.

To me, this money spent has been one of our family’s best investments. Take a look at one and get out there to have some fun……

  • Share on Tumblr

Ammunition Basics

by Woodsbum

Because I have spent an obscene amount of money on firearms and firearm related activities, I felt that it would be a great opportunity to help those that are not familiar with ammunition parts or how it works. The following video is one that I use during my hunters eduction classes to give the students a basic understanding of how ammunition works, the different types and the names of the individual parts.

Please watch the following and enjoy!!!

  • Share on Tumblr

Dillon Precision RL 550B

by Woodsbum

In recent months, I picked up a second job as a bouncer so that I could get some extra toys. One of the top items on my list was a Dillon Precision progressive reloader. Both my brother and my father have one that they use constantly. This last winter, I even took some time of work so I could get in on the action. I spent a couple days using my brother’s system and ended up walking out with about 200 .44 mag, 800 9 mm, 600 .45 ACP, 400 .223, 100 30-06, and about 40 .300 Wby. This was all over 2 days and lots of beer drinking. This made me realize something. This system is really worth the money and any serious shooter should look into them.

This is what the whole system looks like all put together.

Dillon Precision RL 550B

Dillon Precision RL 550B

The one pictured above has all their bells and whistles on it, but let me go over a few things that are REALLY needed to help you with regard to speed and ease of reloading. I took the liberty of circling the accessories that you need to get and will list, explain, and prioritize the importance of these accessories afterward.

Needed Items Dillon RL 550B

Needed Items Dillon RL 550B

Here is the list:

Strong Mount: The Strong Mount raises your Dillon reloader high enough to allow all the parts to fit above the level of table it is bolted to. It also increases the size of the base of your reloader so that it doesn’t put massive amounts of stress on the base bolts and strip them out of the table. It also, and almost most importantly, allows for the press to articulate freely during the whole cycle. In another words, you don’t hit anything on the table or your chair while you pull the level. This simple mount really should be standard with the reloader for it is difficult to operate without it, comparatively.

Bullet Tray: The Bullet Tray holds your bullets for easier access during the reloading cycle. They sit in the tray right next to the station that presses the bullet and crimps the case. It is also angled just enough so that the bullets roll down and forward so you don’t end up chasing them around the tray. For those of you who have used single stage reloading systems it is best described as the solution to the eventual paper cut from the box due to digging around looking for another bullet to press.

Roller Handle: The Roller Handle allows for more uniform and comfortable pulls of the lever during the reloading cycle. Most single stage reloading people only pull the lever a max of 100 times an hour. Because of the speed through the use of the Dillon, you can pull the lever as many as 500 times per hour if you are really cooking through the cases. This means that comfort can become a fairly important item. The knob on the end of the lever that comes with the system by default just gets to be uncomfortable and clunky after about 250-300 rounds in about 40 minutes of work. That was all I could take on my dad’s system when I used it before I loaded all my components up and went to my brother’s. I actually started getting hot spots on my palm from the knob in that little time of using it. There are probably people that can suck it up or just don’t get bothered by the small little orb digging into your palm……  For me the Roller Handle is a must.

Empty Cartridge Bin/Bracket Assembly: The Empty Cartridge Bin/Bracket Assembly provides quick and easy access to your empty cases. It sits next to and a bit down from the handle so as to not interfere with its operation, but is conveniently located next to the first stage of the reloader. My dad only has the Strong Mount and no other accessories for his Dillon. He has to grab cases from one of those holders that are very common for single stage systems. After having used both setups, this accessory will speed up your reloading by at least 10-15%. It has to do with the cases being a few inches closer to where you put them into the case holder. Less movements and less head movement to look for the next case really does increase your speed over time.

Some accessories that are offered that you really don’t need, but are quite nice.

  • Low Powder Sensor – it sounds an alarm when your powder gets low in the measure.
  • Additional Primer Tubes – You can load up several of these tubes so you don’t have to quit reloading to refill in the middle of a run.
  • Quick Change Assembly – These Quick Change kits provide you with all the parts needed to just set your dies and powder measure for each caliber that you reload, then swap the whole system out when you go to a different caliber. No more resetting your dies, adjusting your powder, etc. It is only a couple pins and it is ready for the next run.
  • Casefeeder – I have not seen one of these working yet, but I REALLY would love to get one up and working on my system. It would really speed things up that much more.

At this point I am having a hard time deciding if I am going to buy all these additional accessories before I get my shotgun shell reloader. Depending on how I decide to proceed, I might get the casefeeder in the near future. If I do, I will update everyone as to how well it works.

Being someone who loves to buy things, but has a weird mental block when it comes to time saving purchases I have realized that progressive reloaders like the Dillon RL 550B is far more. It doesn’t just allow you to reload quicker, but allows you to actually save money enough to justify using what you just reloaded. There is no need to put off multitudes of other projects just to get enough rounds ready for hunting. I can crank out hundreds of rounds per hour.

The last part of the whole equation is about saving money. Many times I would reload a few rounds, but supplement my weekend outings with a few hundred factory loads. This actually ended up being more costly in the long run. Components are so much cheaper than loaded rounds if you buy things in bulk. Purchasing only enough materials to do a few hundred rounds really never cut overall costs that much. Now that I can really crank out the rounds, it will get much cheaper in actual monetary costs. Couple that with time savings and I think we really have a winner here. Let’s face it, getting the opportunity to spend one hour drinking beer, smoking my pipe, and reloading enough rounds to take the wife out shooting makes this an affordable past time again.

  • Share on Tumblr