by Woodsbum
Although I don’t like to be called or considered a “prepper” per se, I do believe that it is the responsibility of every adult to ensure the safety and welfare of their family. This includes safety items such as guns and associated equipment. Lately, I included body armor as part of that equipment due to some recent national and local incidents that truly gained my attention. I have started buying body armor and tactical pieces for my son, my wife, and myself. There are also additional reasons that I feel that this is important such as: I am a bouncer at a bar on the weekends and I teach hunter’s safety classes with live fire. Either way, it has become an item that was high on my list of required equipment.
The first post in this series (Body Armor – Part 1) will cover what I initially purchased and branch out to what changes I have made to my initial investment. More correctly it will explain what I purchased and why, then will add more depth to the already murky water I have entered in my search for proper/appropriate ballistic protection. Body Armor – Part 2 is located here. It will cover the information about the police surplus armor I picked up, my thoughts on it, and what I plan to do to it so that it will fully suit my needs.
When I first started looking at body armor, step 1 for me was the carrier. I was VERY persnickety about the carrier and what I wanted in a carrier. My criteria were as follows:
- Multicam or Coyote in color. I did not want digital or black…. ESPECIALLY ACU. I am not fond of camo built only for rock quarries.
- Padded shoulders that make it actually comfortable.
- That it fit, which means that it be capable of fitting a large framed person.
- That it not be as breathable as possible.
- Something less than $300.
What I ended up with was the Mayflower APC.

Mayflower APC
I am not fond of having all sorts of crap hanging off my chest so I only added a kangaroo pouch for 3 magazines to the carrier for normal wear. I do put my 1911 on the front in a military surplus flapped holster when I am not wearing my battle belt. My other mag pouches, holster and dump pouches are on that battle belt. Eventually a radio pouch will be added for my HAM radio, but I have been having a hard time finding a pouch that I like and fits my Yaesu. Basically, what you see now is what I use on my carrier. Of course everyone is different so other people might have things dangling left, right and sideways.
I felt that using a Taz blanket in the background was completely appropriate considering we are showing tactical items.

Mayflower APC
When I started looking for plates, I was interested in saving as much weight as possible while providing the most protection all for the cheapest price. This was tough to do since most lightweight plates are not big enough and those that are big enough are pretty much only the AR500 materials. Since I did not have $1000 per plate to spend on custom poly plates I was really stuck with either ceramic or steel. It ended up with me purchasing Level VI – in conjunction with – plates from
BulletSafe. They have a
video where they shoot the crap out of one of their plates and it seems to stack up quite nicely against other manufacturers. Add the $180 price tag per plate and I was sold. Now I have found that the 12×10 plates are just too small for my large frame. I was originally going to get Level IIIA backers and just run with what I had, but then I ordered a Level II vest to wear concealed as I needed. This changed my outlook on my plates and I ended up ordering some AR500 plates instead. These ceramics will be passed along to my wife.
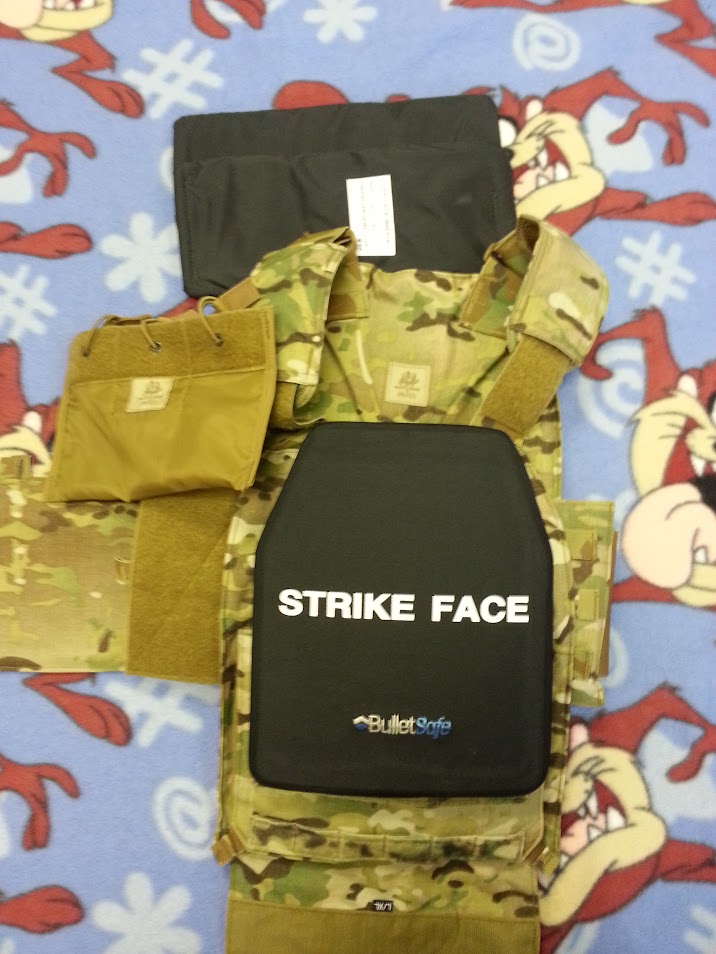
Plates
The side panels I picked up are
Level IIIA soft armor. Level III side plates seemed to all be of the steel construction or only 6×6 sized in ceramic. This left me thinking that 5×13 was bigger than 6×6 so I went with soft armor for at least a little bigger area getting some protection.
Since I found an AR500 kit in 14×11 front/back plates with 6×8 side plates, I figured I would increase my coverage area and forgo the Level IIIA backer plates. The weight difference is still going to be a total of 6 lbs between both ceramics with backers and the AR500 plates. Now I am wondering if I should either add the plates to the front corners of my vest to work as added abdominal/side protection in addition to my side panels or keep the current Level IIIA soft armor as is and give the side plates to either my wife or son.

Side Panel
Another wrench to throw into my whole quagmire of bulletproofing is that I picked up a
Level III abdominal plate that is still 7 weeks or so from being built and delivered. It will look like this.

Abdominal Ballistics System
Because I have added this additional piece, now have extra large steel plates for front and side, have Level IIIA side panels, and am getting a Level II soft vest I really need to sit down to figure out how I am going to divvy all this out. Either that or I can go walking around like a juggernaut. The reason I picked this up was due to my experiences in the field dealing with GSW victims. Many victims I saw had been gut shot where vascular structures or such items as kidneys were hit. This can cause someone to bleed out and die as quickly as a chest wound. It only made sense to me that abdominal protection was needed to properly protect me in the even that this gear was worn for real.
The argument that pelvis and upper leg protection, neck protection and even upper arm protection would be needed if I was go so far as to include abdominal protection. I don’t think I will end up going that far because a reasonable expectation of movement must also be factored into the whole process. If I add all this additional ballistic protection I will be moving like the kid from Christmas Story when his mom bundles him up. If I fell over I would be like an overturned turtle trying to break dance. All in all it would be bad.
So at this point, I have spent a crap load of money and am still not sure how I want to outfit my family or myself. I do believe that it has helped me to start off small and then add to this project so I can pass things down the line that don’t work. My only concern is that I will end up wasting money in the long run on items that don’t fit into any of our “kits.” Only time will tell, but I do have quite a good base to start with.
Next week I will show you my soft armor in Body Armor – Part 2 and continue with my saga.