Category Archives: Camp Techniques

Outdoors and camping techniques to help guide you with your outdoors lifestyle.

Split Wood Fires

by Woodsbum

Several people have told me that I take things for granted due to my upbringing. One of the things that I think probably fits that description is my ability to make fire, even in terribly wet conditions. To assist people in getting better at making fires, I searched around for a couple videos on split wood fires.

Split wood fires are just that: fires made from wood that has been split into smaller diameter sections. The nice thing about split wood fires is that you can get past a lot of wet or punky sections and just use the good parts, you can take big pieces and get them down to desired size without the need for aimless searching through the woods, and even allows you the ability to store large rounds that just get split up before use. It is a great technique and skillset to have.

Here is the first video I found. It goes over some basic ideas and fire lays to get you started.


This one is a bit more advanced and shows the use of a bit larger wood.


I would take every opportunity to practice these techniques and get good at using them. As an estimate, I would guess that about 75% of the fires I make in the bush are split wood type.

Enjoy!

  • Share on Tumblr

Erik Nording Rustic Pipe

by Woodsbum

For many years I was a cigar smoker. Although I love the taste, feel, and aroma of a good cigar the price really put a damper on the various types and amount that I could afford. Even with the lowered price of bundles or seconds it was way too expensive of a vice for me to really partake that often. That was when a friend of mine gave me an old Savinelli pipe that he no longer used. From then on I found that the price of pipe tobaccos gave me the variety that I craved with the lowered costs that I required.

As years went by and more and more pipes found their way into my collection, I stumbled across a very nice looking Erik Nording. Although I am anything but a pipe snob, I was actually quite proud to have this beautiful piece in my collection. Between the draw, the way the heat maintains an even tobacco burn, and the lack of moisture that builds up this has become my favorite pipe by far.

Erik Nording Rustic finish

Erik Nording Rustic finish

As you can see, the stem comes apart quite easily for storage and transport. This makes it the perfect pipe for taking with you on outings. The tobacco shop where I bought this actually has extra stems for sale in case you break one. This also is a nice feature of this pipe.

Erik Nording Rustic pipe

Erik Nording Rustic pipe

Over the years I have become quite fond of the up swept pipe shape. It cuts down on the amount of “juice” that travels up the stem when you get fresh tobacco. I am sure that there are all sorts of techniques to keep this phenomenon from taking place, but I sure have not been able to keep it from happening with any regularity. This is why I only make churchwarden style pipes for myself and am really fussy about the pipes I purchase. If I could find a pipe that had a “juice” bypass valve, I would be all over it.
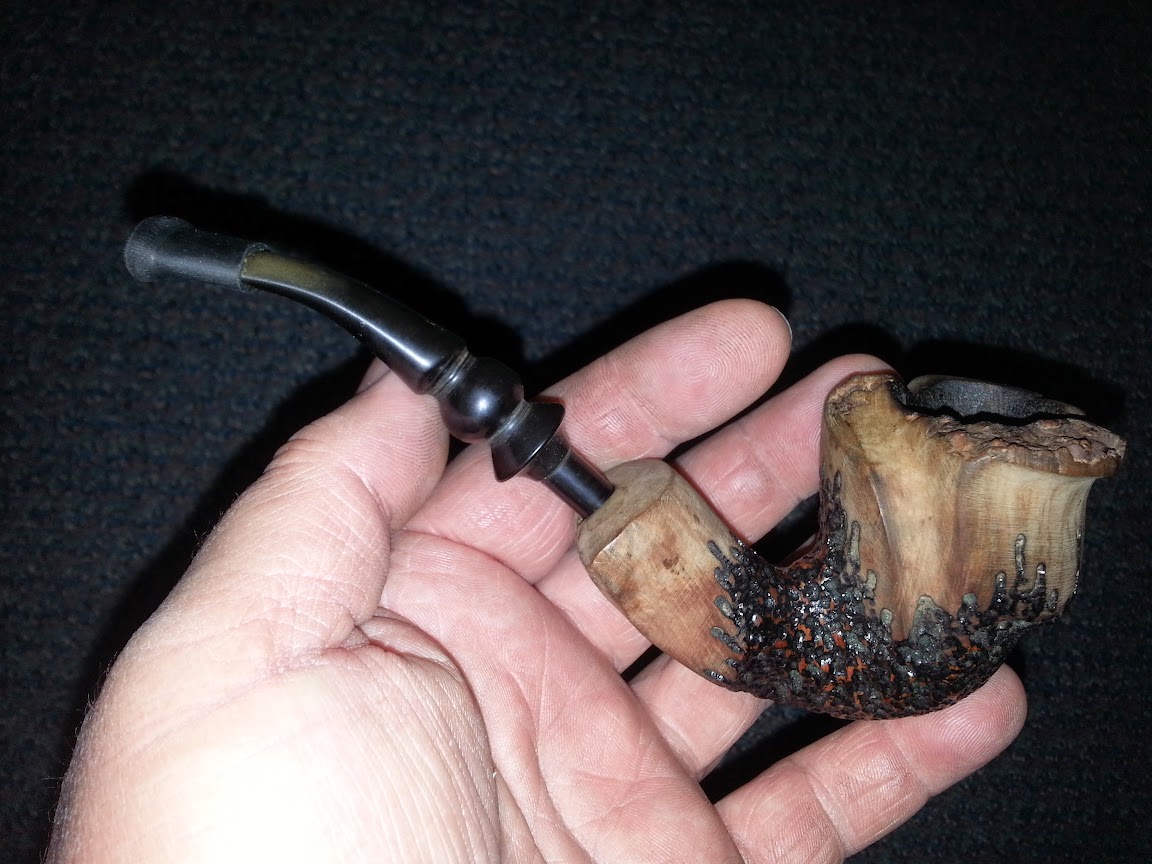
Nording pipe

Nording pipe

The other thing I have discovered is that I like pipes that are big and bulky. I am not too fond of the smaller, dainty models. Maybe it is because I have bear paws for hands, but the actual smoke and draw just seem to be that much more pleasant with a larger pipe.

Again, I am not a pipe expert and am self taught via trial and error. There are many things that I am sure that I am doing wrong, but I don’t care. Smoking a pipe isn’t a status thing for me nor is it something to make me “look cool.” It would take much more than a pipe to make me even remotely close to “cool.” I enjoy the different flavors, aromas, tastes, and relaxation that smoking a pipe provides.

If you are debating on moving over to a pipe my main recommendations for you are as follows:

  1. Spend some money on a good pipe. A $40 pipe will not give you the experience that a $200 pipe will. I don’t know the physics of it all, but I know from personal experience that any cheap pipes that I have purchased have either been intentionally “lost” or given away. The most expensive pipes give a much more pleasant smoking experience.
  2. Making your own pipe is a close second to an expensive pipe purchase. Just make sure you make the stem long enough to cool the smoke properly. Otherwise you get a burned taste from the smoke and the flavors of the tobacco are lost.
  3. Get good tobacco. DON’T BUY PREPACKAGED TOBACCO. Go to a cigar shop and look at the glass containers for your tobacco. It is 200x better tasting and burning.
  4. Get a good pipe lighter. The cheap Bic lighters seem to be only capable of successfully burning my fingers and can barely light the bowl. Some can make it work, but I can’t. I doubt new pipe smokers can either.
  5. Don’t think of it as a cigarette. It is more like a cigar. Don’t inhale the smoke. Play with it and taste it. This also adds to the relaxation and enjoyment of the pipe smoking experience.

I hope this helps you out if you decide to try pipe smoking or have been thinking about getting a Nording pipe. Both are highly recommended by me.

  • Share on Tumblr

Swedish Torch

by Woodsbum

In my normal Internet wanderings, I ran across a new technique that I have never seen before. It was called a Swedish Torch by the person that made the video. I can see how this would work VERY well in highly wet parts of the world. Next time I get out in the woods when it is raining I plan on trying this out. If anyone else has either used this technique please leave a comment.

  • Share on Tumblr

Making an Insulation Bed

by Woodsbum

One of the biggest mistakes that people make when trying to make in improvised shelter or sleeping on the ground is not insulating themselves properly. Either due to lack of training, experience, or even discussions about it around outdoors groups, I have seen this problem become more and more prevalent. This is especially dangerous during the cold nights or when snow is on the ground. You can lose massive amounts of heat through your body’s contact with the cold ground, thus increasing the risk of hypothermia.

There are several things that can be done to fix this problem. Many people advocate the use of cots, but the reality is that they can sometimes be no better than sleeping on the ground if it is really cold out. The cold air can circulate under the uninsulated cot and this increase your heat loss during the night. Sleeping pads do help, but all this increases weight that you carry with you. Considering what Mors Kochanski says, “The more you know the less you carry,” the best bet would be to know more.

This is where insulation beds come in. Natural materials such as boughs, leaves, and other vegetation work quite well as an insulator. By just piling up natural materials properly you can decrease your body’s heat loss and actually make yourself quite comfortable throughout the night. It also works quite well to spread down boughs and vegetation when sleeping on snow. The vegetation will insulate your tent or bedroll, cut down on the icing up of your ground cloth from melting snow, and will also keep you from sinking throughout the night.

Here is a quick video I found that explains the whole insulation bed concept.


In this video, the bed is actually raised up as well. This may or may not be necessary, but the insulation may be required to help maintain body temperatures throughout the night if you don’t have some other sort of sleeping pad or bedroll.

  • Share on Tumblr

Cooking Bannock

by Woodsbum

One of the many great things about camping is a wonderful treat called bannock. Cooking bannock and making bannock is as much an art as it is a treat to eat. The closest way to describe it is hard tack.

Bannock is nothing more than flour, baking powder, water, and whatever spices you desire. I personally like sugar and cinnamon for breakfast or dessert, but mixing bacon grease and a bit of salt work well when used as a hard tack.

Here is a great video about how to cook over an open fire.


This video is about actually making bannock. Remember to experiment a bit with the spices. I know some people that go so far as to add bacon bits and grease so that they have an actual meal/snack or add marshmallows, sugar, chocolate chips, etc., for a dessert. Raisins are also not a bad addition. You can even go far as to use bannock on top and bottom of a bunch of preserves in the middle to make a great Dutch oven cobbler.


Again, just have some fun and test some things out!!!

  • Share on Tumblr