PTR-91 Scope/Mount Combination

by Gunguy

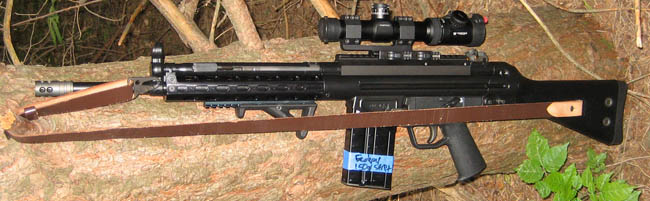
Several people have asked what kind of scope and mount combination I have been running on my PTR-91 since I put up pictures with a previous post. I decided to put a Low Profile Rail Scope Mount on my PTR-91 instead of a STANAG Steel Claw Mount to keep the scope as close to the rifle as possible. I then mounted a MOA Vortex Viper PST 1-4×24 scope in a ADR-X 2 inch Offset Cantilever Ring Mount.

The above combination is rock solid and very accurate. It was rather costly but worth every penny. The scope and mount were an investment and I can use them on different rifles in the future if I ever decide to sell my PTR-91.

ptr_91_scope

  • Share on Tumblr

PTR-91 Firing Issue / Ammo Sensitivity Update

by Gunguy

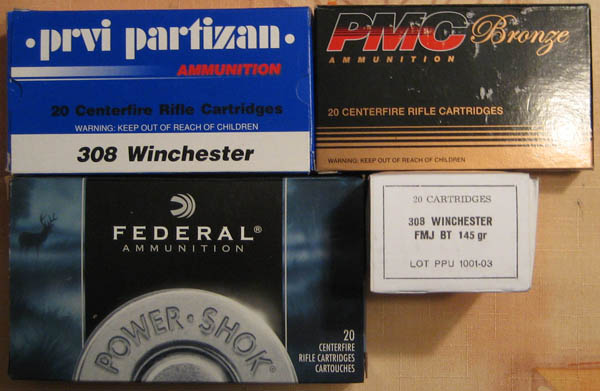
I took the PTR out for several of hours of shooting. I tried making the test as controlled as possible so I could make up my mind if I should keep the rifle or not. I bought 20 round boxes of five different types of ammo. I listed them below and how many failures I had while I fired off a magazine of each. Please note that I only put 19 rounds in each magazine.

  1. 308 Winchester Federal Power-Shok 150 Grain Soft Point- No Failures. My Ptr-91 loves expensive hunting ammo.
  2. PMC Bronze 308 / 7.62 Nato- One Failure even though previously it would not fire more than one round at a time before failing to fire the next round. I attribute this to getting the rifle broken in. If anything changes I will let you know.
  3. Prvi Partizan M80 145 grain FMJBT 2009 Production – My PTR-91 absolutely hated this ammunition. It only fired the first round and then failed to fire the second. After racking another round it failed to fire that round and the next. After that I had a triple feed bloody mess and I gave up on the ammo.
  4. Prvi Partizan .308 150gr Soft Point – After the previous experience I did not expect much from the PRVI 150 grain soft point. This ammunition fired flawlessly like the 308 Winchester. The commonality between the two types of ammo is that they are both manufactured as civilian .308 and not military 7.62. The PTR is manufactured to use 308 and not 7.62 so that makes sense. Hopefully once the rifle is broken in it will take all types of ammo.
  5. Australian 7.62 surplus ammo – I didn’t have a link because I traded my friend some of my PMC 308 for the ammo. The Australian surplus had only two failure to fires but the rest went off without a hitch.

In summary the PTR-91 is a finicky rifle when it comes to ammo. I’ve only put two hundred rounds through it so it’s not broken in yet. I bought the PTR-91 because H&K G3’s are not available and H&K 91’s are hard to come by. In hindsight I should have bought a DSARMS FAL. I’m going to stick with this rifle for the time being but I would not bet my life on it.

ptr_91_scope

308_ammo


  • Share on Tumblr

Firearm Bill of Sale Template

by Gunguy

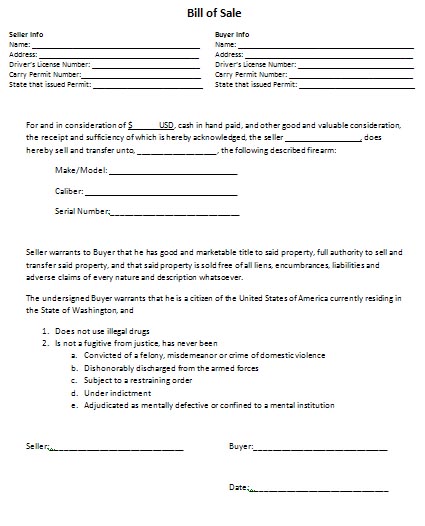
For those of us that live in states that allow transfers of firearms between private parties then the document below will point you in the right direction. Before you download the document and go forth and sell and or buy guns keep this disclaimer in mind. I’m not a lawyer, I don’t advocate using this document in place of legal advice.

I’m just a blogger, what the hell does a blogger know about the law anyway, so for your sake and mine talk to a lawyer and make sure the person you are buying from or selling to passes the comfort test. By the comfort test I mean do I trust this guy/gal with a gun or did this guy/gal is seemingly trustworthy enough to buy a gun from? Words to mull over, indeed.

Firearm Bill of Sale

Firearm_Bill_of_Sale1

  • Share on Tumblr

PTR-91 Firing Issue / Ammo Sensitivity

I picked up a PTR-91 a couple of months ago without doing any research beforehand. I bought four boxes of 308 Winchester Federal Power-Shok 150 Grain Soft Point ammo to try it out with initially. I sighted in the rifle within 20 rounds and put another 40 rounds through it without a hitch. Cleaning the rifle wasn’t a big deal except for putting the bolthead back on the bolthead carrier properly. I found the following HK G3 Disassembly instructions on www.MG-42.net. The information made putting the rifle back together a lot easier. If you have had any issues putting the bolthead back on the carrier then I recommend this bolt assembly tool. After cleaning the rifle I thought I would not have any issues with it for a long time and then…..

I bought a case of PMC Bronze 308 / 7.62 Nato for the rifle and that’s when my firing issues started.

My PTR-91 did not like the PMC ammo even though it was brand new and commercially produced . It would fire one round, the rifle would cycle the next round  and then fail to fire the following round. I tried about a dozen times and it would do this for every round that the rifle cycled. The only time it worked was when I manually worked the action. I thought that this was strange and cleaned the rifle and put it off to the side until I could call PTR.

I called PTR and they asked what kind of ammo I was using and they said that the PMC Bronze would be fine. The PTR rep sent me a new firing pin and spring. After installing the new firing pin and spring the firing issue was not fixed. At this point I went online and quickly realized that a lot of people were having problems with their PTR rifles. I came across forum posts about the PTR being picky about certain types of ammo. Here is the list that I’ve seen online.

  1. South Africa
  2. Winchester white boxes marked 7.62
  3. Venezuela Cavim
  4. Austrian (Hirtenberger)
  5. Some lots of German
  6. British (under powered) will not cycle action
  7. Indian (Over powered)

I also checked the headspace on my rifle with this feeler gauge from Amazon.com and it was within the recommended tolerance of .004-.020 at .017. I had all sorts of issues trying to figure out how to measure the head space on the PTR-91 until I found the following instructions to check the head space on a PTR-91.

  1. Let the bolt and carriers snap forward on an empty chamber
  2. Set the weapon to fire
  3. Pull the trigger
  4. Measure the gap between the bolt head and the bolt carrier should be .004-.020

Since my ammo was not on the list but it was sold as 7.62 / 308 winchester I thought it might not be to 308 spec so I switched back to the expensive Federal 308 ammo and the rifle worked like a champ. I then tried my friends PRVI 308 military surplus ammo and it went through it with no issues. I also used Winchester 308 hunting ammo and it went through it all up except for one misfire. For the final test I loaded a mix of all three types of ammo in a 20 round magazine with 19 rounds and fired the whole thing off without any issues. I’m going to test the rifle some more this weekend a write up my final opinion on the ptr-91 next week.

  • Share on Tumblr

KEGERATOR!!!!

by Woodsbum

This post isn’t very backwoods, gun, or gardening related. It is however AWESOME!!!!!

After many years of putting it off, I finally did the work needed to get my kegerator up and running. As you can see from the picture below, I will have two CO2 beers and one nitrogen beer on tap. There are a few pieces that I am still waiting on to arrive, but for the most part I am done with all the hard part.
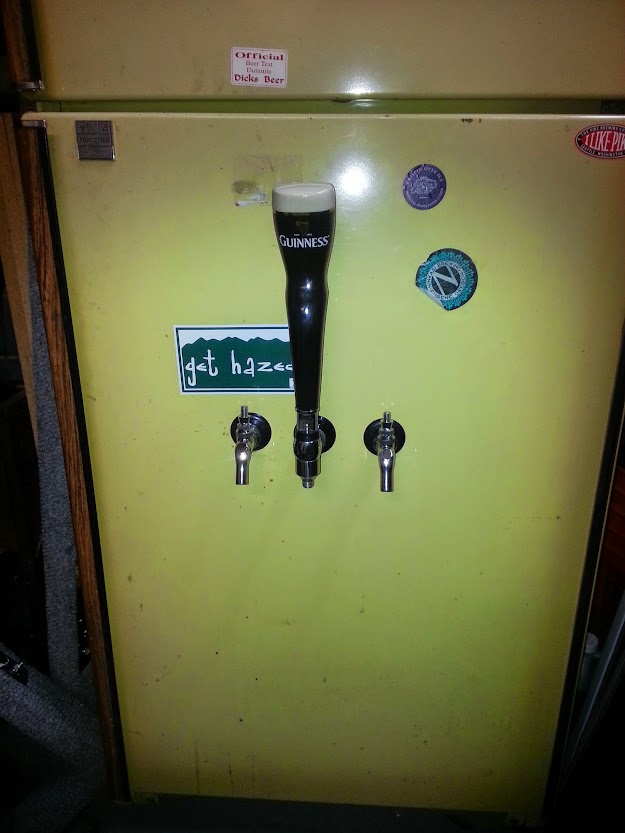
The beauty!!

The beauty!!

The refrigerator was given to me by my brother a while ago. It ended up quitting me for about a year. I then REALLY examined the wiring and found that all I needed to do was tighten a connection. Been working ever since. There was already one hole drilled and a pretty worn/nasty spout installed. He also ran a CO2 hose through the side, but was down in the corner so that kegs could very easily pinch a line. I did a few modifications to make it my own (read as BETTER!!!).
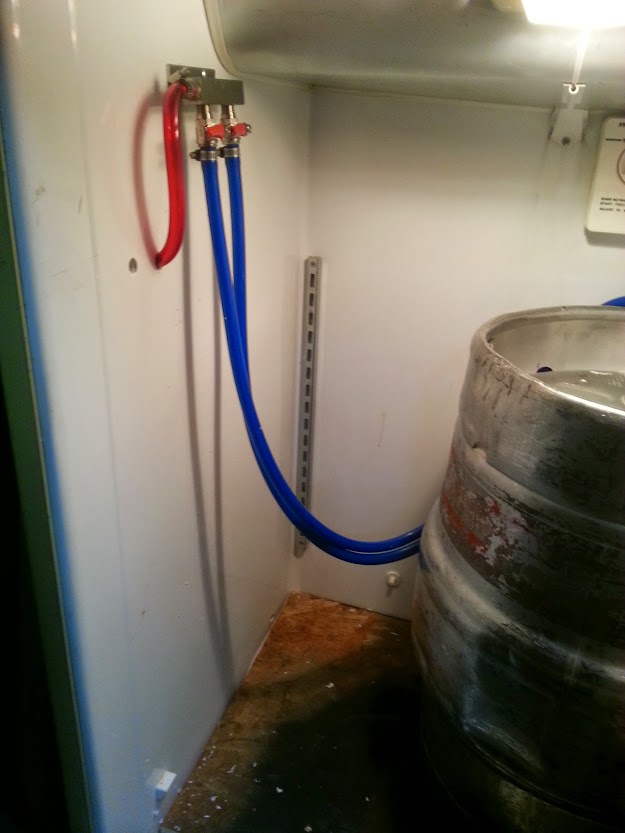
CO2 lines installed.

CO2 lines installed

As you can see, I installed a manifold for my CO2 so that I could run two beers off the one tank. I color coded it so that it would look nice as well. The second hole you see is for my nitrogen lines. That, my CO2 regulator, sankey coupler, and spout for my Guinness faucet should be here today. It was tough, but I drilled the hole just barely big enough for the hose. I did this so that it would stay nice and tight without me having to squirt expandable foam all over the place. I also built a floor for the kegs to sit on out of some scrap wood I had laying around. This has helped keep things in place as well as protecting the bottom of the refrigerator from the kegs as I swap them out.
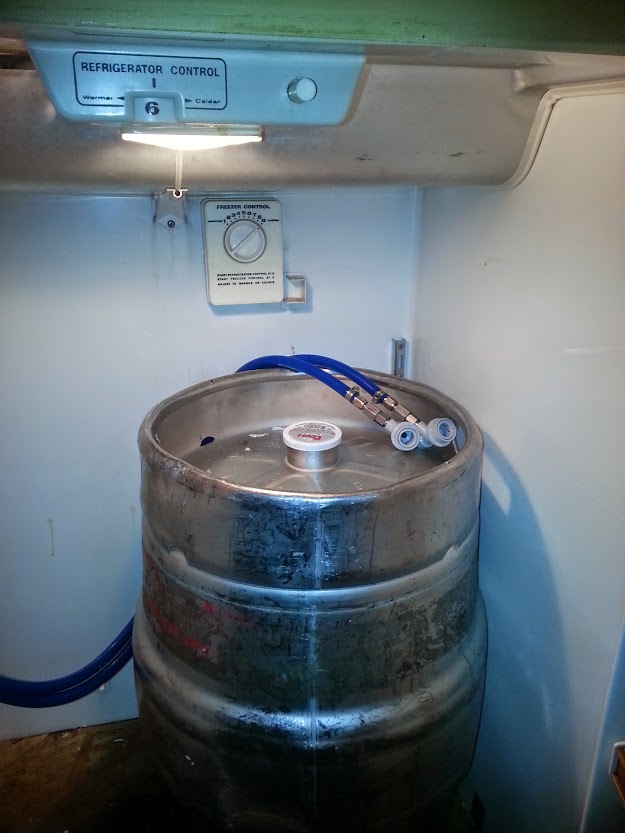
Ball locks on gas lines.

Ball locks on gas lines.

Another thing I did was for ease of swapping couplers and kegs around as I changed out beer. If you look, I put ball lock keg fittings on all my gas lines and I put sankey to ball lock quick disconnect conversion kits on my couplers. By doing this, I can easily swap out between American and European sankey couplers, “M” couplers, or just use the ball lock system for homebrew in corny kegs. It gives me much more freedom in my beer choices. I also did this for my nitrogen system so I can swap in the same fashion. This means that I can use my Guinness coupler (U coupler), sankeys or hook up a corny there as well.
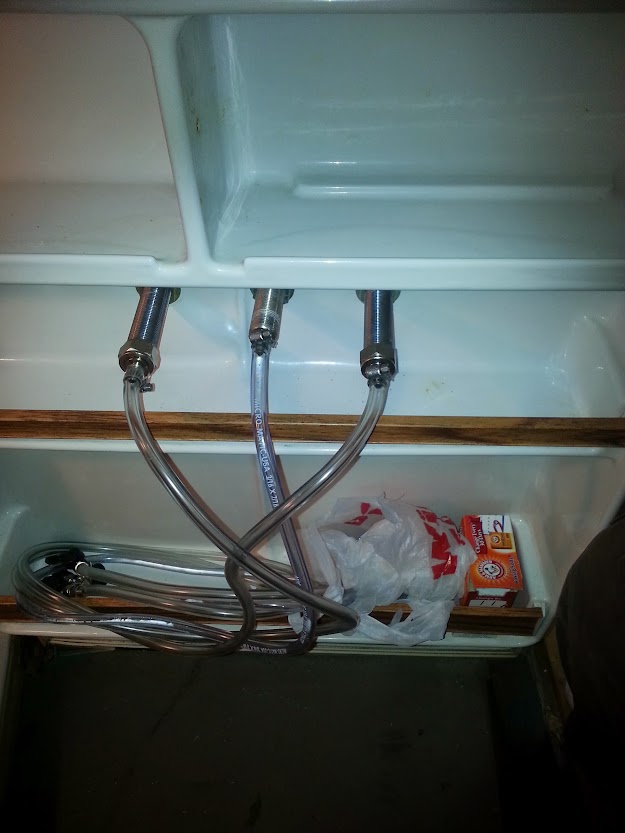
Beer lines to my shanks.

Beer lines to my shanks.

I did the same thing with the beer lines. You can see the ball lock connectors in the door tray. I put the Guinness between the two Perlick faucets so that it wasn’t as odd if I was not running all three beers at once for whatever reason.

To drill the holes, I used a 1/2 inch hole saw. They are about $10 from Home Depot for a good one. It really wasn’t that big of a chore and it really came out well.

The faucet handle situation does need to be rethought a bit. The actual tall, bar style handles I have don’t fit correctly where I have the spout. The handles hit the door and thus don’t close out the faucet properly. This is a serious problem and I will have to do some thinking about how to fix this.

Since I already have my tanks and such, I will end up building myself a tank stand/holder to keep them safe. My CO2 tank actually was originally a soda machine tank, but I reallocated it for a while to do some welding. It already has food style CO2 in it, so hopefully my welds don’t get sick since it wasn’t a welding mix.
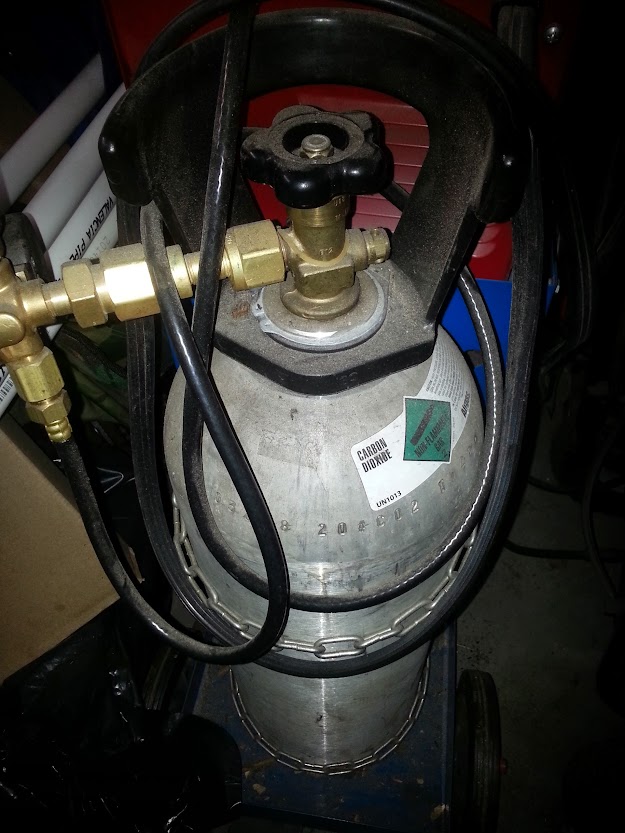
CO2 tank

CO2 tank

Like I mentioned, my regulator for this will be here today. My nitrogen tank will be ready today as well so I can hook up the lines and this bad boy!
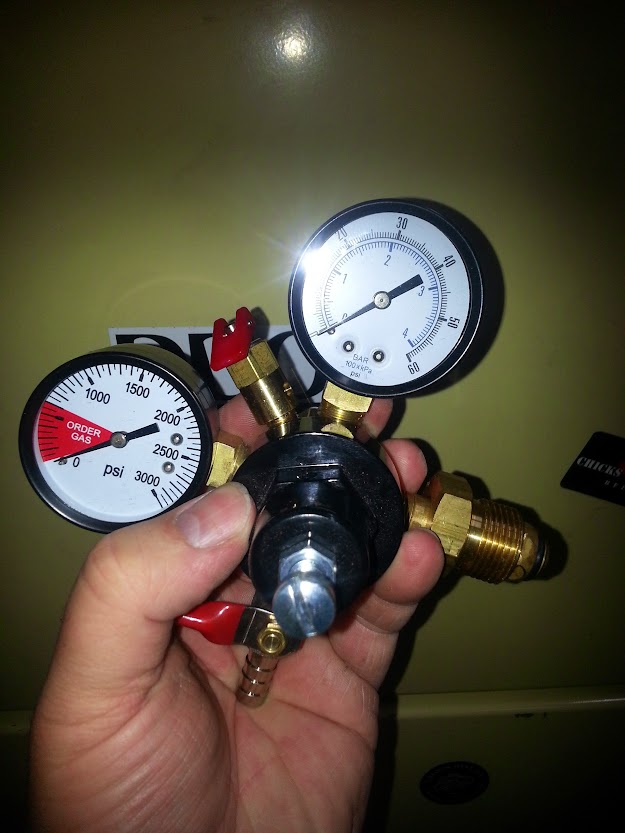
Nitrogen regulator

Nitrogen regulator

I was a little surprised by the differences between CO2 and nitrogen regulators. Notice how the second gauge goes all the way to 60 PSI? Guinness for instance should be run around the 30 mark from what I have been told and have read. It will be a fun experience to “test it out and drink the practice runs.”

Since I have not decided what to do for a drip tray yet, I will have to also do some thinking there. I have been considering re-purposing something completely obnoxious for the task, but can’t find anything worthy as of yet. There is no doubt that I will think of something, however. I might just weld up something out of steel. We will have to see.

If you decide to do your own kegerator, do yourself a favor and do it right from the beginning. I have seen many that were done in a haphazard fashion that were just given away a while later because it didn’t fit the person’s needs. Spend the money for the right parts and just get it done.

Happy beer drinking!!!!

  • Share on Tumblr