Category Archives: DIY Projects

Garage born and raised projects that are done because no one else seems to be able to build it like you would. In another words, you did it yourself and it rocked!

Kuksa – The Bushcrafter’s Coffee Cup

by Woodsbum

There are many, many really cool things that you learn about when diving into the whole “bushcrafting” world. Different techniques for doing things that you have done for years, re-purposing old gear, making your own kit items, and learning about things that you didn’t even know existed are just some of the ways in which an outdoors-person can benefit. When I ran across wooden eating/drinking items, I was not too sure at first. After time, I found that building these things didn’t just help me to become better with cutting tools, but it also helped me to think differently about what I truly needed to carry with me into the woods. Although my spoons, bowls and cups are not ready for prime time I wanted to pass along the whole idea of making your own items. When I make something that is more than one step above functional, I will include pictures and do a post on it. Until then, please learn about the “kuksa.”

Kuksa and Guksi originate from Scandinavian drinking cups that were made from birch burls. Now a days you can find them from all sorts of varied wood types, but they are basically the same concept. They are hollowed out pieces of wood that make a cup shape and have a handle. Not a big innovation of design. They are, however, very nice to use. The ones that I have made seem to cool my coffee to a drinking temperature almost instantly and keep it there for a relatively decent amount of time. They also give something I like to call “style points.”

Here are a couple pictures of different kuksas so that you have an idea of what I am talking about.
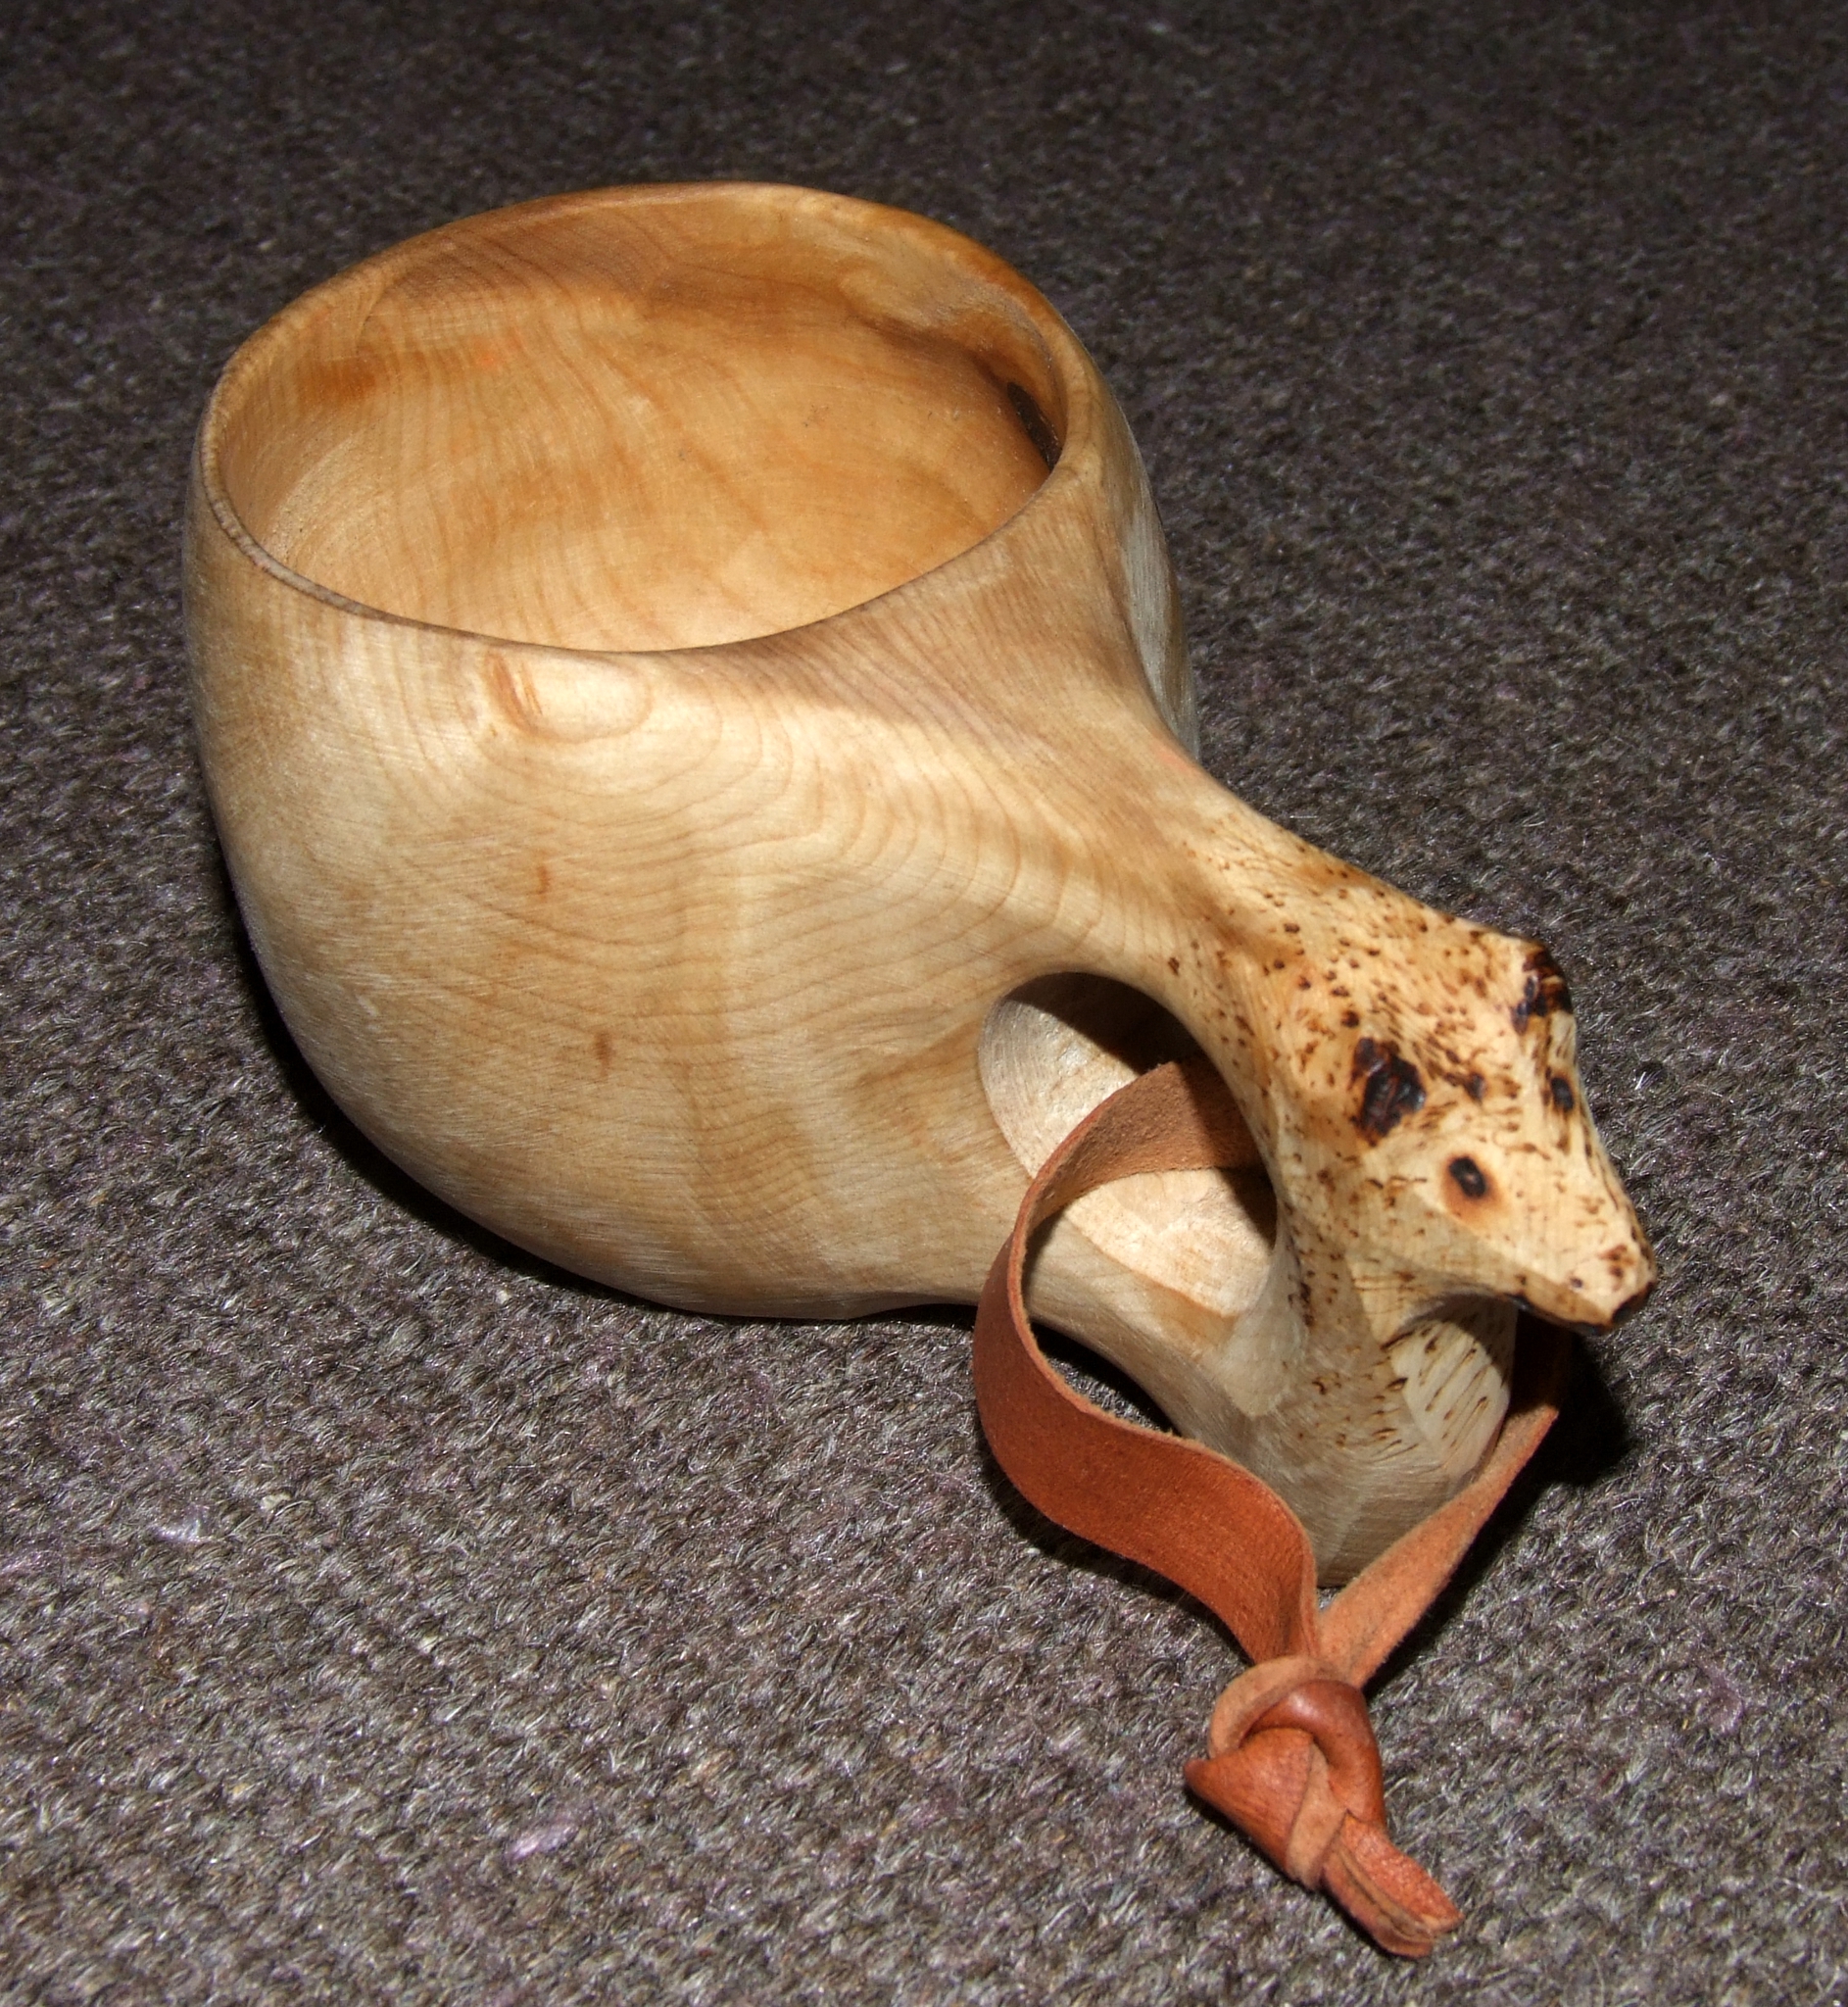
Kuksa

Kuksa

Kuksa

Kuksa

As you can see, they differ in shape and handle style. The only common thread that they really seem to have is that they hold liquids and have a handle of some sort. Many are hand carved in the traditional construction method. Many are also done by machine or a combination of machine, knife and axe. Once completed, they are soaked in some sort of a non toxic oil, like vegetable oil, and allowed to dry so that they don’t crack out.

Here are a few videos on construction.

And another one:

Again, these are beautiful and function pieces of equipment that can either be carved or machined, all depending on your skills. So, grab some wood chunks and get to work making your own. It is a rewarding experience that can become a bit addictive over time.

  • Share on Tumblr

Collapsible Grill or Pot Holder

by Woodsbum

Especially during the spring and fall months, I tend to spend a lot of time in my garage making things. Here is one of my creations that didn’t take that much to build, but is VERY useful when out bushcrafting/camping. It is a takedown grill that also turns into a pot holder for use over your campfire.

Here is a good look at my contraption:

My Pack Grill

My Pack Grill

As you can see from the picture, I made loops at the end of each of the cross pieces as well as a loop and hook on the end of the longer side pieces. This allows me to adjust the spacing, location or even take the entire thing apart for transport.

Here is a picture of it for use with a pot:

Hooked at the end to hold a pot

Hooked at the end to hold a pot

This is how it looks with a tea pot on it:
Making some tea

Making some tea

As a grill, it works quite well. I have used it to a large degree as a way to cook steaks and brauts, but I am sure it will work for any number of things you could cook on a grill. Here is a good picture of how it looks cooking some nice slabs of steak.
Cooking some steak

Cooking some steak

To make this, I just fired up a blow torch and bent the ends of the round stock metal into the desired shape. All told, I think I have less than an hour in the whole thing. This includes cutting my transport/carrier.

For transport, I actually carry it in a PVC pipe with caps that I just tie onto the side of my pack. I did this for transport so that I didn’t have to even clean the grill before I put it away. I could just burn off the extra food that was stuck onto it and then just slide it into the pipe after it cooled off.

Remember that anything you can think of as possibly useful in the bush can probably be fabricated in your garage. Just take some time and play around to see what you can come up with. All told, I love this little grill and wonder all the time as to why I didn’t build one earlier in my life. It would have saved me a lot of hassle with the Weber replacement grills that I used to carry.

  • Share on Tumblr

A Bit Off Topic – Officiating Weddings

by Woodsbum

I know the whole concept of officiating a wedding is a bit off topic considering everything else that is posted on this blog, but I decided to post this for the following reasons:

  1. This whole blog is about doing things yourself and self reliance.
  2. Officiating your kid’s wedding saves money and adds to the special day.
  3. You get to do and say what you want within guidelines of the law.
  4. It’s my blog and I think this is important if you don’t like being at the mercy of others.

This last weekend I performed the wedding ceremony for my daughter. It was a simple, beach wedding that was not very formal or elaborate. As a matter of fact, I made the bouquet and the veil that attached to my daughter’s Cabela’s ball cap…..  I know. A bit redneck, but it was how she wanted it. Just to show you how easy it can be to make a wedding bouquet I have included a picture of what I made for her. This was before I did the camouflage ribbon bow and dangle things off the handle.

Daughter's Bouquet

Daughter’s Bouquet

The whole thing cost me about $55 for the flowers, ribbons, green foam handle and cone shaped base that the handle slipped through. My daughter loved it and I was happy to have been able to make it for her.

Back to officiating the wedding……

Many might not know it, but it only takes a few minutes and about $25-$30 to become an ordained minister with an online church. As far as the state we live in is concerned there are only a few requirements for the ceremony.

  • Someone with a certain credential must officiate, such as judge or minister of any kind.
  • Both parties must verbally agree to the marriage with witnesses present.
  • A license must be purchased.

That is it. If you can get those particulars covered, you can officially marry people. I went through Universal Ministries when I got my ordination. At the time that I got mine there was a few question quiz thing, but that is now gone. You just sign up and order your wall certification. Since there is a physical location for the church, this will actually pass as a regular ordination in most states. Some states don’t care. Just make sure to check your local laws.

After the ceremony I did have to have some signature boxes filled in and will have to mail off the certification of ceremony completion. Seriously, it was so easy that I almost feel like there was something missing.

The hardest part was figuring out what to say. What I did was go over the different lessons and advice that had helped make my marriage as strong as it is today. My wife and I will be married for 20 years this year and we have seen many marriages fail for any number of reasons. Having had the chance to council the kids before they did the wedding and then highlight the important pieces during the wedding is what I feel is a very important piece to their potential success. Marriages are so hard now a days that getting them off on the right foot and with realistic expectations is very important. I am hopeful and confident that I did get that across to them.

For those of you who have ever considered conducting a wedding ceremony for someone, I really do recommend it. It was great to have been the one that stood up and married my daughter off to a great guy. I really was honored to have been able to do it, even though I was nervous as all get out!

I wish my daughter and son-in-law the very best and really do suggest you step up and do something like this for your loved ones. It really will make the day that much more special.

  • Share on Tumblr

Reloading in the Bush

by Woodsbum

For many years our family has used the old school Lee Loader to reload .410 shells. We really didn’t think too much about it until someone saw the little setup we had and was amazed. This little loader allows you to literally reload your .410 shells out in the field if you wished. You are not tied down to a reloading bench and all sorts of permanently mounted equipment. Other than the kit you only need a hand priming system and a small wooden mallet.

This is the loading kit I am referring to:

Lee Loader

Lee Loader

This got me to thinking whether other field type kits were available still or if I was stuck looking for older gear if I wanted something else. A quick search came up with the following results:

.308 Hand Loader
9mm Hand Loader
.38 SPL Hand Loader
.223 Hand Loader
30-06 Hand Loader

These were just a few of the calibers that were available. I didn’t feel like over linking this post, so just click one of the links above and do a search for your specific caliber.

There are also other items that are available to assist if you are setting up to reload in the field. Lee also makes a hand press that will allow you to use your normal dies. It just requires you to strong arm the lever rather than having it bolted to a table. Of course it is also single stage and not progressive, so you wouldn’t want to fill AR15 magazines with what you are loading by hand. It would work well for a SHTF situation or if you had to rebuild some loads with a different bullet weight while in the field for instance. Here is the kit.

Lee Hand Press Kit

Lee Hand Press Kit

Some other items that might be handy if you decide to set up for reloading in the field would be the powder measure kit and maybe some sort of scale to ensure you are getting the right loads.

Even though this might seem a bit extreme just think back to the end of the 1800’s and early 1900’s. Most sportsmen would have similar setups that they took with them to reload as needed in the bush. Factory loads were expensive and had some problems with reliability depending on where you lived. If they were able to reload their hunting loads and pull off the shots that they did, why not take a look at grabbing some equipment for yourself. You don’t have to get a $700 Dillon or Ponsness Warren setup to reload. People like Billy Dixon were able to pull off almost 1 mile shots with their loads. I don’t think that is too bad with an old 50-90 Sharpes, so think how well some simple gear and practice could do for you and your .270.

Here is a video that shows how to use the Lee Hand Loader.

  • Share on Tumblr

Ingenious Home Defense Rounds

by Woodsbum

Our family has been into firearms and reloading ammunition as long as I can remember. Somewhere in all those years I learned about some special pistol loads that our family loads up for self defense. It really didn’t dawn on me until discussing them with Gunguy that they were anything special or out of the ordinary. I essentially grew up with this specially loaded ammunition and has he says, “You take a lot of things for granted because of how you grew up.” Well, this post is for you Gunguy and I hope that it helps push you toward that crazy world of reloading.

Here are the interesting features of this round:

  • Great bullet expansion
  • Very little penetration – lowers the risk of bullets passing through the target
  • Low velocity so multiple shots are not as difficult
  • Inexpensive to load up and use compared to other “defense rounds”

Due to the huge influx of compact revolvers in .38, most of my family has adopted that round as their carry pistol. That is why I will discuss the speed and reloading specifications for this particular caliber. It is also important to note that these work best out of a revolver due to feeding issues in automatics.

With no further build up, here is my family’s adopted defense round:

.38 using inverted wadcutter

.38 using inverted wadcutter

As you can see, there appears to be a huge hole in the center of the bullet. This is how it would normally appear if loaded per factory intended:

Normal wadcutter load

Normal wadcutter load

To get this sort of hollow point looking effect, we load each .38 with 2.5 gr of Bullseye powder and just press the bullet in backwards. With this configuration we are achieving around 650 fps on the chronograph. The following picture shows a pumpkin shot with one of these rounds. I do not have any real desire to figure out any other numbers in regard to the ballistics so you are stuck with the “pumpkin desecration test.”

This is the entrance “wound.” Please note how the entire face of the pumpkin is cracked in various directions radiating outwards from the point of impact.

Initial damage to the pumpkin.

Initial damage to the pumpkin

This is where the bullet exited the pumpkin. Again, please note how the pumpkin is cracked.

Damage as bullet exited the pumpkin

Damage as bullet exited the pumpkin

For those of you wondering, all the other little holes are damage from a pellet gun and a couple .22 short. We decided to shoot it with the .38 after my son had already been plinking for a bit.

Considering this a low velocity round fired from a .38, this really packs a fairly large punch. Like I mentioned, however, the real benefits are associated with the minimum recoil and lack of penetration compared to other loads in that caliber.

For those of you who might not reload and don’t know what at “wadcutter” bullet is, here are a few more pictures. These first two show what the actual bullet looks like. The first one is how it would normally be pressed into the casing. The second one is the inverse side.

Wadcutter for .38

Wadcutter for .38

Back side of the wadcutter bullet.

Back side of the wadcutter bullet.

As you can see, it is not a jacketed bullet like most people are used to. It is a simple, cast bullet made of lead. The last picture I have is the bullet next to the loaded cartridge.

Wadcutter bullet and how it looks inversely loaded.

Wadcutter bullet and how it looks inversely loaded.

Now, I don’t expect the world to adopt this defense load or suddenly make this load one that is mass manufactured. What I hope that anyone reading this will do is start to think outside of the established norms. This goes for everything posted here at Age of Decadence. This is our main goal. Please look around, evaluate the older ways that worked effectively, and don’t be afraid to blaze your own trail. Let us know if you have any other tricks like this.

  • Share on Tumblr