Category Archives: Miscellaneous

And here is the “catch all” category for stuff that doesn’t have its own.

GRAYMAN Satu Folder

by Gunguy

I picked up the Grayman Satu folder a few months ago. I saw the pictures on the Grayman’s Knives website and I knew the knife was going to be big. It still did not prepare me for the size of it when I opened the box. It’s one hell of a big knife.  The first thing I did was inspect it closely. The knife did not have any machining marks or scratches and all the screws were tight. The action was initially stiff. I put a little white lithium grease in the action before  I began to open and close the knife a couple of hundred times in each hand over the next several days to loosen it up. I know that may seem a bit obsessive compulsive but it’s the way I get familiar with the action of a folding knife. This way I get very familiar with the knife and opening it becomes second nature in both hands.

I primarily wanted to use this knife as a hiking knife. I was looking for something very well built that I can put in my pocket or backpack. Since I live on the east coast I have to be more discreet than those of you who live elsewhere. The knife has a really strong clip that will hold on to your pants like a leech. It might be a little to tight in case of an emergency but I’m not carrying this knife as a self defense weapon. You can definitely use it as such but that’s not it’s main purpose. I would like to test this knife further but I can’t bring myself to start chopping at branches just for the hell of it. For now it’s residing in my home waiting for it’s first trip into the woods. Until then I will have to leave you with a bunch of pictures.

satu_left1

satu_right1

satu_left3

satu_right3

  • Share on Tumblr

Gun Safe Best Practices

by GunGuy

GET A SAFE

I know, it seems expensive, but it’s worth it! It helps make sure criminals don’t get your guns. This is good for you, good for society and good for gun rights. Also get a safe that’s at least twice as big as you’d expect you’d ever need. It will fill up quick.

So now you own a safe big enough to hold your long guns and you filled it with guns, papers and valuables…but…are you really using it right? Here is a summary of information I cobbled together from various sources on the internet (so it must be true!). This is not a discussion about what style/brand of safe to buy. I hope this provokes a bit of thought – additions and feedback welcome.

STATS

More than 99% of all robberies in homes with a locked gun sized safe (400lbs or larger) resulted in no loss of the contents inside the safe. The majority of the fraction left was people who stole the entire safe (mostly due to not being bolted down). Less than 0.05% were successfully broken into on location at the home or were removed when properly bolted.

Most common attack methods on safes are (in order of most to least common).

  1. Attempted theft of entire safe
  2. Pry bar attack on door
  3. Fire ax to side of safe
  4. Cutting side/back with diamond saw
  5. Cutting torch

Most common damage to safe (ordered most to least common)

  1. Hammered removal of dial or keypad
  2. Pry marks/bent metal around door edges
  3. Side/back damage


SAFE LOCATIONS BEST PRACTICES

  1. Out of sight from exterior windows and doors.
  2. Away from public or entertaining spaces such as kitchens and living rooms.
  3. If safe is visible from outside the house, face it so contents cannot be seen when it is open.
  4. Downstairs locations are ideal to lower heat from house fires. (heat goes up…unless its an inferno and the whole house comes down…)
  5. Rule of thumb – the bigger the hassle to get it to that spot – the harder it will be to steal. The more stairs they have to carry it up or doorways and corners they have to navigate, the less likely it will be stolen.
  6. The cheaper the safe, the smaller the space you should choose to locate it. This is to minimize attack options on the thinner metal on the sides and back.


BOLTING BEST PRACTICES

  1. Ideal – concrete floor (…duh)
  2. For ground floor locations over a crawl space – Drill ¼ pilot hole through pre-made holes in safe bottom. Glue a 2×6 boards to underside of the floor. Nail board ends to the support beams on each side so the pilot holes are centered. Using larger drill bit to drill all the way through flooring and 2×6. Fasten using 2 large washers and long round head bolts (aka timber bolts).
  3. For upstairs locations with standard home flooring – Open ceiling under safe location and do the same as #2 above.
  4. If bolting to floor is not an option, but the safe can be located in a small closet – Buy a piece of metal plate 3/8 to 1/2inch thick large enough to fit entire floor area of closet. Bolt the safe to the plate using round head bolts. Safe cannot be removed due to the oversize metal square bolted to bottom – at worst it can be tipped over onto its face through the doorway. (this method is difficult and requires 2-3 people to implement and floor must be strong enough to support this increased weight)

Note: Bolting can be successfully negated on elevated safes (i.e. with legs) by cutting the bolt between the safe and the floor with a hacksaw. Consider this when buying a safe.


ITEM STORAGE BEST PRACTICES

  1. Store breakables on bottom shelf if you safe is not bolted down. Most unbolted safes are knocked over at some point during the robbery attempt.
  2. Put most valuable objects on very bottom shelf. Most attempts to pry/cut/torch/chop into a safe are performed near the top of the safe between waist and chest high.
  3. If you have large amounts of ammo, store it at the top of safe. A top heavy safe is more unwieldy to steal than a bottom heavy safe.
  4. Use metal cash boxes inside safe to hold cash and important papers – they will provide an additional 10-30 minutes of fire protection, plus it requires taking much more time to cut/torch a much larger hole so they can be removed. (contents are a pita to get out while the box is inside the safe unless it’s a vertically spacious shelf). Store jewelry and watches separately the same way.
  5. Use a dehumidifier to prevent rust. There are many plug in models for less than $100 and less effective/less costly ones for cheaper.
  6. Do not put a gun into the safe that is a dramatically different temperature physically – condensation can form and cause rust.

SAFE COMBO BEST PRACTICES

A touch pad can be coated with different things to reveal which keys are frequently used. From there a savvy burglar can make a few educated guesses before being locked out for several minutes. You should clean your keypad regularly.

  1. Use 6 or more digits that are not a phone number and doesn’t form a word
  2. One repetitive number is ok. e.g 567784.
  3. Do not use multiple repetitive numbers. E.g 588774 – these have a slightly higher probability of being guessed if they know what keys are being used. (don’t ask me why – I ain’t a math guy)
  4. Do not end the code in 0 (zero) this is the most common last digit.
  5. Do not start your code with 1 since this is the most common starting digit
  6. Second most common starting digit is 0 due to the usage of birth dates (e.g. 031475) as codes…don’t do that.


Lastly, doing all of the above is not help whatsoever if you leave the bypass key where it can be found. The contents of your safe is only as secure as your bypass key.

Here is a video about choosing the right safe.

  • Share on Tumblr

Oilcloth Tarp – Fail (Take 1)

by Woodsbum

Ok, folks. I decided that I was going to make myself a nice oilcloth tarp. Not because I NEED one, but because I wanted one due to the supreme COOL factor of using one. I know that it would be heavy and completely impractical. Really, it doesn’t matter. Being able to show up and put up an oilcloth tarp would just make me incredibly happy.

Now on to the story…….

My first step was to read several forum posts and blogs about how to make oilcloth. Most of the tutorials involved either boiling some chemicals with wax or using some sort of linseed oil. Both methods talked about the destruction of the fibers in the cloth after a period of time. Then I found a method that looked like it works quite well, doesn’t destroy the fabric, and seemed to be very easy. I opted for this method.

With this tutorial printed and embedded into my brain, I went shopping.

I went to Harbor Freight and picked up one of these:

Cavas Dropcloth

Canvas Dropcloth

I also picked up several (5) jars of Sno-Seal:

Sno-Seal

Sno-Seal

The first real step was to smear Sno-Seal all over the fabric like this:

Smeared Sno-Seal

Smeared Sno-Seal

That was easy enough, so I used up about 2 (2 1/2) jars of the paste to just coat the heck out of the canvas. Being a tough and manly, man I didn’t care about wearing gloves……  (Use gloves, people) 

After scraping all the waxy substance off my hands, I then started to heat up the fabric and melt the Sno-Seal into the cloth.

Melting the Sno-Seal

Melting the Sno-Seal

It was at this point that I discovered a few things:

  1. Wash and dry the fabric first to close up the fibers.
  2. Sno-Seal melts and drips everywhere.
  3. You have to use A LOT of Sno-Seal for this method.
  4. It doesn’t work if you are not aware of 1-3.
  5. Wear gloves when smearing.

Needless to say, I don’t have an oilcloth tarp at this time. I will need to start my search for a better method in addition to taking the tarp to a laundry mat in the middle of the night to wash out the Sno-Seal, close up the fibers, and fix my mess. When my wife saw the failed attempt, she promptly told me that I was not going to be able to use our household washing facilities unless I wanted to get beat severely. I think this attempt at oilcloth making has beat me enough.

Thank you for reading through this and I will post up my next attempt. Hopefully it goes much better than this one, is less messy, and adds to the sheer awesomeness of my bushcrafting gear.

  • Share on Tumblr

Gear Check – Water Purification

by Woodsbum

Mainly due to having had to pull out my water purification systems over the weekend, I decided to do a quick post on the different products that are out there that I like. Of course, like almost all subjects, there is a lot of opinion based around my preferences. This is posted and put out so that those that went to the gear check can have a reference for what we discussed.

My most used piece of water purification gear is my Katadyn Mini Ceramic Filter. I use this thing on almost every outing. Although it is slow to fill a canteen and even slower to fill a large bladder, it really is a great piece of gear. Every couple times I use it I clean off the ceramic filter. It doesn’t really go bad. It lasts longer than my gear breaking mind can comprehend. It truly is worth every penny.

Katadyn Mini Ceramic Filter

MSR also makes a filter called the SweetWater Microfilter. I have also used this filter and it does work well. It actually pumps out water faster than the Mini I mentioned above. The problem I see is that you have to replace the filter cartridges regularly. The O-ring seals also failed for me on the 3rd or 4th use. I found that you really have to keep the seals from getting dry or they crack and leak very easily. I keep my Katadyn in my truck 99% of the time and have had the same exact configuration of the filter for years without issue. Not trying to knock MSR’s product, but you need to compare them with others in the market to assure that you are getting the right filter for your needs before you purchase.

MSR Sweetwater Filter


I have also used several different types of straws. LifeStraw makes one that I have packed away for emergency purposes. It doesn’t last as long as the Katadyn, but it is really effective in purifying water. If you don’t mind replacing your filter and just want to drink out of a cup of muddy/murky water with an oversized straw, then this might be your choice.

Some people also like to use iodine tablets or bleach drops. Both can be effective and viable choices. Having been in the military and had to use both of those methods quite extensively I would suggest you not do this and save up for a good filter. The iodine tablets seems to give people a stomach ache over prolonged use (me for instance) and the bleach just seems wrong. Sometimes you can find the military surplus tablets at a cheap price as well. Here are the guidelines for using those:

In 1 quart of water, use:

  • One tablet for clear water

  • Two tablets for unclear water

  • 3 or 4 in Thailand, Okinawa, or Central America

You should also keep the cap loosely screwed on (not tightly) and shake it so that the threads get wet. You should then let it sit for 15 – 20 minutes, then take the cap off and let it sit for another 10 minutes or so.

My take on the tablets and drops is as such: Using chemicals to make water drinkable just seems to be like using perfume to avoid taking a shower. Ewww……

Another tried and true method is boiling your water. All you need to do is filter the water going into your pot with something like a scarf or shirt, put the pot over your fire or stove, and bring it to a full boil. You don’t need to boil it for 10 minutes or any such nonsense. Just a full boil is sufficient. You can then drink the water afterwards. I do use the method for cooking about 50% of the time, but for drinking it is not my favorite method. Simply put, I don’t want to drink very hot water on a very hot day. I want something nice and cool.

Not matter what method of purification you choose, make sure that it will work for you and fits within your needs. Spending money just to spend money is never advisable, unless you are buying guns or custom knives…..  Don’t tell my wife I said that last part.

  • Share on Tumblr

Gear Check – Packs

By Woodsbum

To continue our series about gear discussed during our “Gear Check” Meetup, I am going to write a bit about packs. Packs are one of those things that can be hard to nail down and find a good one that fits, has just the right amount of space, and doesn’t break your bank.

Many people are very into the military surplus packs like the ALICE or ILBE. These can be great bushcraft packs and are made to withstand some heavy duty use. They are designed to make it through combat, so they should be able to handle the occasional dirt stain or rain shower. They do have their drawbacks, however.

Medium ALICE Pack and Frame

Medium ALICE Pack and Frame

While I was in the military, I spent about 3 years living out of an ALICE pack. The pack is great, but definitely has its flaws. Let’s discuss the good first. They are one of the toughest pieces of gear I have had the pleasure of using. If the frame gets messed up, it can easily be bent back into shape and lashed back together with 550 cord or an improvised rivet or two can be used until a better fix can be engineered. They seem to have just enough room for a couple day’s worth of gear. Long weekend trips, day hikes, or even packing out meat quarters while hunting fit right within this pack’s limits. For weeks on end or long trips, however, this pack is a bit lacking. There just isn’t enough room. There are large ALICE packs that offer more room, but the frame constraints are the same. Shoulder and waist straps on this are not made for larger people. They are designed for average sized individuals. The shoulder pads are too short without some redesign and modification as are the hip belt and pad. I am not talking about being overweight, either. These straps just don’t fit larger people.

If you are not interested in a frame, the better military surplus pack is the ILBE.
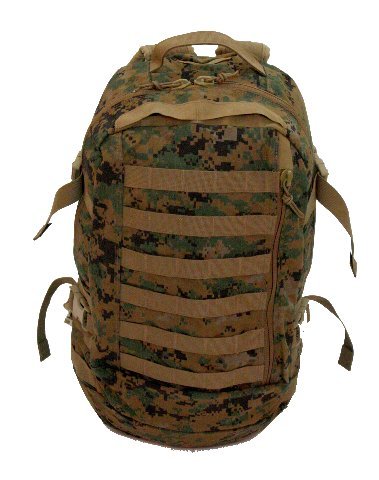
ILBE

ILBE

These packs have pockets everywhere, carry about as much as the ALICE (granted that you are not strapping on sleeping bags and Isomats) and even have some straps that make carrying an axe very easy. If you are thinking “prepper” style or fashion, this is military surplus and therefore screams, “Motivated and military” so it might not be the right style or fashion for you. The nicest thing about it is the fact that the straps and fit are comfortable for small to large sized people without any major modifications.

These are also a great pack, but are fairly difficult to come up with most of the time. This is the Swedish M39 rucksack.

Swedish M39

Swedish M39

The problem comes down to trying to find one it good condition. They are old and have not usually been treated too well during their life. The nice things about this pack are the axe loop on the side, the large flap that keeps rain and such out and allows you to carry a coat or something under it, and the fact that it is nicely framed with a lightweight design. You will have to do some metalwork on the frame to widen the hip area. It was designed for people with a 26-30 inch waist (guessing while cursing the fit). But once you widen out the bottom portion of the frame, they fit really well and are quite comfortable. Unless you are the size of Skeletor don’t expect to be able to use the leather waist belt. Just figure on either making a longer one or not using a waist belt at all.

There is a post to what I built out of an old French pack. Projects like this are quite viable and allow you to make what you want. I highly recommend doing something like this if you are handy.

Last but not least is to mention all the Swiss, German, Polish, Swedish, French, etc., canvas rucksacks that are available on the market. Most are WWII surplus and are great options if you care to explore them. The ones I mentioned above are the most common “bushcrafter packs” that people get and modify to their needs. If you can grab one that suits your needs, grab it and get out to use it!

Other options are much more expensive, however. You can pick up something from Frost River or Duluth Trading Post. Their packs are INCREDIBLE, but the price point is also INCREDIBLE. That being the case, don’t look while eating. You will choke, so be warned. Of these two, I prefer the Isle Royale by Frost River. The shape, size, construction, etc., seem to be more suited to my particular needs. Although I have not purchased one yet, this is on my short list after I finish up my custom knife purchases.

There are also many options that are not “traditional” canvas type rucksacks. So many that it really doesn’t warrant listing them. The main thing to think about while picking your pack is this: get something that will withstand the rigors of bushcrafting, fits you nicely, and holds all your kit. If any of these criteria are not met, you really should just pass on the pack and move to the next one. The most common criteria that they don’t meet is “withstanding the rigors of bushcrafting.” Bushcrafting requires more durable equipment due to the many tools (axes, Scotish augers, knives, saws, etc.) that you carry with you. Most backpackers don’t take as many sharp objects with them like a bushcrafter will.

Well, it is time to do some searching and testing of some different packs to find what you like. Don’t be intimidated no matter how scared you get. Just get what you like and what fits you. Most other things can be modified with some ingenuity and a sewing kit.

Have some fun and get dirty!!!!

  • Share on Tumblr