by Woodsbum
In recent months, I picked up a second job as a bouncer so that I could get some extra toys. One of the top items on my list was a Dillon Precision progressive reloader. Both my brother and my father have one that they use constantly. This last winter, I even took some time of work so I could get in on the action. I spent a couple days using my brother’s system and ended up walking out with about 200 .44 mag, 800 9 mm, 600 .45 ACP, 400 .223, 100 30-06, and about 40 .300 Wby. This was all over 2 days and lots of beer drinking. This made me realize something. This system is really worth the money and any serious shooter should look into them.
This is what the whole system looks like all put together.

Dillon Precision RL 550B
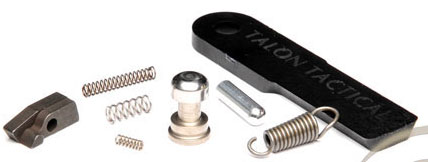
The one pictured above has all their bells and whistles on it, but let me go over a few things that are REALLY needed to help you with regard to speed and ease of reloading. I took the liberty of circling the accessories that you need to get and will list, explain, and prioritize the importance of these accessories afterward.
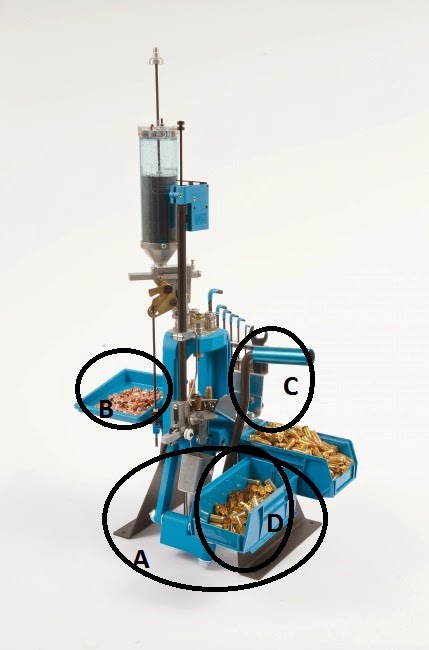
Needed Items Dillon RL 550B
Here is the list:
Strong Mount: The Strong Mount raises your Dillon reloader high enough to allow all the parts to fit above the level of table it is bolted to. It also increases the size of the base of your reloader so that it doesn’t put massive amounts of stress on the base bolts and strip them out of the table. It also, and almost most importantly, allows for the press to articulate freely during the whole cycle. In another words, you don’t hit anything on the table or your chair while you pull the level. This simple mount really should be standard with the reloader for it is difficult to operate without it, comparatively.
Bullet Tray: The Bullet Tray holds your bullets for easier access during the reloading cycle. They sit in the tray right next to the station that presses the bullet and crimps the case. It is also angled just enough so that the bullets roll down and forward so you don’t end up chasing them around the tray. For those of you who have used single stage reloading systems it is best described as the solution to the eventual paper cut from the box due to digging around looking for another bullet to press.
Roller Handle: The Roller Handle allows for more uniform and comfortable pulls of the lever during the reloading cycle. Most single stage reloading people only pull the lever a max of 100 times an hour. Because of the speed through the use of the Dillon, you can pull the lever as many as 500 times per hour if you are really cooking through the cases. This means that comfort can become a fairly important item. The knob on the end of the lever that comes with the system by default just gets to be uncomfortable and clunky after about 250-300 rounds in about 40 minutes of work. That was all I could take on my dad’s system when I used it before I loaded all my components up and went to my brother’s. I actually started getting hot spots on my palm from the knob in that little time of using it. There are probably people that can suck it up or just don’t get bothered by the small little orb digging into your palm…… For me the Roller Handle is a must.
Empty Cartridge Bin/Bracket Assembly: The Empty Cartridge Bin/Bracket Assembly provides quick and easy access to your empty cases. It sits next to and a bit down from the handle so as to not interfere with its operation, but is conveniently located next to the first stage of the reloader. My dad only has the Strong Mount and no other accessories for his Dillon. He has to grab cases from one of those holders that are very common for single stage systems. After having used both setups, this accessory will speed up your reloading by at least 10-15%. It has to do with the cases being a few inches closer to where you put them into the case holder. Less movements and less head movement to look for the next case really does increase your speed over time.
Some accessories that are offered that you really don’t need, but are quite nice.
- Low Powder Sensor – it sounds an alarm when your powder gets low in the measure.
- Additional Primer Tubes – You can load up several of these tubes so you don’t have to quit reloading to refill in the middle of a run.
- Quick Change Assembly – These Quick Change kits provide you with all the parts needed to just set your dies and powder measure for each caliber that you reload, then swap the whole system out when you go to a different caliber. No more resetting your dies, adjusting your powder, etc. It is only a couple pins and it is ready for the next run.
- Casefeeder – I have not seen one of these working yet, but I REALLY would love to get one up and working on my system. It would really speed things up that much more.
At this point I am having a hard time deciding if I am going to buy all these additional accessories before I get my shotgun shell reloader. Depending on how I decide to proceed, I might get the casefeeder in the near future. If I do, I will update everyone as to how well it works.
Being someone who loves to buy things, but has a weird mental block when it comes to time saving purchases I have realized that progressive reloaders like the Dillon RL 550B is far more. It doesn’t just allow you to reload quicker, but allows you to actually save money enough to justify using what you just reloaded. There is no need to put off multitudes of other projects just to get enough rounds ready for hunting. I can crank out hundreds of rounds per hour.
The last part of the whole equation is about saving money. Many times I would reload a few rounds, but supplement my weekend outings with a few hundred factory loads. This actually ended up being more costly in the long run. Components are so much cheaper than loaded rounds if you buy things in bulk. Purchasing only enough materials to do a few hundred rounds really never cut overall costs that much. Now that I can really crank out the rounds, it will get much cheaper in actual monetary costs. Couple that with time savings and I think we really have a winner here. Let’s face it, getting the opportunity to spend one hour drinking beer, smoking my pipe, and reloading enough rounds to take the wife out shooting makes this an affordable past time again.